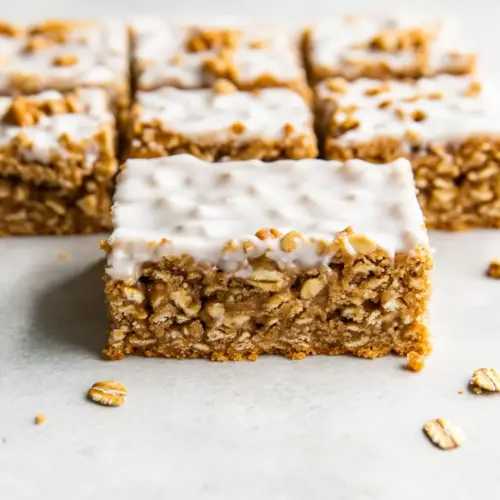
Oatmeal Cookie Bars
Oatmeal Cookie Bars are a chewy, buttery treat with warm notes of molasses and cinnamon, finished with a silky confectioners sugar glaze. These easy to make bars deliver a comforting texture from old fashioned oats and a tender crumb from Caputo "00" flour, perfect for casual gatherings or a cozy snack. Make a pan and enjoy several days of simple sweetness.
Equipment
- Stand mixer
- Paddle attachment
- 9-inch square baking pan
- Parchment Paper
- Wire Rack
- Small Bowl
Ingredients
- 1 cup (227 grams) unsalted butter, room temperature Creamed to provide a rich, tender base and incorporate air for a soft, buttery texture in the bars; room temperature butter blends smoothly with sugars to create structure and mouthfeel.
- 1 cup (220 grams) firmly packed light brown sugar Packed to add deep, caramel-like sweetness and moisture while contributing chewiness and a slight molasses complexity to the cookie bars; helps with color and chew.
- 1/2 cup (100 grams) granulated sugar Granulated to provide clean sweetness and help create a slightly crisp edge by dissolving into the butter-sugar mixture; balances the brown sugar’s molasses flavor.
- 2 tablespoons (42 grams) unsulphured molasses Added sparingly to contribute warm, complex sweetness and enhance overall depth of flavor; molasses also helps with color and a subtle chewiness in the baked bars.
- 2 large eggs (100 grams), room temperature Beaten to bind ingredients, add moisture, and provide lift through steam and coagulating proteins; room temperature eggs emulsify fats for a uniform batter.
- 1 1/2 teaspoons (6 grams) vanilla extract Stirred in to impart aromatic sweetness and round out flavors; vanilla extract enhances and melds the brown sugar and molasses notes in the bars.
- 2 cups (254 grams) Caputo “00” Chef’s Flour Measured carefully to build the cookie structure, supplying gluten and body; Caputo “00” Chef’s Flour yields a fine crumb and slightly tender chew when combined with oats.
- 2 cups (160 grams) old-fashioned oats Folded in to contribute hearty texture, nutty flavor, and chew while absorbing some moisture for stability; old-fashioned oats keep the bars substantial and rustic.
- 1 1/2 teaspoons (4.5 grams) kosher salt Sprinkled to balance sweetness and enhance overall flavor perception; kosher salt also strengthens gluten and moderates the sweetness for a well-rounded bar.
- 1/2 teaspoon (2.5 grams) baking soda Activated to provide leavening and light lift by releasing carbon dioxide when combined with moisture and acid, helping the bars rise slightly and develop texture.
- 1/4 teaspoon (1.25 grams) baking powder Added to offer a mild additional leavening boost and help control spread; baking powder works with baking soda to fine-tune the rise and crumb.
- 1/4 teaspoon ground cinnamon Blended to infuse a warm, aromatic note that complements brown sugar and molasses; cinnamon adds depth and a cozy spice profile to the bars.
- 1 1/4 cups (150 grams) confectioners’ sugar Sifted into the glaze to create a smooth, sweet coating that sets to a delicate crust; confectioners’ sugar provides sweetness and structure for the icing.
- 2 tablespoons (30 grams) water Whisked to adjust the glaze consistency so it spreads easily and creates a glossy finish; water thins the confectioners’ sugar to the desired pouring texture.
- 1/4 teaspoon kosher salt Sprinkled into the glaze to subtly offset sweetness and enhance flavor balance; a pinch of kosher salt brightens the icing and ties flavors together.
- 1/4 teaspoon (1 gram) vanilla extract Stirred into the glaze to impart a gentle vanilla aroma and round the sugary finish; a small amount of vanilla elevates the glaze’s overall flavor complexity.
Instructions
- Preheat oven to 325°F (170°C). Spray a 9-inch square baking pan with baking spray with flour. Line pan with parchment paper, letting excess extend over sides of pan.: Close your eyes and notice the small, comforting warmth that begins to fill the kitchen when the oven powers up, a quiet promise of transformation. The specified temperature ensures a gentle, steady bake so the bars cook through without burning at the edges, producing a tender center and golden perimeter. You will likely smell faint hints of butter and sugar as the oven warms, which is a good sign the environment is ready. One important reason for this moderate temperature is to allow the internal oats and batter to set slowly, preventing the exterior from tightening too fast and leaving an underbaked middle. A common mistake is cranking the oven higher to save time, which causes the edges to brown too quickly; avoid that by trusting the temperature. Also, confirm your oven thermometer periodically since many ovens run hot or cold, and an inaccurate oven can sabotage texture. Before placing the pan inside, ensure your rack is centered so air circulates evenly, and set a timer mentally or on your device so you do not over rely on visual cues alone.
- For bars: In the bowl of a stand mixer fitted with the paddle attachment, beat butter, brown sugar, granulated sugar, and molasses at medium speed until light and fluffy, 2 to 3 minutes, stopping to scrape bottom and sides of bowl. Add eggs, one at a time, beating until combined after each addition and stopping to scrape sides of bowl. Beat in vanilla.: The action of spraying the pan with a baking spray that contains flour creates a thin protective coating, making it far easier to release the bars without damage once baked. You may notice the subtle sheen on the pan surface as the spray catches the light, and that indicates coverage. This small step reduces the risk of the bars sticking, which would mar the edges and tear the crumb when you try to lift them out. If you do not have a flour containing spray, you can lightly grease the pan and dust with flour, but be consistent so one corner does not cling. A common oversight is skipping this step and relying on parchment alone, which can still stick at the corners if the pan is not prepped properly, so take the extra minute to ensure a clean release.
- In a large bowl, whisk together flour, oats, salt, baking soda, baking powder, and cinnamon. With mixer on low speed, gradually add flour mixture to butter mixture, beating until just combined. Spread into prepared pan.: Lining the pan with parchment and leaving an overhang gives you convenient handles for lifting the cooled bars out, and the parchment also creates a barrier that helps prevent any sticking. When you press the parchment into the corners, take note of how it smooths against the pan walls; this helps the batter sit evenly and not pool. The overhanging edges are invaluable when you later want to transfer the bars to a wire rack to cool, allowing you to lift the whole slab without breaking it. A trap many bakers fall into is cutting the parchment too small, which forces them to pry the bars out and often breaks them; leave generous overhang for peace of mind.
- Bake until edges are golden brown and a wooden pick inserted in center comes out clean, 50 to 55 minutes. Let cool in pan for 10 minutes. Using excess parchment as handles, remove from pan, and let cool completely on a wire rack.: As you begin creaming, pay attention to the texture shift from glossy and dense to lighter and airier, which usually takes about the stated time. The mixture should lighten in color and slightly increase in volume as the tiny air bubbles trap heat and expand during baking, contributing to a delicate crumb. Use medium speed to avoid overheating the butter , which can separate if whipped too aggressively, and stop occasionally to scrape the bowl so no pockets of unincorporated sugar remain. You'll notice a soft, sweet aroma developing, and the molasses will add a darker, complex scent that deepens the batter. If you under cream, the result is a denser bar; over cream and you risk too much aeration that causes uneven rise and possible collapse, so aim for the described window.
- For icing: In a small bowl, whisk together confectioners’ sugar, 2 tablespoons (30 grams) water, salt, and vanilla until smooth. Pour and spread on cooled bar. Cut into pieces. Store in an airtight container for up to 3 days.: Adding the eggs slowly ensures a smooth emulsion, avoiding any curdling that might happen if too much liquid hits the fats at once. Each addition should disappear into the mixture with a glossy sheen, and the batter will become more cohesive as you proceed. Scraping the sides prevents streaks of unincorporated egg that would create inconsistency in texture. A telltale sign of proper incorporation is when the batter holds together without visible flecks of egg . If the mixture looks separated or greasy, stop and scrape thoroughly; continuing without correction can yield a greasy crumb.
- Beat in vanilla: Once the eggs are integrated, the vanilla blends in seamlessly, releasing a warm, aromatic lift that brightens the whole batter. This tiny addition plays a major role in rounding flavors, making the sweetness taste more complete. Give it a few beats at medium speed so the aroma disperses evenly. Because vanilla is potent, measure carefully; too much will add an artificial note. If you forget to add it now, mixing it later can still help but adding early ensures the flavor is present throughout.
- In a large bowl whisk together flour oats salt baking soda baking powder and cinnamon: Whisking these dry components together distributes the leaveners and spices uniformly, which is essential for even rise and balanced flavor in every bite. You will see the fine powder of the flour and the coarser texture of the oats come together, and the light dusting of cinnamon will disappear into the mix. This step avoids pockets of baking soda or powder that can produce odd metallic spots or bitter pockets in the finished bars. A common slip is to skip whisking and add the dry ingredients in clumps, resulting in uneven texture and flavor.
- With mixer on low speed gradually add flour mixture to butter mixture beating until just combined: Adding the dry mix slowly on low speed prevents over development of gluten, which keeps the bars tender rather than tough. You'll notice the batter becoming thicker and more matte as the flour and oats join the fats and sugars, and the motion should be gentle to maintain that tender crumb. Stop mixing as soon as you no longer see streaks of dry ingredients to avoid a gummy texture. One common mistake is rushing at higher speed, which creates a denser result, so take your time for the best mouthfeel.
- Spread into prepared pan: Press the batter evenly into your lined pan so the bars bake uniformly, taking care to reach each corner and smoothing the top with an offset spatula or back of a spoon. The even surface promotes a consistent rise and uniform browning, and when you look at the pan you should see a smooth, compact layer ready to bake. If the batter is heaped in places, the edges may overbrown before the center sets. Resist the urge to press too hard which can compress the oats and produce a compacted, heavy texture.
- Bake until edges are golden brown and a wooden pick inserted in center comes out clean 50 to 55 minutes: As the bars bake you will see the edges take on a rich golden brown while the center firms slightly and aromatic notes deepen as sugars caramelize. The wooden pick test is crucial because visual cues alone can be misleading; insert it into the center and look for minimal crumbs rather than raw batter. The sound in the oven is subtle but you might notice a faint settling as the center sets. Avoid opening the oven frequently as this changes temperature and can affect the final set. If the pick shows wet batter when you first check near the lower end of the time window, continue baking in short increments until it comes out clean.
- Let cool in pan for 10 minutes: Allowing the pan to rest gives the bars a chance to firm up slightly so they hold together when removed, and you will notice the surface deflate a touch and become less glossy as steam dissipates. This brief resting period reduces the chance of the slab breaking when lifted and helps the internal crumb stabilize. A common error is immediately trying to remove the bars while they are piping hot, which causes them to fall apart, so wait the recommended time.
- Using excess parchment as handles remove from pan and let cool completely on a wire rack: Lift the bars by the parchment overhang and transfer the slab to a wire rack to cool completely, allowing air to circulate and prevent steam from making the bottom soggy. The surface will lose its residual heat and the crumb will set, giving clean edges when you slice. Slicing warm bars often results in smearing and crushing, so patience pays off. If you skip the rack and cool on the pan, condensation can create a damp underside, which affects texture.
- For icing In a small bowl whisk together confectioners sugar 2 tablespoons 30 grams water salt and vanilla until smooth: Whisk the glaze until it reaches a silk like consistency, watching how the powder dissolves into a glossy ribbon as you stir, and adjust with tiny drops of water if it seems too thick. A well made icing should flow slowly off the whisk in ribbons and spread easily over the cooled bars, adding a sweet, smooth contrast to the textured oat surface. If the glaze is too thin, add a touch more confectioners sugar ; if too thick, add more water sparingly. A common mistake is glazing while the bars are still warm which causes the icing to melt and run off, so ensure thorough cooling first.
- Pour and spread on cooled bar: Use a small offset spatula or the back of a spoon to distribute the glaze evenly, watching it puddle and then slowly thin out into a uniform layer that sets with a soft sheen. The contrast between the matte, textured bar and the glossy glaze is pleasing and indicates the right moment to cut. If you prefer a thicker topping, allow the first layer to set and repeat, but remember thicker glaze changes the balance of sweetness. Smooth strokes produce a neat finish, while a rustic swipe gives a homey look depending on your preference.
- Cut into pieces: Once the glaze has set, use a sharp knife to cut into squares, wiping the blade between cuts for clean edges. Clean slices reveal the interior cross section where the oats and tender crumb meet, and you can appreciate the contrast of textures. Chill briefly if you want extra clean lines, as slight refrigeration firms the glaze and crumb for slicing. A dull knife or sawing motion will tear the bars, so use a steady, decisive cut.
- Store in an airtight container for up to 3 days: Keep the bars at room temperature in an airtight container to preserve the tender crumb and prevent the glaze from cracking, and you will notice they remain moist and flavorful over a few days. If you need to extend storage, refrigerate briefly but allow bars to return to room temperature before serving for best texture. A typical mistake is stacking without parchment between layers which can cause sticking, so separate layers if packing tightly.
Notes
- Toast the oats — Lightly toasting the oats in a dry skillet until they give off a nutty aroma enhances their flavor; watch them closely as they brown quickly, and allow to cool before adding to the batter.
- Adjust sweetness — If you prefer a less sweet bar, slightly reduce the granulated sugar by a tablespoon to let the oats and molasses shine through without losing structure.
- Chill before cutting — For cleaner slices, chill the cooled, glazed slab briefly so the icing firms and the crumb sets, preventing smearing when you cut squares.
- Use parchment overhang — Always leave excess parchment when lining the pan, it acts as a handle for safe removal and keeps edges intact when lifting the slab out.
- Freshen the glaze — If your confectioners’ sugar seems clumpy, sift before whisking with water to ensure a silky, lump free icing that spreads smoothly over the bars.