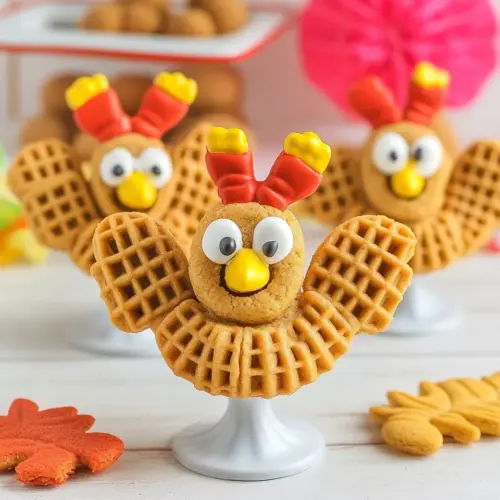
Nutter Butter Turkey Cookies
Nutter Butter Turkey Cookies are a playful, crispy and easy seasonal treat that bring peanut butter cookie texture together with bright candy accents. Perfect for Thanksgiving or fall parties, these cookies combine visual charm with simple assembly for an easy weeknight or weekend project. Make them to delight kids and guests, and you will have a conversation starting centerpiece that is quick to prepare.
Equipment
- Orange Round Sprinkles
Ingredients
- 12 Nutter Butter cookies Provide a crunchy cookie base and classic peanut butter flavor that resembles a turkey body; these cookies hold coatings and decorations well without crumbling. Serve as the main structural element so each assembled treat maintains shape while being handheld. Pair with melted candies for adhesion and colorful details to complete the turkey motif.
- 108 candy corns Add small tapered orange candies to form the turkey feathers and provide a sweet, seasonal color contrast; use multiple pieces per cookie to achieve a full plume. Scatter them evenly across the cookie’s rear to create a visually appealing fan that sticks to melts. Their firm texture helps maintain feather shape during serving and transport.
- 1/2 cup red candy melts Melt into a smooth glaze to coat cookie surfaces and act as an adhesive for candies and sprinkles; use the red melts for bold color accents like a wattle or to secure candy corn. Temper slightly if needed to avoid running off the cookie and to create a glossy finish. Choose a consistent thickness so decorations attach securely and the cookie remains attractive.
- 12 yellow candy melts Melt into a softer coating or use individual discs as small colorful accents; yellow melts deliver bright highlights for feathers or body detailing. Apply sparingly to avoid overpowering the cookie’s base flavor while ensuring good adhesion for small candies. Use melted yellow to glue decorations and add sunny contrast among the orange and red elements.
- 24 orange round sprinkle shapes Provide small round orange accents to mimic feather tips or textured details and add crunchy contrast; place two per cookie for symmetry or multiple to emphasize the tail. Sprinkle shapes offer quick visual interest and bite-sized bright color that complements melts and candy corns. Their flat profile helps them adhere well when pressed into melted coatings.
- 24 candy eyeballs Create expressive eyes to bring each turkey cookie to life and offer a playful focal point; press gently into softened melts so they remain fixed once set. Candy eyeballs are lightweight and readable at a small scale, instantly transforming decorated cookies into characters. Position them above the wattle or center of the cookie for best facial proportion.
Instructions
- In a small microwave safe mixing bowl, melt the red candy melts in the microwave. Melt in 30 second intervals at 50% power. Stir between each interval. This will take 4-5 minutes.: The warm aroma of melting sugar is immediate, and the candy will gloss over as it softens, signaling it is nearly ready. I like to use a shallow bowl so the heat distributes evenly, which helps avoid hot spots. Stirring after each interval brings the temperature down and encourages a smooth texture, preventing graininess. A common mistake is overheating, which can cause the candy to seize, so use low power and short bursts. If the mixture looks lumpy, let it rest for a few seconds, then stir until silky.
- Transfer the melted candy melts in a piping bag. Pipe melted candy melts onto the outside edge of one side of the cookies. Use the piped candy melts to attach 9 candy corns to the outside edge of one side of the cookie. You want the narrow end of the candy corn to be facing inward. Allow to set for 3 minutes.: You will hear small bubbling and see steam rise when the edges begin to liquefy, that is your cue to pause and stir. By using 30 second intervals, the melt warms gradually, allowing for a glossy finish and better control. The sound is subtle, a gentle hiss, and the visual is a transformation from chunky bits to a fluid shine. Avoid leaving it unattended inside the microwave, as overheating can quickly alter texture. If it seems too thick after melting, add a single drop of vegetable oil and stir to loosen.
- Flip the cookie over and using the melted candy, attach two eyes. Use the red melted candy to create a little 'wattle' leading from the eyes and immediately press 2 orange round sprinkles to create a little beak. Allow the face to set for 3 minutes.: Each stirring motion incorporates cooler outer pieces into the center, smoothing out consistency and preventing scorching. The rhythmic scrape against the bowl gives you a sense of progress, and the color becomes uniformly bright as you work. If you notice undissolved pockets, continue short bursts and stir thoroughly, but resist the urge to crank the power. Over stirring when the mixture is hot can introduce air bubbles, which may create tiny pockmarks when the candy sets.
- Place a dollop of the red melted candy at the base of the cookie and press one of the yellow candy melts into it to create a base. This will allow the cookie to stand upright.: The timing creates a predictable window to organize your station and sort candy pieces, which reduces haste during assembly. Use this interval to line up candy corns in small groups and position a piping bag within reach. If your kitchen is cool, melts may set a bit faster on the surface, so plan to work briskly. One trap is underestimating set time, which leads to attaching decorations to candy that is already cooling and less sticky, so keep an eye on consistency.
- Allow to set for 5 minutes and serve immediately or store in an airtight container for 3-4 days.: The transition from bowl to bag is satisfying, and you will hear a soft swish as the glossy candy moves. A smaller tip gives you finer control for precise dabs, while a wider opening speeds up application for feather placement. Hold the bag at a slight angle to encourage a steady flow, and test a small dot on parchment to check pressure. A common error is filling the bag too full, making it hard to maneuver, so fill about half to two thirds for comfort.
- Pipe melted candy melts onto the outside edge of one side of the cookies.: The tactile sensation is smooth and slightly warm as the candy touches the cookie. Apply a thin line around the edge where you plan to attach the feathers, pressing gently so the adhesive contacts both the cookie and candy corn. Visually, you want a continuous glossy border that will hold pieces without oozing. If you pipe too heavily, the melt can drip over the edge, so use controlled pressure. Clean any excess immediately with a small spatula to keep presentation tidy.
- Use the piped candy melts to attach 9 candy corns to the outside edge of one side of the cookie.: Arrange the candy corns with the narrow ends facing inward, creating a fan that reads like feathers. You will feel a mild resistance when pressing the candy corn into the melt, followed by a satisfying click as it seats. The visual effect is vibrant and layered, with alternating textures. One oversight is uneven spacing, which makes the fan look crowded; take a breath between placements to check symmetry. If a piece slips, gently remove it while the melt is still soft and reposition quickly.
- You want the narrow end of the candy corn to be facing inward.: This orientation creates a full feathered look, and the wider ends at the exterior read as a colorful bloom. From a distance, the pattern registers as a fan, which is key to the turkey illusion. The tactile alignment feels methodical, and small adjustments make a big difference visually. Avoid placing them too flat, which reduces the sense of depth; a slight angling adds dimension.
- Allow to set for 3 minutes.: During this brief wait, the candy cools and firms, and you can admire the emerging shape while preparing the next station. The surface will lose its glossy sheen and gain a matte stability, a clear cue it is ready for the next touches. If you rush, pieces may slide, so resist temptation to move them. In a warm kitchen, set time may take a bit longer, so be patient and check the firmness with a gentle fingertip press.
- Flip the cookie over and using the melted candy, attach two eyes.: The underside becomes the face, and pressing the candy eyeballs into fresh melt gives an immediate personality. You will feel a gentle tack as the eye adheres, and visually the contrast of white eyeballs against the cookie base reads animated. Place them symmetrically for a friendly look. A common mistake is misaligned eyes, which can make the expression look lopsided; adjust quickly while the melt is still soft to center them.
- Use the red melted candy to create a little wattle leading from the eyes and immediately press 2 orange round sprinkles to create a little beak.: The thin ribbon of red candy melts forms a bright accent below the eyes, and pressing the orange round sprinkle shapes into it yields a tidy beak. The motion produces a tiny click and a glossy dab where the sprinkle meets the candy. This detail adds charm and helps viewers read the face from across a table. Avoid pressing too hard, which can flatten the shape; a light but decisive touch secures the components.
- Allow the face to set for 3 minutes.: Waiting lets the adhesive firm so the eyes and beak stay put during subsequent handling. The surface will shift from glossy to matte, indicating it is stable. Use this pause to arrange cookies on a serving tray, maintaining a soft, steady rhythm. If you skip this pause, transfers can lead to skewed features or lost embellishments.
- Place a dollop of the red melted candy at the base of the cookie and press one of the yellow candy melts into it to create a base.: The sensation of anchoring the cookie is satisfying, and the melted candy adheres strongly to the underside, forming a pedestal when the yellow candy melts set. This little foundation gives the cookie an upright presence on a platter. Press gently until you feel it seat, then let it sit. A mistake here is using too little adhesive, which causes wobble; ensure you use a modestly sized dollop for stability.
- This will allow the cookie to stand upright.: When the base firms, the cookie stands like a tiny sculpture, offering a playful display. The visual is delightful, with feathers and face perfectly visible from all angles. If the surface used for display is uneven, the cookie may lean, so set them on a flat tray. If one leans, re-seat it after the base has fully set.
- Allow to set for 5 minutes and serve immediately or store in an airtight container for 3 to 4 days.: The final rest period ensures everything is firm and travel friendly, and the scent of peanut butter and sweet candy will mingle as they cool. Stored in an airtight container, they retain shape and remain fresh for several days, though textures are best early on. Avoid stacking while still warm, which can cause sticking; use layers of parchment if packing multiple layers.
Notes
- Swap the base color by using a different candy melt color for the pedestal to match party themes, making the cookies fit seasonal palettes without changing structure.
- Create smaller versions by trimming candy corns for a petite feather look, which is great for bite sized platters and younger children.
- Use a disposable piping bag for quick cleanup, cut a small tip for precise dots, and switch bags between colors to avoid muddying hues.
- Pre sort candies into small bowls so assembly becomes an assembly line, making the process faster and more enjoyable for groups.
- Double the decorative elements by adding tiny sprinkles around the base for texture contrast, which enhances the visual appeal without altering flavor.
- Plate creatively on a bed of crinkled paper or faux leaves to give a seasonal backdrop that complements the cookies and makes them pop on a dessert table.
- Make ahead strategy is to fully assemble and store in single layers with parchment, ensuring they keep their look up to three to four days.