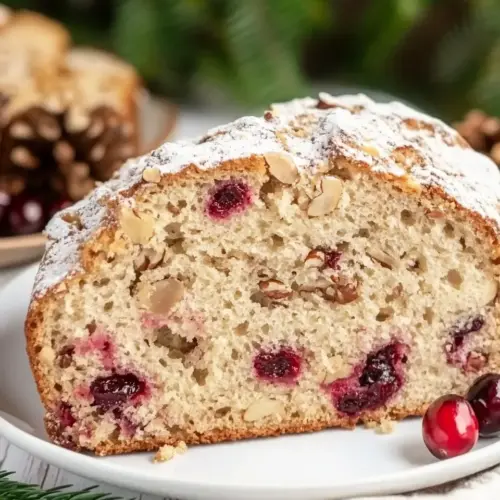
No Knead Cranberry Walnut Bread
No Knead Cranberry Walnut Bread is a hands off, rustic loaf with a crackly crust and a tender, nut studded crumb. This easy bread offers toasty walnut crunch and bright dried cranberry pockets, perfect for breakfast, brunch, or a holiday table. Make it for a cozy week when you want an impressive loaf without heavy kneading.
Equipment
- Small Bowl
- Large Mixing Bowl
- Stand mixer
- Plastic Wrap
- Sharp Knife
- Dutch Oven
Ingredients
- 1 teaspoon molasses 7 g Adds deep sweetness and a hint of caramel to feed the yeast and enrich the dough; dissolves easily in the warm liquid and enhances overall flavor complexity. Provides a subtle color boost and balances the tartness of cranberries while being used in a very small amount so it doesn’t overpower the bread.
- 1 1/2 cups warm water 340 g Provides the warm liquid medium to activate yeast and hydrate the flour, creating the dough structure for fermentation; its temperature should be comfortable to the touch to avoid killing yeast. Also helps dissolve molasses and evenly distribute ingredients so gluten develops gradually in this no-knead method.
- 1/2 teaspoon active dry yeast 2 grams Leavens the dough by producing carbon dioxide during fermentation, creating lift and airy crumb in the no-knead loaf when properly proofed. Requires activation in warm water and works slowly in a long rise to develop flavor without intensive kneading.
- 4 1/2 cups bread flour 540 g Forms the bulk of the dough, supplying gluten-forming proteins that give structure and chew to the bread; bread flour’s higher protein helps create a stronger network for good oven spring. Absorbs the liquid and, with long fermentation, develops flavor and texture in a simple, hands-off process.
- 1 1/4 cups coarsely chopped walnuts 141 g Contributes crunchy texture and a toasty, slightly bitter flavor that contrasts with the sweet cranberries and enriches mouthfeel; coarsely chopping preserves pleasant chunks throughout the loaf. Adds healthy fats and nutty aroma while complementing the bread’s tender crumb.
- 2 teaspoons table salt 12 g Season the dough to enhance overall flavor and balance sweetness from molasses and cranberries; salt also strengthens gluten structure and regulates yeast activity. Ensures a well-rounded taste and improved dough handling during the long fermentation.
- 2/3 cup dried cranberries 76 g Provides bursts of sweetness and tartness dispersed through the loaf, adding chewy texture and fruity flavor that contrasts with nuts and crust. Rehydrates slightly during proofing to meld flavors without releasing excessive moisture into the dough.
- 2 teaspoons vegetable oil 8 g Coats the pan or dough surface lightly to prevent sticking and contribute a subtle, neutral sheen while aiding release after baking; vegetable oil also helps keep crust from becoming overly dry. Helps with handling and storage by maintaining moisture in the finished loaf.
- 1/2 cup rice flour for dusting Dusts the work surface or boule to prevent sticking while shaping and transferring to the baking vessel; rice flour resists absorbing moisture and provides a non-sticky barrier that won’t gum up the dough. Helps achieve a clean release and a pleasing crust texture without altering flavor.
Instructions
- Dissolve the molasses in the water and then sprinkle in the yeast. Mix with a spoon and let it sit undisturbed until the top starts to foam.: The moment you smell a faint yeasty sweetness and see a foamy cap is a clear signal the yeast is active, which sets the stage for good fermentation. You'll notice tiny bubbles rising to the surface, and the surface will look slightly frothy and glossy. If it stays flat and lifeless after ten to fifteen minutes, the yeast may be expired, which will prevent a proper rise, so replace it. Avoid stirring vigorously after the yeast is sprinkled, because that can slow the foam formation and mask activity.
- In the bowl of a stand mixer, whisk together the bread flour, walnuts, and salt.: When you whisk these dry elements you create an even distribution so each forkful has balanced flavor and structure. The walnuts will scatter through the flour, and the salt will be dispersed so it does not touch the yeast directly. Pay attention to a uniform color and texture in the mixing bowl; lumps indicate poor mixing which can create dense pockets. Do not add the liquid yet, and avoid over handling the nuts so they do not release oils prematurely.
- Add the yeast mixture and cranberries. Mix at low speed using the dough hook attachment until it is combined. (The dough will be quite wet).: As you start mixing, you will hear the soft shush of dough coming together and see the cranberries fold in. The mixture will look shaggy and very wet, almost like a loose batter rather than a smooth dough. This wet stage is intentional because it leads to an open crumb once baked. One common mistake is trying to add extra flour to make it stiffer, which yields a tighter crumb, so resist that urge.
- Increase the speed to medium-high and mix for 4 minutes. The dough should be smooth and have some elasticity.: During this interval the dough should begin to look smoother and feel more cohesive as gluten develops. You may hear a slightly higher pitch from the mixer, and the dough will pull cleanly from the bowl sides without sticking excessively. This mechanical development replaces manual kneading and encourages elasticity. If the dough still feels excessively sticky after four minutes, the mixer may be underpowered or the flour measurement could be off, so assess hydration before adding anything.
- Transfer the dough ball to a large mixing bowl greased with vegetable oil. Cover the bowl with plastic wrap and let it sit in a warm (65°-70° F) environment for approximately 9 hours (or overnight). The dough is ready to bake when it has tripled in size, is covered in bubbles, and is noticeably puffy looking.: You will see a dramatic visual change as the dough puffs and becomes aerated, with a network of bubbles visible at the surface. The aroma will shift from raw flour to a lightly fermented scent, slightly tangy and sweet. If the dough only doubles after long hours, it may have been in a cooler spot, which slows fermentation, so allow more time. Avoid disturbing the bowl while it proofs, because gentle hands keep those fragile bubbles intact.
- Place the Dutch oven in a cold oven and preheat it to 500°F.: Preheating the Dutch oven with the oven ensures a burst of steam and oven spring when the dough hits the hot surface, giving a crisp crust and impressive lift. You will know the oven is ready when it reaches temperature and the Dutch oven feels intensely hot to the touch through heavy oven mitts. A common error is to place a cool Dutch oven into a hot oven late, which can warp or stress the pot, so start preheating early.
- While the oven is heating, dust your work surface with some rice flour. Gently transfer the dough to the prepared surface using a silicone bowl scraper (or silicone spatula). Shape the dough into a ball by folding the edges underneath themselves, rotating the dough ball as you do so.: The rice flour prevents sticking and creates a barrier between the dough and the surface. As you fold the dough, you should feel slight resistance that indicates surface tension building. This shaping step helps the loaf hold its form and encourages a round, even bake. Avoid aggressive handling which will deflate the fermentation gases you worked for.
- Score (make a slit) on the top of the dough ball with a very sharp knife and let it rest for 5 minutes.: Scoring guides how the loaf expands and creates an attractive ear when baked. The cut should be decisive and clean, not jagged, which produces a controlled release of steam. After scoring, a brief rest allows the cut to settle and the dough to relax slightly before the oven heat intensifies it. If the blade drags or tears the dough, it was not sharp enough or the dough was too sticky, so chill briefly on the counter rather than forcing a cut.
- Remove the hot Dutch oven from the oven and sprinkle the bottom with rice flour to prevent the dough ball from sticking to it.: The contrast between the sizzling hot metal and the cool dough creates an immediate surface crust. The rice flour acts like tiny ball bearings that reduce sticking and help release the loaf after baking. You will hear a low sizzle as the dough meets the hot pot, and steam will start to billow. If you skip this step, the loaf can adhere and tear when lifted out, so take the extra second to dust the bottom.
- Carefully place the dough ball into the Dutch oven, sprinkle with more rice flour, and bake covered for 30 minutes. Remove the lid and reduce the oven temperature to 450°F. Bake for another 15-20 minutes or until the bread is brown and crusty on top. The bread is done when it registers 195°F on an instant-read thermometer and should sound hollow when you knock on it with your hand.: Covered baking traps steam to create a glossy, blistered crust, while the uncovered finish browns and crisps the exterior. You will see the crust transition from pale to golden to deep brown, and the aroma will shift toward toasted nuts and caramelized sugars. Avoid opening the lid too early, which releases too much steam and limits oven spring. If the crust browns too quickly, tent with foil and continue to the target internal temperature.
- Lift the bread from the Dutch oven and place it on a wire rack to cool to room temperature before cutting.: Cooling lets steam escape gradually which stabilizes the crumb so slices are not gummy. The crust will crisp further as it cools, and the interior will settle into its final structure. Expect a warming nutty scent and a satisfying residual steam as the loaf releases heat. Cutting too soon collapses the crumb and produces a gummy texture, so be patient for the best slice.
Notes
- Ideal yeast temperature The ideal temperature to bloom yeast is between 105°F and 110°F, which gently wakes the yeast without killing it. Use a thermometer if you are unsure, because water that feels warm to the wrist can still be too hot for the yeast. If your yeast does not foam in about ten to fifteen minutes, it may be expired and should be replaced to avoid a failed rise.
- Expired yeast check If the yeast doesn’t foam, it may have expired. Always keep your yeast in a cool, dry place or refrigerate it to extend its life. When in doubt, proof a small amount first and observe for a light foam and yeasty aroma before committing the full batch.
- Rice flour purpose Don’t use regular flour to replace the rice flour on the bottom of the Dutch oven. Regular flour can burn at the high temperatures used here and create a bitter flavor. Rice flour provides a protective, nonstick dusting that helps remove the loaf cleanly after baking.
- Use the right Dutch oven size Use a 5 quart or larger Dutch oven to give the loaf room to expand while baking. A too small pot will constrain oven spring and distort the shape. Preheat the pot with the oven to get the best rise and crust formation.
- Nutritional facts scope Nutritional facts in the recipe refer to the whole loaf per the note. If you divide the loaf into slices, calculate per slice by dividing the totals by your chosen number of servings to track intake accurately.