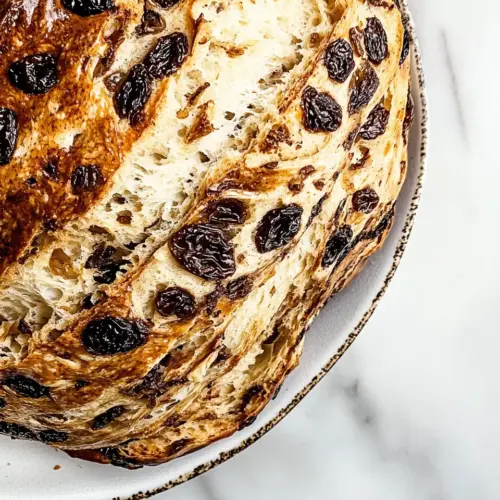
No Knead Cinnamon Raisin Bread
No Knead Cinnamon Raisin Bread is an easy, aromatic loaf with a tender crumb and crisp crust, bursting with warm cinnamon and chewy raisins. This hands off method uses time rather than effort to develop flavor, making it perfect for a cozy breakfast or simple brunch. It’s an approachable recipe for bakers of any level, delivering bakery style results with minimal fuss.
Equipment
- Le Creuset Enameled Cast Iron Signature Round Dutch Oven, 5.5 qt.
- Meringue Danish Dough Whisk
- Parchment Paper
- CUTCO Bread Knife 9.8” High Carbon Stainless
Ingredients
- 3 cups all-purpose flour Provide structure and bulk to the dough, forming the gluten network when hydrated and mixed gently. Use all-purpose flour for a balanced texture that yields a tender crumb without being overly chewy. Sift or stir before measuring to ensure consistent volume and even incorporation.
- 1 teaspoon salt Enhance overall flavor by balancing sweetness and improving gluten strength slightly, while also regulating yeast activity for proper fermentation. Add the salt evenly to avoid direct contact with yeast and to ensure an even-tasting loaf. Measure precisely to prevent an overly salty or flat-tasting bread.
- 1/2 teaspoon active dry yeast Leaven the bread by producing carbon dioxide during fermentation, creating air pockets that yield a light crumb. Use active dry yeast rehydrated in lukewarm water for reliable rise in a no-knead method. Avoid hot water that can kill the yeast and cold water that slows fermentation.
- 1 tablespoon cinnamon (ground) Impart warm, aromatic spice throughout the loaf and create a signature cinnamon-scented flavor profile. Use ground cinnamon evenly mixed into the dough or layered with raisins to ensure consistent spice distribution. Adjust quantity slightly if a more subtle or pronounced cinnamon presence is desired.
- 1 cup raisins Provide pockets of concentrated sweetness and chewy texture, adding flavor contrast to the spiced dough. Soak or mix raisins into the dough so they plump and distribute evenly during the slow fermentation. Use-quality dried fruit for the best texture and flavor impact in the finished bread.
- 1 1/2 cup water (lukewarm (105°F to 115°F)) Hydrate the flour to activate gluten and yeast while creating the dough's hydration level necessary for a moist crumb. Use lukewarm water between 105°F and 115°F to wake the yeast without harming it, promoting consistent fermentation. Add water gradually if humidity or flour absorption varies to achieve the desired sticky, no-knead consistency.
- 3 tablespoons brown sugar Contribute sweetness and a touch of molasses flavor that complements the cinnamon and raisins, aiding browning of the crust. Dissolve brown sugar into the lukewarm water so it blends evenly and feeds the yeast during fermentation. Adjust slightly for personal sweetness preference while maintaining dough balance.
Instructions
- In a big bowl mix the flour, salt, yeast, cinnamon and raisins together. Pour water into the bowl and using a spatula or a wooden spoon mix it until well incorporated. You do not need to activate the yeast before, even though we're using active dry yeast.: Right away you notice the dry mixture takes on a uniform color dotted with specks of cinnamon and the scattered shapes of raisins . The smell is pleasantly spicy and dry, not yet sweet. Mixing the dry ingredients evenly matters because it prevents pockets of salt or yeast from concentrating, which could lead to uneven rise. A common pitfall is insufficient mixing, which shows up later as inconsistent texture.
- Cover the bowl with plastic wrap and let it sit on your counter or inside your unheated oven for 12 to 18 hours. You need to let this dough rest for a minimum of 5 hours to allow the yeast to do its job.: As you add lukewarm water , the mixture transforms into a shaggy, sticky mass. The sound is a soft scraping of the spoon, and the surface will look glossy in spots where the water has fully moistened the flour. This step hydrates the flour so gluten can form over time, and not kneading preserves an open crumb. Avoid over stirring here because it will make the dough denser than intended.
- Preheat oven to 450°F. Add your cast iron pot to the oven as it's heating and heat it as well until it's at 450°F. Usually when the oven is done preheating your pot should be hot enough as well. Remove the pot from the oven and remove the lid from it. Use oven mitts, as to not burn yourself.: During this long rest the dough will slowly ferment and develop flavor, releasing a faint yeasty aroma that mingles with the cinnamon . You will see small bubbles and the dough should expand visibly, but it will remain sticky. This slow development is what gives the loaf depth of flavor, so resisting the urge to shorten the time is important. Rushing this step risks underdeveloped gluten and a tight crumb.
- Flour your hands really well and also sprinkle a bit of flour over the dough. With your floured hands gently remove the dough from the bowl and place it on a well floured work surface. Flatten the dough a little bit then sprinkle the brown sugar over the dough. Now fold the dough over itself a few times, to make the brown sugar blend a bit into the dough. Form the dough into a ball, use more flour if needed. Place the dough over a piece of parchment paper.: Even at the shortest acceptable rest, you should notice a softer, aerated texture and a mildly tangy scent. This minimum ensures fermentation has progressed enough to create lift during baking. If your kitchen is cool, plan for the longer end of the range. A common error is assuming the dough should double like quick rise recipes, but this slow dough often rises less dramatically and still bakes beautifully.
- Take the ball of dough with the parchment paper and drop it into the hot Dutch oven. Cover the pot with the lid and place it back in the oven.: Heating to a high temperature builds a burst of steam in the pot, which fosters a crisp crust. When the oven reaches 450°F the air becomes dry and hot, and placing the heavy pot inside helps it become uniformly heated. Use oven mitts and be cautious of heat when handling the pot. A frequent mistake is not preheating the pot long enough, which prevents that oven spring and yields a duller crust.
- Bake for 30 minutes with the lid on, after which remove the lid and bake for another 15 to 20 minutes until golden brown. Remove the bread from the pot, it should fall out easily. Let cool completely before slicing into it and serving.: The pot will feel noticeably hot, and touching it is not safe, so rely on mitts. The benefits of a preheated pot are immediate; it sears the dough surface and traps steam for a crunchy exterior. If the pot is cool, the loaf will spread instead of rising up, resulting in a flatter shape.
- Usually when the oven is done preheating your pot should be hot enough as well: Assess the readiness by carefully opening the oven and observing the pot, which may shimmer slightly from heat. This synchronized readiness ensures the dough hits an intense environment that encourages lift. Avoid exposing the pot to sudden moisture before placing dough inside because it can lower the temperature and affect baking.
- Remove the pot from the oven and remove the lid from it: The aroma that escapes as you lift the lid before placing the dough will be just hot air, but soon it will cradle the loaf and keep heat consistent. Removing the lid before placing the dough helps you position the parchment and loaf easily. One thing to watch for is placing the dough into a not quite hot pot, which reduces oven spring.
- Flour your hands really well and also sprinkle a bit of flour over the dough: The tactile experience here is key, as the sticky dough will cling to your skin without enough flour. The surface should feel tacky but manageable. Using too much flour on the dough can dry the outer layer and interfere with the final crust, so use a light dusting just to ease handling.
- With your floured hands gently remove the dough from the bowl and place it on a well floured work surface: When you lift the dough you will feel its weight and elasticity; it should hold together but be soft. The sound is quiet, a gentle rustle as it leaves the bowl. This careful handling preserves air pockets; rough treatment will deflate them, causing a denser interior.
- Flatten the dough a little bit then sprinkle the brown sugar over the dough: The brown sugar lands as a granular shimmer and will melt into pockets during folding, adding caramel notes. Visually you will see darker specks begin to sink as you fold. A common mistake is adding too much sugar which can make the crumb heavy and overly sweet.
- Now fold the dough over itself a few times, to make the brown sugar blend a bit into the dough: Folding distributes the raisins and brown sugar without de-gassing the dough. You should notice a slightly more cohesive surface after a few folds, and the texture becomes more elastic. Overfolding can compress the air bubbles and produce a tighter crumb, so fold just until ingredients are relatively even.
- Form the dough into a ball, use more flour if needed: Rolling the dough into a rough ball creates surface tension which helps it maintain shape during the bake. The exterior should be smoothish and taut, with the interior still soft. Watch out for adding too much flour to force a neat ball, because that can dry the loaf.
- Place the dough over a piece of parchment paper: The parchment becomes your transfer medium into the hot pot, and you will notice the dough sits comfortably on it, ready for the dramatic bake. The paper also prevents sticking and helps the loaf slide out after baking. Skipping parchment risks tearing and difficulty removing the loaf.
- Take the ball of dough with the parchment paper and drop it into the hot Dutch oven: As the loaf hits the hot surface you might hear a faint hiss and feel a rush of heat, which signals the start of crust formation. That initial contact seals the bottom and helps create a crisp base. Being careless while dropping can lead to burns or a mishapen loaf.
- Cover the pot with the lid and place it back in the oven: The covered environment traps steam which helps the crust expand before it sets, and the first part of the bake is all about that moist heat. You will notice the aroma intensify through the lid, and that trapped steam is what creates a beautifully blistered crust. Removing the lid too early will limit crust development.
- Bake for 30 minutes with the lid on, after which remove the lid and bake for another 15 to 20 minutes until golden brown: During the covered bake the dough will rise and set, and once you remove the lid the crust browns and crisps. Look for a deep golden brown color and listen for a hollow sound when you tap the bottom after cooling slightly. Underbaking leaves a pale, gummy interior while overbaking risks an overly hard crust.
- Remove the bread from the pot, it should fall out easily: When the loaf releases, you will see a beautifully domed shape and a crackled, browned crust. Let it rest where you can admire it but avoid slicing immediately. If it sticks, a thin spatula around the edge helps free it without tearing the crumb.
- Let cool completely before slicing into it and serving: Cooling allows the crumb to set and the steam inside to redistribute, which prevents a gummy texture. The smell remains enticing, but patience here yields cleaner slices and better texture. Cutting while warm is a frequent mistake that ruins the final slice structure.
Notes
- Check your yeast freshness. If the yeast is old the dough may not rise as expected. Always verify the expiration date and store yeast in the refrigerator once opened for longer life.
- Keep water temperature steady. Lukewarm water between 105°F to 115°F is ideal; water that is too hot will kill the yeast and too cool will slow fermentation dramatically.
- Embrace the sticky dough. This recipe is designed to be tacky; adding too much flour during shaping will yield a dry, heavy crumb, so flour your hands and work surface lightly.
- Use a heavy lidded pot. A cast iron or enameled Dutch oven retains heat and traps steam which creates that prized crisp crust and airy interior.
- Allow ample resting time. Overnight fermentation yields deeper flavor, though you can shorten it by reducing yeast and using a warmer spot; still, longer rest equals better taste.
- Cool fully before slicing. Patience at the end preserves crumb structure and prevents a gummy texture in the center of the loaf.