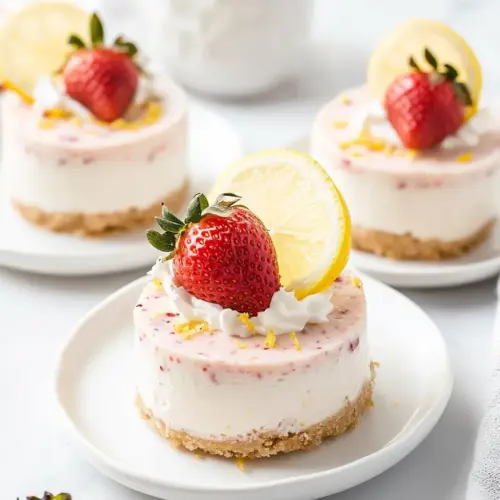
No Bake Strawberry Lemonade Cheesecakes
No Bake Strawberry Lemonade Cheesecakes are creamy, bright and easy to make, combining tangy lemon, sweet strawberries and a buttery graham cracker crumbs crust. These individual cheesecakes are perfect for summer gatherings, offering a refreshing chilled dessert that can be made ahead. They deliver a silky texture and vibrant flavor, making them a must try for warm weather entertaining.
Equipment
- Medium Bowl
- Electric Mixer
- Rubber spatula
- Measuring Cups
- Serving dishes
Ingredients
- 1 cup graham cracker crumbs Provide a crunchy, slightly sweet base that supports the cheesecake filling and contrasts the creamy texture; press evenly into molds to form firm crusts that hold without baking. Combine with melted butter and sugar so crumbs bind and set in the refrigerator for best results.
- 1 tablespoon granulated sugar Add a touch of sweetness to balance the tart lemon and complement the graham crumbs; dissolve into the crumbs with melted butter to help form a cohesive crust. Use sparingly to avoid making the crust overly sweet compared to the filling.
- 4 tablespoons unsalted butter, melted Melt to bind the graham cracker crumbs and form a stable, buttery crust; contributes richness and helps the base hold its shape in the no-bake setting. Allow to cool slightly before mixing with crumbs so it coats evenly without cooking other ingredients.
- 8 ounces cream cheese, room temperature Soften to a smooth, tangy, and creamy base for the filling that provides body and structure; beat until light to ensure a silky texture when combined with condensed milk. Ensure room temperature to prevent lumps and to allow seamless incorporation of the other filling components.
- 14 ounces sweetened condensed milk Sweeten and thicken the filling while providing a rich, milky sweetness that sets without baking; pour slowly while mixing to achieve a cohesive, creamy texture. Use its dense sweetness to balance bright citrus notes and create a smooth no-bake cheesecake consistency.
- 1/3 cup freshly squeezed lemon juice, about 4 lemons Provide bright acidity and fresh lemon flavor that firms the filling as it reacts with the sweetened condensed milk; freshly squeezed juice ensures vibrant, natural citrus notes. Measure carefully for desired tanginess and strain if pulp-free texture is preferred.
- 1 teaspoon pure vanilla extract Add warm, aromatic flavor to enhance the overall profile and round out the tartness of the lemon; a small amount elevates the filling without overpowering. Stir in toward the end of mixing to preserve its subtle fragrance.
- 3/4 cup hulled and chopped strawberries Contribute fresh berry flavor and slight texture variation within the filling or as a topping; hull and chop to distribute small bursts of strawberry throughout the cheesecake. Choose ripe strawberries for optimal sweetness and fold gently to maintain a tender filling.
- whipped cream Whip to soft peaks and use as a light, airy topping that adds creaminess and visual appeal; sweetened or unsweetened whipped cream complements the dense filling. Pipe or dollop just before serving to keep texture light and prevent sogginess.
- strawberries Slice or halve to garnish and add fresh berry flavor and color to the finished cheesecakes; whole strawberries offer juicy contrast and an attractive presentation. Select firm, ripe berries for best holding and taste.
- sliced lemon Slice thinly to garnish and reinforce the lemon flavor visually, adding a bright, citrusy accent to the finished dessert; use as a decorative edge or small wedge. Remove seeds if needed and place chilled slices atop the whipped cream for a crisp finish.
Instructions
- In a medium bowl, stir together the graham cracker crumbs, sugar and melted butter. Evenly divide the crumbs between 6 individual serving dishes and press into the bottoms of the dishes to form a crust layer. Place serving dishes into the refrigerator while you prepare the cheesecake.: Right away you will notice the warm, toasty scent of the graham cracker crumbs melding with the melted butter , and that aroma is a good cue the crust is taking shape. As you press the crumb mixture into each dish, feel for a compact, even layer that holds when you tilt the dish, rather than falling apart. The pressure should be firm and even, so use the back of a spoon or a flat measuring cup to press down to create a dense base. If crumbs feel loose or sandy, it usually means there was not enough butter or they were not pressed firmly enough, so top with a bit more melted butter and re-press. Once chilled, the crust will firm up and the contrast between the crunchy base and the creamy filling will be at its best. Avoid pressing so hard that the crust becomes overly compact and loses its pleasant crumbly texture.
- In a large bowl with an electric mixer, beat cream cheese for 2-3 minutes.: As you beat the room temperature cream cheese , you should see it transform from a slightly lumpy block into a velvety, smooth mass with a pale sheen, and the sound will be a consistent low hum from the mixer. This stage is crucial because any lumps will show up in the final texture, so be sure to scrape the sides and bottom of the bowl intermittently. The reason this matters is that a fully aerated cream cheese base will combine more evenly with the sweetened condensed milk , giving a lighter mouthfeel. A common mistake is starting with cold cream cheese , which resists smoothing and creates stubborn lumps, so always let it soften to room temperature for the best result. Also avoid overbeating to the point of breaking down the fat structure, which can make the filling too loose.
- Add in sweetened condensed milk and mix until smooth. Make sure to scrape the sides of the bowl with a rubber spatula to ensure the cream cheese is fully incorporated.: When you pour in the sweetened condensed milk , notice the glossy ribbon it forms as it folds into the whipped cream cheese ; the mixture will become noticeably silkier and slightly heavier. Use a medium mixer speed and pause to scrape the bowl, because sticky pockets of cream cheese are easy to miss and create uneven texture. The vibrancy of the filling depends on a homogeneous mix, so taking time to fully incorporate ensures each bite tastes consistent. Watch for air bubbles forming if you mix too fast, which can lead to small holes in the chilled filling, so keep the speed moderate. If the filling seems grainy, it’s often due to cold ingredients, so allow them to warm briefly and re-whip gently.
- Add in lemon juice and vanilla and beat for an additional 2-3 minutes until smooth and creamy. Fold in strawberries.: As you add the lemon juice and vanilla extract , the mixture will brighten and thin slightly, releasing a fresh, citrus aroma that tells you the flavors are coming together. Beat until the texture is silky and slightly thickened again, then stop and fold in the chopped strawberries to preserve small bursts of fruit throughout the filling. The reason for folding rather than high speed mixing is to keep the fruit from turning to mush and to avoid over aeration. Common pitfalls here include adding too much acid which can make the filling separate, so measure the lemon juice carefully and taste as you go to maintain balance. If the strawberries release too much juice, gently pat them dry first to prevent a runny filling.
- Evenly spoon mixture into prepared serving dishes, cover and refrigerate for at least 4 hours.: As you portion the filling, you should see a glossy, firming surface that becomes more set as it chills; the scent will mellow into a pleasing lemon strawberry perfume. Press gently to level the tops so the garnish will sit neatly, then cover to prevent any fridge odors from seeping in. The chilling step is essential because it allows the filling to firm up without baking, creating that ideal spoonable cheesecake texture. A frequent error is not chilling long enough, which results in a filling that is too soft to hold its shape when served, so plan for the full chilling time. If you need a faster set, a brief stint in a colder part of the fridge can help, but sudden temperature changes may affect texture, so avoid freezing.
- Before serving, top with whipped cream, strawberries and lemon slices.: The final garnish adds contrast in texture and temperature, with the cool whipped cream and bright, slightly tart lemon slices complementing the creamy center and crunchy crust. Arrange the strawberries and lemon slices thoughtfully so each serving looks inviting, and dollop the whipped cream for a light, cloudlike finish. Smell the citrus and fresh fruit as you plate, it should be lively but not overpowering. One mistake is adding the garnish too early, which can cause it to wilt or weep; always garnish right before serving for the cleanest presentation. If the whipped cream softens, a quick chill before serving will help it hold its shape.
Notes
- Mini tart style Convert the portions into a single 9 inch crust by pressing the crumb mixture into a pie pan, pour the filling in, and chill for a shareable dessert perfect for potlucks.
- Berry swirl Puree a handful of the strawberries and gently ripple the puree into the filling before chilling to create pretty pink marbling and pockets of concentrated fruit.
- Layered parfait Alternate spoonfuls of filling with additional crushed crumb layers and fresh strawberries to make a parfait with contrasting textures in each spoonful.
- Sturdy garnish If transporting, use stabilized whipped cream or pipe a small rosette of ganache flavored with lemon oil to maintain decoration during travel.
- Individual jars Use small jars with lids for portable servings that store well in the fridge and make charming gifts or picnic desserts.