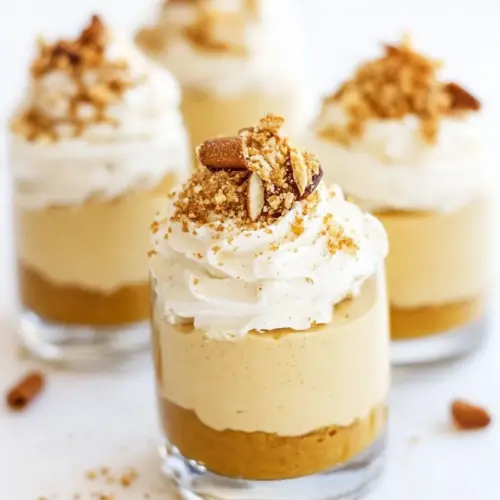
No Bake Pumpkin Cheesecake Shooters
No Bake Pumpkin Cheesecake Shooters are creamy, spiced, and delightfully easy to assemble, offering a light autumn dessert that is perfect for gatherings. Each shooter balances a crunchy nut crumb base with a fluffy pumpkin filling for a crowd pleasing treat that feels indulgent but not heavy, ideal for easy entertaining and last minute holiday desserts.
Equipment
- Food Processor
- Mixer
- Piping bags
Ingredients
- 1/2 cup almond optional walnut halves Crunchy and nutty addition that forms the base when crushed; provides texture and a subtle buttery flavor to contrast the creamy layers. Optionally used to create individual shooter crusts or as a garnish for crunch. Can be pulsed with a bit of coconut oil to bind and hold shape in small cups.
- 2 tablespoons coconut sugar Lightly sweet, caramel-like sweetener used to add depth without refined sugar; enhances the pumpkin and spice flavors. Dissolves easily into wet ingredients and helps balance tartness from cream cheese. Can be adjusted to taste for a more or less sweet finish.
- 1 tablespoon coconut oil Mild, tropical oil that acts as a binder for the crust and adds moisture without dairy; melts to help hold crust ingredients together. Imparts a subtle coconut aroma when warmed and helps set chilled no-bake bases. Use sparingly to avoid greasiness in small shooter portions.
- 4 ounces lite cream cheese softened Smooth, slightly tangy dairy component that provides the creamy body and structure of the cheesecake layer. Softened to ensure a velvety blend with pumpkin and sugar for even texture. Whips easily with sweeteners and flavorings to create stable mini cheesecake filling.
- 1/2 cup pumpkin puree Velvety purée that delivers classic pumpkin flavor and moisture while lightening the cheesecake filling; contributes natural sweetness and color. Blended thoroughly with cream cheese and spices to achieve a smooth, cohesive layer. Offers seasonal aroma and pairs well with pumpkin pie spice.
- 1 teaspoon pumpkin pie spice Warm, aromatic spice blend that infuses the filling with traditional autumn flavors; elevates the pumpkin taste with cinnamon, nutmeg, and cloves. Added in measured amounts to avoid overpowering the delicate cream cheese. Can be adjusted slightly for a milder or bolder spice profile.
- 1/4 cup coconut sugar Additional sweetener used to fine-tune sweetness and balance the filling; brings a warm, molasses-like note when combined with pumpkin. Sprinkled into the cream cheese mixture to reach the desired taste and consistency. Helps stabilize whipped mixtures when incorporated gradually.
- 1 1/2 cups whipped topping Light and airy topping used to create a fluffy, cloud-like finish for the shooters; adds volume without extra richness. Folded gently into the pumpkin-cheesecake mixture or piped on top for decorative swirls. Provides contrast to denser layers and makes individual servings feel indulgent.
- 8 cinnamon sticks for decoration, optional Aromatic, decorative stirrers that add visual height and a subtle cinnamon scent when used as garnish; optional for presentation. Placed upright in each shooter for a festive look and a hint of spice aroma when sipping. Not intended for consumption but enhances the overall sensory experience.
Instructions
- In a small food processor, pulse nuts, coconut sugar, and coconut oil together until they become the texture of fine crumbs. Spoon an equal amount into the bottom of 8 shot glasses, or layer the crumbs with the filling, my personal favorite :-).: You will smell toasted nut oils and a hint of caramel as the mixture comes together, and visually it should resemble damp sand, not oily clumps. The slight cohesion is important so the base slightly packs into the glass, giving a contrasting texture to the filling. If you overprocess, the oils release too much and the crumbs become pasty, so pulse in short bursts and check frequently. A common mistake is using warm oils, which can make the crumbs greasy, so use coconut oil just softened not fully melted.
- Using a mixer, beat cream cheese until smooth and creamy. Add pumpkin puree, pumpkin pie spice, and coconut sugar. Beat until smooth and sugar is dissolved. Mix in 1 cup of the whipped topping.: When spooning, press gently to compact the base so it stays put when you add the filling, but do not press so hard the crumbs become dense. The sound is subtle, a faint tapping as the crumbs settle, and the visual cue is a neat, even layer at the base. If you skip compacting, the crumbs may float into the filling and lose their crunchy contrast. Avoid overfilling the glasses with crumbs so there is room for a generous filling layer.
- Once light and creamy, divide equally into shot glasses or dessert dishes.: As you beat, the cream cheese will shift from tacky to glossy and silky. Pause to scrape the sides so no lumps remain, and the texture becomes ribbon like when the beater lifts away. Smoothness at this stage prevents grainy pockets in the final filling. A frequent error is using cold cream cheese , which resists blending and leaves lumps, so ensure it is softened to room temperature for effortless creaming.
- Finish off each shot glass with a dollop of whipped topping. If desired, sprinkle with cinnamon or any remaining crumbs.: After combining, the aroma will change, bringing warm spice notes and a sweet pumpkin scent. Mix on low until fully incorporated; the color should be a uniform warm orange. This combination builds the core flavor profile, so mix until no streaks remain. Overmixing at high speed can trap air and make the texture too airy, so use measured mixing to maintain a mousse like consistency.
- OPTIONAL: In two separate piping bags, add pumpkin mixture to one and 1/2 cup whipped topping to the other. Pipe pumpkin mixture over crumbs, followed by whipped topping. Sprinkle on a dash of pumpkin pie spice, cinnamon, or any remaining crumbs.: Run a quick taste to ensure the sweetness and spice balance is right, and you should not feel any grit from sugar. The tongue will notice a cohesive creamy mouthfeel when the sugar is fully dissolved. If you still taste graininess, continue mixing briefly and let the mixture sit for a few minutes to allow sugar to dissolve into the liquid. A common slip is assuming dissolution is instant, but patience yields a silkier result.
- Mix in 1 cup of the whipped topping: Folding in the whipped topping lightens the filling, making it pillowy and easy to spoon or pipe. Use a spatula and gentle folding motions to preserve volume and avoid deflating the mixture. The sound is barely audible, a soft swoosh as the batter becomes airy. If you stir too vigorously you will lose the whipped texture, creating a denser filling, so fold carefully.
- Once light and creamy, divide equally into shot glasses or dessert dishes: Aim for even distribution so each guest gets the same balance of crust and filling. The filling should sit proudly above the crumb base, smooth and slightly billowed. Visual symmetry is satisfying, and a small offset can make plating look charmingly rustic. A common error is uneven scooping, which can be solved by using a piping bag or an ice cream scoop for consistency.
- Finish off each shot glass with a dollop of whipped topping: The final dollop adds a cloud like contrast and a cool note against the spiced filling. Use the reserved whipped topping and create a gentle peak for visual appeal; you might hear a soft plop as the dollop lands. If you prefer cleaner presentation, pipe the topping for neatness. Avoid over decorating, as heavy toppings can overpower the pumpkin flavor.
- If desired, sprinkle with cinnamon or any remaining crumbs: A light dusting of cinnamon offers aromatic brightness and a pleasant bitterness against the sweetness, while extra crumbs restore the crunch if some was lost during assembly. The scent of cinnamon will rise as you sprinkle, enhancing the seasonal experience. Be careful not to overdo the spice, as it can dominate the delicate pumpkin notes.
- OPTIONAL: In two separate piping bags, add pumpkin mixture to one and 1/2 cup whipped topping to the other : Piping yields a layered, professional look with alternating textures; the visual effect is appealing and ensures each bite includes both components. The technique emphasizes control over portion size, and the quiet squeeze of the bag gives precise placement. If you do not have piping bags, a spoon works fine, though the finish will be less polished.
- Pipe pumpkin mixture over crumbs, followed by whipped topping: The contrast of colors and textures becomes more pronounced with piping, and the layers stay distinct as they chill. You should see clean lines between the pumpkin and white topping, and the overall result looks like miniature parfaits. One mistake is piping too forcefully which can disturb the crumb base, so apply gentle pressure to maintain structure.
- Sprinkle on a dash of pumpkin pie spice, cinnamon, or any remaining crumbs: This final touch adds aroma and a hint of texture that makes the presentation feel finished. The tiny flecks of spice should be enough to catch the eye and nose. Resist heavy dusting, as it may introduce bitterness and hide the pumpkin color.
Notes
- Swap nuts carefully, if you prefer a milder base use almonds, which provide a subtle, sweet crunch, while walnuts give a richer, slightly bitter edge. Taste the crumbs before assembling to decide if you want to add the full amount of coconut sugar, as walnut natural bitterness may need more sweetness.
- Adjust sweetness incrementally, because coconut sugar has depth that can mask pumpkin spice, add it in stages to the filling and taste as you go. If you find the mixture too sweet after chilling, balance with a small pinch of salt.
- Control texture with whipped topping, fold in less for a denser, cheesecake like mouthfeel, or fold in more for a lighter, mousse style filling. Remember that overfolding deflates air and leads to a creamier but heavier texture, so stop folding as soon as the color evens out.
- Make ahead strategy, prepare the crumb base and pumpkin filling a day ahead and keep them refrigerated separately. Assemble shortly before serving to preserve the crispness of the crumbs and the fresh look of the whipped topping.
- Presentation tips, pipe the filling and topping for a clean layered look, or spoon them for a rustic charm. Garnish with a single cinnamon stick for drama, placed at a slight angle so it does not fall into the filling during transport.
- Chill for best texture, let assembled shooters rest in the refrigerator for at least one hour so flavors meld and the filling firms. If rushed, pop them in the freezer for ten minutes, but avoid freezing solid as the whipped topping texture will suffer.