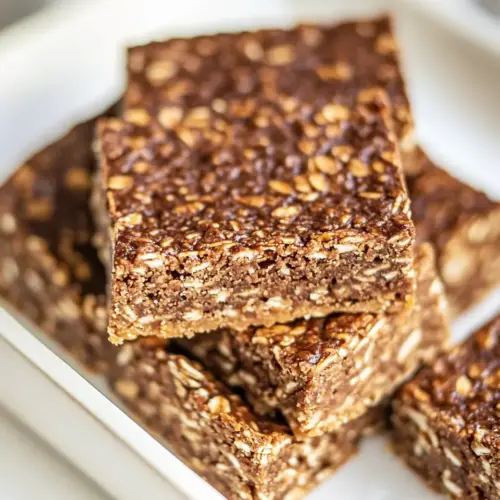
No Bake Oatmeal Peanut Butter Cookie Bars
No Bake Oatmeal Peanut Butter Cookie Bars combine creamy peanut butter, chewy oats, and rich cocoa into an easy no bake treat. These bars are quick to assemble, reliably chewy, and freezer friendly, making them perfect for snacks, lunchboxes, or last minute gatherings. They offer a balanced sweet and salty profile and are a crowd pleasing pantry staple worth making again and again.
Equipment
- 8 inch baking pan
Ingredients
- 1 cup (256 g) unsweetened peanut butter or almond butter, well stirred (crunchy or creamy works) Provide creamy texture and rich nutty flavor while binding the bar mixture; well stirred unsweetened peanut or almond butter contributes healthy fats and protein, helping the bars hold together without baking. Choose crunchy for added bite or creamy for a smoother consistency, and ensure it is room temperature for easier mixing.
- 1/2 cup (170 g) pure maple syrup or honey Add natural sweetness and moisture while helping to set the no-bake bars; pure maple syrup or honey also contributes viscosity that helps bind oats and nut butter. Use the specified amount to balance sweetness without making the bars overly sticky, and warm slightly if too firm to mix easily.
- 1/2 cup (112 g) coconut oil or butter Melt to create a smooth, pourable fat that helps combine dry and wet components and contributes tenderness; coconut oil adds subtle coconut flavor while butter gives a richer dairy profile. Carefully melt and cool slightly before combining so it emulsifies into the nut butter without separating.
- 6 tbsp (50 g) cocoa powder Impart deep chocolate flavor and slight bitterness that balances the sweetness while drying the mixture to a fudgy consistency; cocoa powder intensifies color and adds cocoa solids without extra fat. Sift or stir well to avoid lumps and distribute flavor evenly through the bars.
- 2 tsp pure vanilla extract Enhance overall flavor profile by rounding out sweetness and lifting other flavors; pure vanilla extract adds aromatic complexity and a warm finish. Stir into the wet ingredients so its aroma disperses evenly throughout the mixture.
- 2 cups (180 g) quick oats Provide structure, chew, and whole-grain body while absorbing excess moisture to create firm bars; quick oats blend smoothly for a tender texture and faster binding than rolled oats. Measure and pack gently to maintain the intended oat-to-moisture ratio for set bars.
- 1/2 tsp sea salt to taste Balance and brighten flavors while controlling sweetness and enhancing chocolate notes; sea salt used to taste brings out the depth of peanut butter, maple syrup, and cocoa. Sprinkle or mix in according to preference to avoid over-salting delicate bars.
Instructions
- Heat the peanut butter (or almond butter), pure maple syrup (or honey), and coconut oil (or butter) in a saucepan over medium heat. Stir constantly, until the ingredients are melted together.: You will notice the mixture begin to loosen and shimmer as the peanut butter and coconut oil melt together, and a faint aroma of roasted nuts will rise. The sound is gentle bubbling rather than loud sizzling, which means your heat is moderate. This melding is important because it creates a smooth binder for the oats , preventing grainy pockets. If you rush with very high heat, the mixture can separate or scorch, producing a bitter note. Stir constantly so the heat distributes evenly, and stop when the mixture is homogenous and glossy, about one to three minutes on steady medium. A common mistake is walking away and allowing the bottom to brown, which creates burnt flavor.
- Remove the saucepan from the heat and add in the vanilla extract and cocoa powder and stir well until dissolved.: As you stir, notice the texture shift from thick and clumped to silky and pourable, and watch for uniform color. This step ensures the cocoa powder and sweetener will incorporate cleanly later on. The gentle, continuous stirring prevents hot spots and keeps the blend emulsified, which helps the bars hold together after chilling. If you hear a change to a louder, crackling sound, reduce the heat immediately to avoid scorching. Avoid under-stirring, which can leave unmelted chunks of peanut butter or solidified coconut oil .
- Add in the quick oats and sea salt and stir well until all of the ingredients are well-combined. Because there is no raw egg or raw flour in this great recipe, feel free to taste test the mixture for flavor so you can add additional goodies if you’d like.: Once off the burner, the steam will subside and the warmth will be perfect for dissolving the cocoa powder , releasing a deep chocolate scent. Stirring now prevents the cocoa from clumping, and the vanilla will unfold aromatic top notes that brighten the mix. The reason we remove the pan from heat is to avoid cooking the vanilla and to let the cocoa hydrate into the warm fat rather than scorch. If lumps remain, use a whisk and press them against the sides to smooth them out. A pitfall here is adding cocoa while still too hot, which can cause it to seize into gritty bits, so let it cool a few seconds if the pan is very hot.
- Line a 8" x 8" square baking pan with parchment paper, wax paper, or spray it liberally with cooking spray.: The oats will absorb the glossy chocolate mixture and the aroma will change to a warm, toasty chocolate scent as they hydrate. Stir until the oats look evenly coated, leaving no dry streaks. The sea salt distributes tiny bright hits across the mixture, enhancing sweetness. This absorption is why quick oats are ideal they soften quickly and bind without needing baking. Overworking the mixture can crush the oats and yield a pasty texture, so stir just until combined.
- Pour the cookie dough into the prepared pan and spread it into an even layer.: Preparing the pan well ensures you can lift the whole slab out for neat cutting. I like parchment because it makes removal effortless and keeps the bars from sticking. Press the paper into corners and leave an overhang for easy retrieval. If you skip lining and the mixture sticks, you risk tearing edges when unmolding, so take the extra minute to line the pan carefully.
- Freeze for at least 1 hour, or until the mixture is set up.: When you pour, the mixture should flow slowly and hold together as a cohesive mass, with a shiny surface from the fats. Use the back of a spoon or an offset spatula to press it gently into corners and smooth the top; you should feel slight resistance as the oats settle. Smooth, even thickness ensures consistent chilling and uniform bars. Avoid overcompressing which can create overly dense bars; a firm but gentle press is best.
- Pull the whole batch of bars out of the dish by pulling on the parchment paper and transfer to a cutting board.: As the pan chills, the coconut oil or butter will solidify and the bars will firm. You will notice the surface lose its glossy sheen and develop a slightly matte finish when fully set. The cold also helps flavors meld, so patience pays off. A common misstep is removing too early, which yields soft, crumbly bars that do not cut cleanly. If your kitchen is cool, refrigeration might suffice, but freezing guarantees a quick, firm set.
- Use a sharp knife to cut 12 to 16 individual bars.: The bars should lift as a single block, and you will feel the solidity as you move it. The aroma will be more muted when cold, but the texture will reveal itself visually, with a firm edge and a slightly tender center. Working from the parchment prevents slipping and keeps the slab intact. A frequent error is trying to lift without the paper overhang, which can smash the block and make cutting messy.
- Use a sharp knife to cut 12 to 16 individual bars: A sharp knife yields clean edges and neat bars. Warm the blade briefly under hot water and wipe it dry between cuts for the cleanest slices, since a chilled slab can cause crumbly edges. Aim for consistent widths so every piece has an even ratio of filling to oats. A common mistake is using a dull knife, which drags and tears the bars instead of slicing cleanly. If the bars begin to crumble, chill them a bit longer before resuming cutting.
Notes
- Swap nut butter confidently: If you prefer almond butter instead of peanut butter, the bars will have a lighter, nuttier profile. Use the same weight and stirring technique to ensure even texture. Some almond butters are thinner, so you may want to chill a bit longer to achieve the same firmness.
- Choose your sweetener wisely: Maple syrup offers a deeper, more complex sweetness while honey brings floral notes. Both function as binders, but honey can be stickier when warm, so stir thoroughly to distribute it evenly to avoid pockets of extra moisture.
- Adjust cocoa intensity: If you want a more chocolate-forward bar, increase the cocoa powder slightly, tasting the mixture before chilling. Be cautious not to add so much that the texture becomes dry; compensate with a touch more syrup if needed.
- Use coconut oil for firmer set: Choosing coconut oil instead of butter tends to create a slightly firmer bar when chilled, especially at cooler serving temperatures. If you prefer a softer texture, use melted butter and shorten chilling time.
- Make ahead and freeze: After cutting, place bars in a single layer in the freezer for rapid firming, then stack with parchment between layers. Frozen bars keep up to three months, and thaw in the fridge for portable treats that travel well.