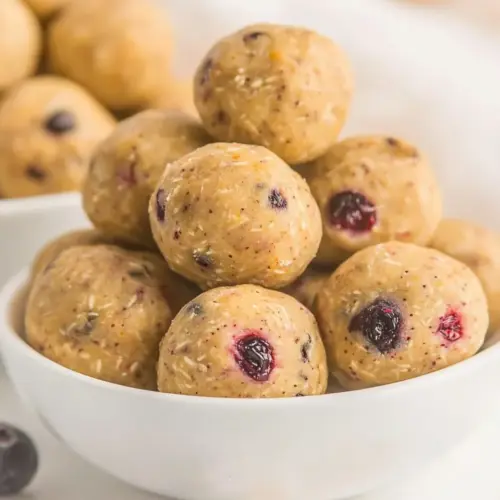
No Bake Mixed Berry Snack Bites
No Bake Mixed Berry Snack Bites are an easy, no oven treat with bright fruity notes and a chewy, nutty texture. These small bites combine ground freeze dried raspberries with gluten free and coconut style flours, natural peanut butter, and honey for a portable snack perfect for summer picnics or lunchboxes, ideal when you want something quick and homemade.
Equipment
- Blender or food processor
- Large Mixing Bowl
- Plate with Parchment
Ingredients
- 1/4 cup raspberries, freeze dried Provide intense fruity crunch and concentrated raspberry flavor; add vibrant color and a tart contrast that brightens the bites. Preserve long shelf stability and deliver a pleasant textural pop without adding moisture, helping maintain a firm no-bake structure.
- 1 1/2 cup flour, gluten free Act as the primary dry binder and structural base in a gluten-free format, supplying bulk and crumb that hold the bites together. Absorb moisture from wet ingredients to create a cohesive dough while keeping the final texture tender yet sturdy for slicing or rolling.
- 1/2 cup flour, coconut Contribute a mild, subtly sweet, and nutty texture while increasing fiber and healthy fats in the mixture. Enhance binding alongside other flours to produce a softer, more pliable dough that balances moisture without overpowering flavor.
- 1/2 cup peanut butter, all-natural Provide natural creamy fat and protein that bind the dry ingredients together while contributing a rich, savory undertone. Offer moisture and help emulsify the mixture so the bites hold shape without baking; also add satisfying mouthfeel and a hint of nuttiness.
- 1/2 cup honey Deliver natural sweetness and sticky consistency to act as the main sweetener and adhesive for no-bake formation. Impart depth of flavor with floral notes and help set the bites as it cools or firms, reducing need for added sugars.
- 1/4 cup milk Add just enough liquid to hydrate dry components and allow proper mixing and binding of the dough. Provide a touch of creaminess to smooth textures and can be substituted for dairy alternatives if needed to maintain consistency.
Instructions
- In a small blender or food processor, add your freeze dried berries and blend until it is a flour-like consistency. Set aside. Line a large plate with parchment paper and set aside.: As you pulverize the freeze dried raspberries the room fills with a bright, slightly tart aroma, and the berries quickly transform from crunchy shards into a fine, dusty powder that looks almost like pink sand. The sound of the motor will change as the pieces get smaller, shifting from distinct pops to a steady hum, which signals that you are nearing the right texture. This fine powder disperses easily through the batter and rewards you with even fruit flavor in every bite, avoiding clumps of dried fruit. A common mistake is underprocessing, which leaves chewy bits that can make the bites uneven. If you see specks of larger pieces, pulse a few more times. Setting the plate with parchment prepares a clean surface for forming, and it prevents sticking so the chilled balls lift off easily.
- In a large mixing bowl, add your oat flour and coconut flour and mix well. Stir in your smooth nut butter and honey and mix until it is a crumbly texture.: When you combine the dry flours they create a pale, powdery base that looks light but substantial; stirring in the smooth peanut butter and honey introduces glossy ribbons of color and a nutty scent that warms the air. As you fold, you will notice the mixture change from loose dry bits to clumps that feel slightly tacky between your fingers, and that transitional texture is the cue that the binders are doing their job. The crumbly stage is ideal because it means the ingredients are incorporated without becoming overly wet. Avoid over mixing, which can make the mixture overly dense and dry. If it feels too dry to come together later, you will add small amounts of milk , but for now aim for even distribution of the nutty and sweet notes throughout.
- Add milk of choice, one tablespoon at a time, until a thick batter is formed. Stir in your dried berries. Using your hands, form into bite-sized balls and place on the lined plate. Refrigerate for at least 30 minutes to firm up.: As you introduce milk slowly, watch the texture shift; the mix will darken slightly and take on a pliable sheen, moving from crumb to a cohesive, moldable batter. Adding the milk by small increments prevents the mixture from becoming runny and lets you find a sweet spot where the batter holds shape without being sticky. Once the ground raspberries are folded in, you will see tiny flecks of pink and smell a fresh, fruity lift that brightens the nutty aroma. The batter should feel moist but firm, and you should be able to press a small amount into a ball with gentle pressure. A frequent error is dumping too much liquid at once, which leads to a loose mixture that will not set properly; if this happens, stir in a touch more gluten free flour to rescue the texture.
- Using your hands, form into bite sized balls and place on the lined plate.: Rolling the batter into balls warms it slightly, releasing the fragrant scent of peanut butter and honey , and your palms will pick up a faint dusting of berry powder. Aim for uniform sizes so they chill evenly; I like about one inch balls, which create a pleasing mouthful. If the mixture sticks to your hands, a light mist of water or a quick chill of the bowl will help. Place each ball on the parchment so they are not touching, which prevents them from fusing as they set. Avoid packing them too tightly while rolling, because over handling will make them dense rather than tender.
- Refrigerate for at least 30 minutes to firm up.: During chilling the honey and peanut butter solidify slightly, and the bites go from soft to pleasantly set, with clean edges and a satisfying chew. You may notice the aroma calms, and the texture becomes more cohesive when you press gently and it springs back. The recommended 30 minute window ensures they are firm enough to transport, but letting them chill longer yields a firmer, almost truffle like center, which some prefer. A common mistake is skipping the chill, resulting in sticky, fragile bites that will not hold shape when served. Once chilled, they are easier to store and handle.
Notes
- Swap the nut butter You can substitute the peanut butter with another all natural nut butter for a different flavor profile, keeping in mind that texture and oil content vary across brands and may slightly alter the amount of milk needed.
- Adjust sweetness Use a bit less honey if you prefer a more tart result, or add a touch more if you want a sweeter snack, tasting the batter before chilling to reach your preferred balance.
- Make mini or large bites Roll them smaller for a nibble size suited to parties, or make larger balls for a more satisfying treat, noting that larger pieces will need a little more chilling time to firm through.
- Turn them into bars Press the batter into a small pan lined with parchment and chill until firm, then slice into bars for easy packing and a different eating experience.
- Store smartly Keep the bites chilled in an airtight container, layering parchment between rows to prevent sticking and maintain the texture.