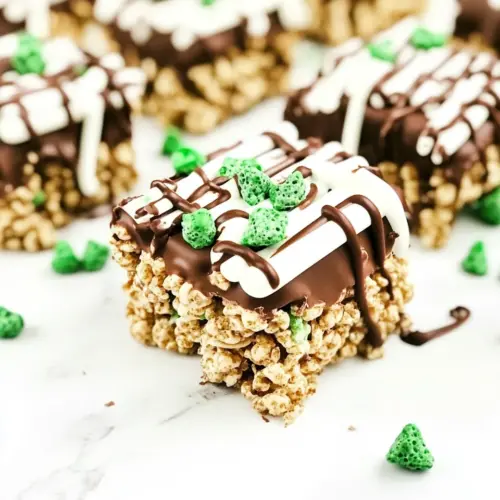
No Bake Mint Chocolate Krispies
No Bake Mint Chocolate Krispies are a quick, crispy, and minty treat with a glossy white coating and a pop of peppermint. This easy no bake snack blends crunchy rice krispie cereal with gooey mini marshmallows and toasted peanuts, finished with a chocolate and green candy drizzle for festive flair, perfect for quick gatherings and sweet gifting.
Equipment
- Large Bowl
- Microwave-safe Bowl
- Spatula
- Medium Cookie Scoop
- Waxed paper
Ingredients
- 2 cups rice krispie cereal Provide light, crisp texture and bulk to the bars, helping them hold together when coated. Pair with melted binding ingredients to create the classic krispie structure that offers crunch in every bite.
- 2 cups mini marshmallows Add sweetness and sticky binding power when melted, allowing the cereal and peanuts to adhere into cohesive bars. Melt gently to avoid scorching and mix thoroughly for an even, gooey texture throughout.
- 1 -1/2 cups dry roasted peanuts Introduce crunchy, nutty flavor and protein contrast to the sweet elements while contributing additional texture and mouthfeel. Use roasted peanuts for depth of flavor and evenly distribute to balance each bite.
- 1/4 tsp peppermint oil Impart concentrated mint flavor with a small amount, delivering a refreshing coolness that complements the chocolate and sweetness. Use sparingly due to potency, adding drop by drop and tasting to achieve the desired mint intensity.
- 1 (24-oz) package white almond bark Provide a smooth, sweet coating when melted that encases the cereal mixture, setting into a firm, glossy shell that holds the bars together without baking. Melt over low heat or in short microwave bursts, stirring until silky before combining with the mixture.
- 1/4 cup chocolate chips (optional) Offer optional pockets of rich chocolate flavor and a slightly softer texture contrast when sprinkled or mixed in, enhancing overall chocolate presence. Choose quality chips and add after initial coating to preserve shape and create melty bites.
- 1/2 cup green candy melts (optional) Supply optional vibrant color and minty-themed decoration when melted and drizzled or topped, creating an attractive finish and slight additional sweetness. Melt carefully and use piping or drizzling techniques for even, controlled application.
Instructions
- In a large bowl, combine cereal, peanuts and marshmallows.: The bowl fills with a chorus of textures and a faint toasted note from the peanuts as you gently fold them into the rice krispie cereal . You should hear a light rustle when you stir, and the marshmallows will start to cling once warmed in the next step. This dry assembly helps you judge proportions before adding melted coating, which prevents the mixture from becoming soggy. A common mistake at this stage is overmixing and crushing the cereal, which reduces the desirable crisp snap. Use a large, roomy bowl so you can fold without pressing down the pieces, preserving their integrity.
- In a microwave-safe bowl, melt white almond bark according to package directions. Stir in peppermint oil.: When heating the white almond bark , melt in short bursts of ten to twenty seconds at medium power, stirring between each burst, until it becomes smooth and glossy. The surface should shimmer and move like thick cream. Once melted, stir in the tiny amount of peppermint oil , and you will notice a bright, cool scent lift up from the bowl. The reason for low, intermittent heating is to avoid overheating which can make the coating seize and grainy. If the coating appears clumpy, a brief low power stir will often bring it back; never keep blasting it at high power which ruins the texture.
- Pour melted almond bark over cereal mixture. Stir well.: As the warm almond bark cascades over the bowl, it glosses the dry components and the mixture begins to clump in shiny clusters. Use a sturdy spatula to fold the coating through the rice krispie cereal , ensuring each piece gets a light, even glaze. You should see everything take on a pale, uniform sheen and hear the mixture change from dry to tacky. Stirring thoroughly ensures structural stability when you scoop; insufficient coating will cause the scoops to fall apart. Avoid overworking the mixture because too much mixing can crush the cereal and make the final texture dense.
- Using a medium cookie scoop, drop rounded scoops onto waxed paper.: As you portion the mixture with a medium cookie scoop, the clusters should hold shape and feel firm but slightly yielding to the touch. Drop the rounded scoops onto waxed paper spaced a little apart so air circulates as they cool. The surface will flatten very slightly as the coating sets, and the bottoms should be smooth. A common issue here is packing the scoop too tightly which makes the centers undercoated and prone to falling apart; instead, press gently to form rounded mounds that still have a little surface texture.
- Melt chocolate chips and green candy melts and drizzle over krispies. Let sit until firm.: Melt the optional chocolate chips and green candy melts in separate containers using short microwave bursts, stirring until satin smooth. Transfer to piping bags or use a fork to create fine ribbons across the tops of each scoop. The contrast of dark ribbons and pale clusters adds visual interest and an extra layer of flavor. Work quickly because candy melts set fast; if the drizzle becomes too thick, a brief low power zap with stirring will loosen it. A frequent misstep is overheating the chocolate which causes it to seize and become grainy, so keep the heat gentle and intermittent.
- Store in an airtight container.: Allow the No Bake Mint Chocolate Krispies to rest undisturbed until the coatings are fully set, which usually takes a few minutes at room temperature depending on humidity. You will know they are ready when the surface is no longer tacky and the drizzle has a firm snap when tapped. This resting phase is crucial for clean handling and storage. If you try to move them too early they may smudge or lose shape, so give them the time they need to solidify and hold together.
- Store in an airtight container: Once firm, arrange the pieces in a single layer or with parchment between layers in an airtight container to preserve crispness. Stored properly, they keep their texture for several days at room temperature. Warm or humid environments can soften the coating, so choose a cool spot. A common storage mistake is stacking warm pieces which causes sticking and surface blemishes, so always let them fully cool before covering.
Notes
- Room temperature handling is important, work with slightly cooled but still pliable coatings to avoid burning and ensure smooth coverage.
- Control peppermint intensity by adding the peppermint oil in increments and smell between additions, it takes very little to make a big difference.
- Use dry roasted peanuts for depth, they add toasted flavor and crunch that balances the sweet coatings.
- Prevent sogginess by ensuring your spatula motions are gentle so the cereal stays intact and crisp in the final bites.
- Decorative drizzling becomes easier if you transfer melted chips and candy melts to a small squeeze bag for controlled, elegant lines.
- Storage tip Place parchment between layers when stacking to preserve presentation and keep surfaces pristine.