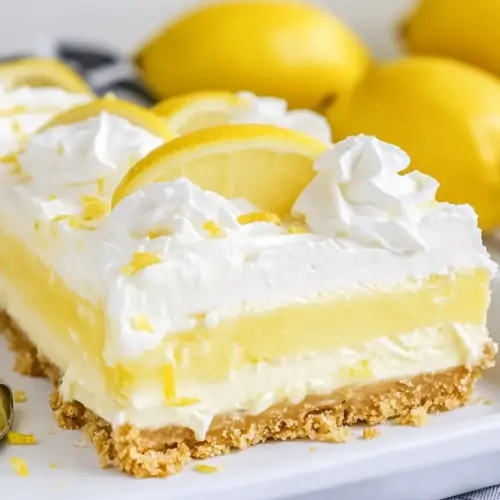
No Bake Lemon Pie
No Bake Lemon Pie is a creamy, bright dessert with a crunchy graham cracker crust and a light whipped topping. This easy no bake dessert comes together quickly and chills to perfect slices, making it ideal for summer gatherings or busy weeknight celebrations. Its tangy lemon flavor and airy texture make a refreshing choice that guests will request again.
Equipment
- Mixing Bowl
- Whisk
- Spatula
- 8×8 square baking dish
- Measuring Cup
- Microwave
Ingredients
- 1/2 cups salted butter Melted and slightly cooled to bind the crust together, providing moisture and a rich, buttery flavor that helps the graham crumbs clump into a firm base. Salted butter also contributes a hint of savory balance to the pie’s sweetness and improves texture for easier slicing.
- 1 3/4 cup graham cracker crumbs Finely crushed to form the structure of the pie crust, creating a sandy base that holds together when mixed with melted butter and pressed into the pan. Graham cracker crumbs add a toasty, slightly sweet backbone that complements the tart lemon filling.
- 1/4 cup granulated sugar Sprinkled into the crust mixture to enhance sweetness and help balance the tartness of the lemon filling; it also assists with slight caramelization flavors when combined with butter. Granulated sugar can be adjusted slightly for personal taste while maintaining the crust’s cohesion.
- 6.8 ounces instant lemon pudding mix (two 3.4-ounce packages) Instant lemon pudding mix used dry and prepared with milk to create the primary lemon-flavored filling; its thickening agents set quickly without baking, delivering bright citrus flavor. Using two 3.4-ounce packages ensures a full, tangy filling with the proper consistency for a no-bake pie.
- 2 cups whole milk (or 2% milk) Poured into the instant pudding mix to hydrate and activate the thickening agents, yielding a creamy, smooth filling; whole milk provides richer mouthfeel while 2% is a lighter alternative. Chilled milk helps the pudding set faster and keeps the filling cool for assembling the pie.
- 1 teaspoon lemon zest Zested finely to intensify fresh lemon aroma and add concentrated lemon oils that boost brightness without extra acidity; a teaspoon of zest gives a vibrant, natural citrus lift. Lemon zest also provides small flecks of color and a fragrant contrast to the sweet filling.
- 8 ounces Cool Whip (divided in half) Folded into part of the prepared pudding and used as a topping with the remaining portion to add airy lightness and creamy volume; dividing the Cool Whip ensures both a fluffier filling and a smooth finish. Frozen whipped topping helps maintain structure and a cool, dessert-like texture.
Instructions
- Place the butter in an 8×8 square glass baking dish and microwave for 30 to 45 seconds to melt the butter.: Warm, melted butter should glisten and steam just slightly when you remove it, releasing a warm, toasty butter aroma that will infuse the crust. Use a microwave safe dish that is clean and dry so the butter melts evenly, and stop heating as soon as it is fully liquid to avoid scorching. If the butter separates or seems too hot, let it sit for a minute to cool until tepid before adding crumbs, because overly hot butter can make the crust greasy. A common error is overheating and then adding cold crumbs, which can create clumps; stir gently to achieve a smooth, uniform liquid.
- Add the graham cracker crumbs and sugar directly into the baking dish and mix with the melted butter to combine.: As you stir, notice how the sandy crumbs begin to cling together into glossy, moistened sand, and the sweet scent of graham cracker and sugar becomes more pronounced. Use a sturdy spoon or spatula to fold the mixture until no dry streaks remain, ensuring an even distribution of butter. If you see dry pockets, press the mixture with the back of the spoon to incorporate them. Avoid over mixing to the point of becoming paste like, which can produce a dense crust rather than a crisp one.
- Press the graham cracker mixture evenly across the bottom of the baking dish and place in the freezer to firm up while preparing pudding.: Use the bottom of a measuring cup or a flat spatula to tamp the crust into an even layer, paying attention to the corners where gaps can form; you want uniform thickness for solid slicing. The crust should have a compact, slightly glossy finish when done, and it will stiffen quickly in the freezer, producing a clean snap when you slice. If you skip firming it in the freezer, the crust may crumble when you serve, so give it at least the few minutes needed to set before adding the filling.
- In a mixing bowl, whisk together the contents of the pudding packages, milk and lemon zest. Continue whisking until the pudding thickens.: As you whisk, the powder absorbs the milk and the bowl fills with a fresh lemon perfume from the zest, while the mixture thickens slightly. Whisk briskly in one direction to dissolve the instant mix completely, scraping the edges to prevent dry pockets. The goal is a smooth, silky batter with no lumps, and the mixture should begin to hold together as it activates. If you detect grit, continue whisking and scrape the bottom well; under mixing is the usual culprit for grainy texture.
- Scoop 1 cup of pudding from the mixing bowl and spread it evenly over the chilled graham cracker crust.: When you spread the first pudding layer, you'll feel the coolness of the crust and see a creamy, pale lemon layer appear, offering a neat contrast against the darker base. Use an angled spatula to glide the pudding into a thin, uniform sheet so the next layers sit level. If you press too hard you may disturb the crust, so work gently. A frequent mistake is adding too much at once and creating an uneven surface that makes the top layers slope, so measure the cup and spread with patience.
- Fold 1/2 of the container of whipped topping (4 ounces) into the remaining pudding in the mixing bowl. Spread this layer of pudding/whipped topping evenly over the pudding layer in the baking dish.: Folding should be slow and deliberate, creating soft streaks that gradually vanish, and resulting in a light, mousse like filling that is creamy and slightly billowy. The sound will be quiet, with gentle swooshes as the spatula moves, and the smell becomes sweeter and less concentrated. Take care not to over fold, which can deflate the aeration and make the texture heavy. If the mixture seems too runny, check that the pudding was fully mixed and that the whipped topping was not completely thawed to liquid.
- Gently scoop the remaining whipped topping into the baking dish and spread evenly. Be careful not to mix into the layers below.: As you smooth this lighter layer, look for a satiny finish and minimal air pockets, as these pockets can create weak spots when slicing. The contrast between the denser first pudding layer and this airy middle should be visible, and the aroma will be softer, cream balanced with lemon. Move slowly to preserve the texture, and if you spot bubbles, tap the dish gently on the counter to release them. A common slip is dragging a spatula too forcefully, which can tear the base layer beneath.
- Chill the lemon pie in the refrigerator or freezer until set. Top with lemon zest and serve.: This final cloud like topping should sit like a soft blanket, with feathered peaks if you wish. Spread with a light hand so you do not blend the layers; the visual separation is part of the charm. The topping should remain cool and hold its shape, providing an inviting contrast to the firmer layers beneath. If you apply too much pressure, the layers can merge and you will lose the signature layered appearance, so glide the spatula instead of pressing.
- Chill the lemon pie in the refrigerator or freezer until set: As the pie chills, the pudding will firm and the crust will lock into a sliceable texture, while the lemon aroma softens into a rounded, pleasant scent. I often chill in the refrigerator for several hours or overnight for the best texture, though a short stint in the freezer can speed the process if needed. Watch for the filling to become fully set, not jiggly in the center, before slicing. A typical misstep is slicing too early, which causes the filling to be loose and results in messy pieces, so be patient and allow adequate chilling time.
- Top with lemon zest and serve: The final touch of fresh lemon zest adds a burst of aromatic oil and a bright visual finish, enhancing the citrus profile. When you slice, use a warm, clean knife for smooth edges and wipe it between cuts for neat servings. The first forkful should present the combined textures of crisp crust, creamy pudding, and airy topping. If slices crumble, return the pie to chill longer to firm up before serving.
Notes
- Crust packing: Press the crust firmly and evenly using the bottom of a measuring cup to prevent crumbling when slicing and to give a satisfying crunch against the creamy filling.
- Milk choice: Use whole milk for a silkier, richer texture, but 2 percent works if you prefer a slightly lighter result without sacrificing structure.
- Whipped topping handling: Fold the whipped topping gently into the pudding to retain air, which is what gives the middle layer a mousse like lift; over mixing will flatten it.
- Chill overnight: If time allows, chill overnight to let flavors marry and ensure the pie slices cleanly and holds its shape at serving.
- Serving neat slices: Run a knife under hot water and dry it before each cut to produce tidy portions and avoid dragging the filling.