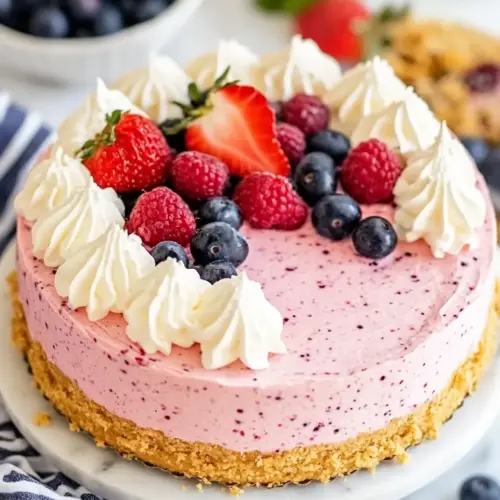
No Bake Berry Cheesecake
No Bake Berry Cheesecake is a creamy, airy dessert with a crisp graham crust and bright berry compote. This easy, no oven required treat combines smooth cream cheese filling and jammy berries for an impressive, crowd pleasing finish, ideal for warm weather entertaining or easy weeknight gatherings.
Equipment
- Springform Pan
Ingredients
- 2 cups graham cracker crumbs Provide a crunchy, sweet base for the cheesecake that holds together when combined with melted butter; press firmly into a pan to form an even crust. Add texture contrast to the creamy filling and help absorb some moisture from toppings to prevent sogginess.
- 7 tablespoons unsalted butter melted Bind together the graham cracker crumbs and sugar to form a cohesive crust; melted butter also adds richness and a tender bite. Ensure butter is warm enough to evenly coat crumbs for a stable crust that slices cleanly.
- 1/4 cup brown sugar or granulated sugar Sweeten and caramelize the crust slightly when mixed with crumbs and melted butter; brown or granulated sugar also contributes moisture and a hint of depth. Adjust amount for desired sweetness and texture in the base layer.
- 16 ounces frozen mixed berries can use fresh berries in a pinch Provide bright, fruity flavor and natural jammy texture once cooked or thawed; frozen mixed berries can be used directly for convenience, while fresh berries add firmer texture. Offer a colorful topping or swirl option that complements the rich cheesecake filling.
- 1/4 cup brown sugar Sweeten and thicken the berry topping when cooked; brown sugar adds a deeper, slightly molasses flavor compared with granulated sugar. Use as part of a compote or sauce to balance the tang of the cream cheese.
- 1/2 cup granulated sugar Sweeten the fruit mixture or filling with a neutral, clean sweetness that balances acidity and richness. Measure precisely to achieve the intended flavor without overpowering the dessert's delicate components.
- 3 tablespoons cornstarch Thicken fruit topping or sauce by absorbing liquid and creating a glossy, stable texture once heated; dissolve cornstarch in cold liquid before adding to avoid lumps. Use the specified amount to achieve a spreadable compote that sets as it cools.
- 24 ounces cream cheese 3 blocks, full fat cream cheese Provide the creamy, tangy base of the cheesecake filling and determine the overall richness and mouthfeel; full-fat blocks yield a smooth, stable consistency. Soften to room temperature for easier mixing and to prevent lumps in the batter.
- 3/4 cup granulated sugar Add sweetness to the cheesecake filling while helping achieve a balanced flavor profile against the tang of cream cheese. Dissolve completely into the batter to maintain a smooth, even texture and consistent sweetness.
- 1 teaspoon vanilla extract Impart warm, aromatic flavor that enhances the creamy filling and pairs well with berries and vanilla-scented crusts. Add at the end of mixing to preserve its delicate fragrance and avoid overmixing which can diminish aroma.
- 1 cup heavy whipping cream Whip into soft peaks to create a light, airy texture in the no-bake filling and contribute body and stability. Chill well before whipping and fold gently into the cream cheese mixture to maintain volume and a silky mouthfeel.
Instructions
- In a large bowl, combine melted butter, graham cracker crumbs, and brown sugar. Stir with a spatula until melted butter is completely incorporated.: The bowl will smell warmly of butter and toasted crumbs, and you should see the mixture clump slightly when pressed between fingers, indicating it will bind into a crust. This step matters because an evenly moistened crumb mixture compacts uniformly, preventing a crumbly base. A common mistake is adding too much butter which makes the crust soggy, so add the butter gradually and look for a sandy, slightly damp texture. If lumps of dry crumbs remain, give it a few more stirs until homogeneous.
- Line the bottom of a spring-form pan with parchment paper and scoop your graham cracker mixture in.: The parchment makes removal clean and safe, while the crumb mound should sit centered in the pan, ready to be spread. This step sets you up for precise shaping and keeps the edges neat. Forgetting to line the pan can lead to stuck crust edges, so always place parchment beneath the crumbs. Visual cues include an even mound ready for pressing and no loose crumbs around the rim.
- Using the bottom of a glass or a measuring cup, press the mixture evenly into the springform pan, taking the mixture up the sides about 3/4 of an inch to an inch.: As you press, you will hear slight compacting sounds and see the crumbs shine as butter distributes; the surface should be flat and firm. This technique ensures slices hold together and the crust supports the filling without collapsing. Applying uneven pressure leads to thin spots that crumble later, so rotate the pan and press methodically. A well pressed crust will not feel loose when tapped.
- Place in the freezer until you are ready to add your filling.: Chilling firms the butter and sets the crumb matrix, producing a crisp texture once chilled. The freezing step also shortens overall assembly time later. A typical oversight is not chilling long enough, which makes pressing the filling distort the crust; keep it until noticeably firm to the touch.
- In a saucepan over medium heat, combine frozen berries, brown sugar, granulated sugar and cornstarch. Stir until berries are coated and mixture has come to a simmer.: As the mixture warms, it will begin to steam and release fruity aromas, and you will see glossy juices appear. This initial simmer dissolves sugars and activates the cornstarch to thicken. Stir constantly at this stage to avoid burning the sugars on the pan surface, which is a common misstep. The compote should bubble lightly, not roar, signaling the right heat level.
- Reduce heat to low and simmer, stirring frequently, until berries break down and the mixture becomes thick, about 6 to 10 minutes. Take a potato masher and mash the larger berries if necessary.: The sound shifts to gentle bubbling and the texture moves from whole fruit toward a jammy consistency, while the aroma becomes intensely berry forward. Mashing ensures uniform texture so large fruit pieces do not create unwelcome gaps in the filling. Over simmering can make the compote overly dry, while undercooking leaves watery spots, so aim for a spoon thick coating on the back of a spoon.
- Once thickened, remove from heat and allow to come to room temperature.: Cooling is essential to prevent the chilled cream cheese filling from breaking or becoming watery. As the compote cools it becomes glossier and will stop releasing steam, a good visual cue it is ready. Rushing this step risks a runny filling, so be patient and leave it until it is no longer warm to the touch.
- In a large mixing bowl or the bowl of a stand mixer, beat the cream cheese until smooth and creamy.: The cream cheese should become aerated and free of lumps, with a silky sheen under the beaters. This smooth base ensures the filling never tastes chalky, making texture the star. Working with cold cream cheese is a frequent error, so always bring it to room temperature first for a lump free mix.
- Add in the vanilla extract and granulated sugar. Mix until incorporated.: The aroma of vanilla extract will bloom and the sugar will dissolve, creating a balanced, slightly sweetened foundation. This matters because evenly incorporated sugar ensures consistent sweetness throughout each bite. If you add sugar too quickly it can leave a grainy mouthfeel, so mix until the texture is uniformly creamy.
- Add in the cooled berry compote and mix until fully combined.: When the compote blends in, you will see ribbons of pink and purple fold through the pale filling, and a fruity scent will rise. This integration distributes brightness evenly and prevents pockets of overly sweet or tart spots. Be mindful not to add warm compote, which can destabilize the filling and cause separation; always ensure it is cooled.
- In a smaller mixing bowl, beat the heavy whipping cream with a whisk attachment until stiff peaks form. Fold in the whipped cream to the cream cheese mixture using a spatula.: The whipped heavy whipping cream adds lift, turning the filling into a light, mousse like texture while still setting firmly in the fridge. Listen for the swoosh of the whisk and watch peaks hold their shape when lifted. Over whipping can create grainy butter, so stop when peaks are firm but not dry. Folding gently preserves air, otherwise the filling will deflate and feel dense.
- Remove the crust from the freezer.: It will feel solid and cool to the touch, providing a stable platform for the filling. This step ensures the filling sits neatly without pushing into the crumb. A common mistake is assembling on a warm crust, which can cause the base to become soft and uneven; always ensure the crust is firm.
- Gently scoop in the cheesecake filling into the center, using an offset spatula to evenly disperse the mixture.: As you spread, the filling should glide smoothly and settle into a level surface; the spatula will leave soft trails that even out with gentle passes. Even distribution prevents dense zones or air pockets, which affect slicing. Pushing too hard can indent the crust, so use gentle, broad motions for a clean surface.
- Once the filling is evenly layered in the springform pan, cover the springform with plastic wrap or beeswax wrap and place in the fridge for 6 to 8 hours minimum (or overnight) so it can set.: During chilling the filling firms and flavors marry, transforming a soft mousse into a sliceable cheesecake. You will notice the surface become less tacky and more cohesive as it sets. The error to avoid is insufficient chilling, which results in sloppy slices, so give it the recommended time for best texture.
- Once cheesecake is set, garnish with whipped cream and fresh berries. Serve and enjoy!: Garnishing adds a final visual and textural lift, with fresh berries offering bright, juicy bursts against the creamy filling. Present on a chilled plate for clean cuts and use a hot knife for neat slices. Cutting too soon leads to collapsing slices, so patience here rewards presentation and flavor.
Notes
- Make the crust gluten free by swapping in a gluten free graham cracker crumb alternative; press and chill as usual to maintain structure.
- Intensify berry flavor by simmering the compote slightly longer to concentrate juices, but watch closely so it does not become too stiff.
- Less sweet option reduce the granulated sugar in the filling by one quarter cup and taste before folding in the whipped cream, adjusting to preference.
- Swap berries use all strawberries or a mix of berries based on seasonality; fresh berries may need an extra minute or two of simmering to break down.
- Make ahead and freeze assemble fully, freeze for one hour for clean slicing, then store covered; thaw in the fridge for an hour before serving for best texture.
- Decor variations swirl a few tablespoons of whole berry compote on top before chilling for a marbled look that is visually appealing.