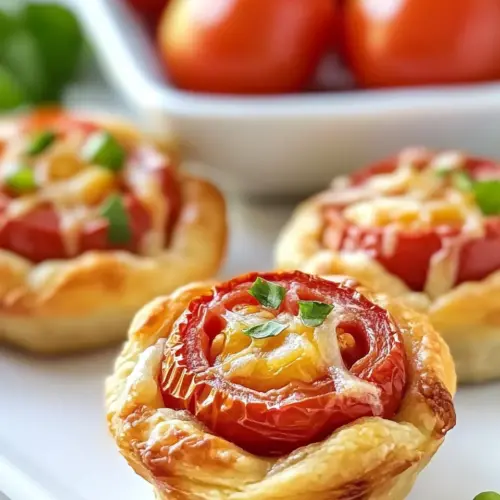
Muffin Pan Tomato Tarts
Muffin Pan Tomato Tarts are crispy, cheesy, and wonderfully easy to make, pairing flaky puff pastry with juicy cherry tomatoes and melted cheeses for an irresistible bite. Perfect for a relaxed summer brunch or an easy weeknight snack, these tarts balance creamy mayonnaise, savory cheddar cheese, and stretchy mozzarella cheese topped with fresh basil. Make them for a crowd and watch them disappear.
Equipment
- Oven
- Muffin Pan
- Mixing knife
- Cutting Board
Ingredients
- 1 (17.3-oz.) pkg. frozen puff pastry, thawed Thawed and rolled to fit muffin cups, provides a flaky, buttery base that puffs and separates into layers during baking. Adds structure and an elegant texture contrast to the savory filling, while absorbing some of the tomato juices to prevent sogginess. Can be trimmed and pressed to create individual tart shells that are easy to handle and serve.
- 1/2 cup mayonnaise Creamy binder that enriches the filling with tangy, smooth fat to help hold cheeses and tomatoes together. Contributes moisture and flavor, preventing the pastry from becoming dry while also adding a subtle richness that complements the cheeses. Helps create a glossy surface and slightly browned top when baked.
- 2 tsp kosher salt Salty seasoning used sparingly to enhance and balance the overall flavors of the tart without overwhelming the delicate ingredients. Aids in drawing out tomato juices and accentuating the savory notes of the cheeses and mayonnaise. Evenly distributed, it ensures each bite is well-seasoned while also assisting in flavor development during baking.
- 1 tsp pepper Ground spice that provides subtle heat and aromatic complexity to the filling and tomatoes. Balances richness from mayonnaise and cheeses, and brightens the overall flavor profile with mild pungency. Can be adjusted to taste to control the level of sharpness in the finished tarts.
- 1 cup shredded cheddar cheese Sharp, tangy shredded cheese that contributes bold flavor and adds a salty, savory element to each tart. Melts into a slightly oily, flavorful layer that combines with mozzarella for complexity and helps create appealing browning on top. Works as part of the binding matrix with mayonnaise to keep fillings cohesive.
- 1 cup shredded mozzarella cheese Mild, stretchy shredded cheese that melts smoothly to create a creamy, cohesive filling and pleasant mouthfeel. Blends with cheddar to balance sharpness and produce an appealing meltiness that strands when pulled. Helps to fill gaps and support the tomatoes while providing a neutral dairy base.
- 3 cup multicolored cherry tomatoes, halved Vibrant, halved cherry tomatoes that offer juicy bursts of sweet-tart flavor and attractive color contrast. Release some juice when baked, contributing bright acidity that cuts through the richness of cheeses and mayonnaise. Multicolored selection enhances visual appeal and provides slight variations in sweetness and texture.
- fresh basil, chopped Aromatic herb, chopped finely to add fresh, peppery-sweet notes and bright green color as a finishing touch. Scattered over warm tarts to provide herbal lift and contrast to the richness of the filling, enhancing overall freshness. Can be mixed into the filling or used as a garnish to intensify basil flavor.
Instructions
- Preheat oven to 400°F. Spray 2 muffin pans with cooking spray.: As the oven warms, you should notice a faint dry heat and the sound of the fan or element cycling, which signals that the environment is ready to puff the pastry. Proper preheating ensures reliable rise and even browning, which matters for a crisp base that holds the filling. A common mistake is placing the tarts in an oven that is still warming, which can cause uneven puffing and soggy centers. If your oven runs hot or cool, use an oven thermometer to confirm accuracy before baking.
- Unfold pastry sheets. Spread mayonnaise on each pastry sheet; sprinkle each sheet with salt and pepper.: When you spray the pans, there is a subtle sheen on the metal that prevents sticking and helps the pastry release cleanly. Ensuring full coverage in the cups, including the edges, reduces the risk of the pastry adhering and tearing. Avoid over spray that pools in the cups, as excess oil can fry the bottoms and change texture. If the pastry starts to cling when you remove the tarts, gently run a thin spatula around the edges to loosen them.
- Cut each pastry sheet into 9 (3-inch) squares.: Unfolding the sheets produces a delicate papery sound, and you want to work on a cool surface to prevent the butter layers from melting into a sticky mess. Handle gently to keep the laminated layers intact, which is what yields flakiness in the oven. Rushing or stretching the pastry can tear it, leading to uneven pockets and compromised rise. If the pastry resists unfolding, allow a few more minutes at room temperature until it relaxes.
- Press squares into muffin pans. Divide cheese and tomatoes among tarts.: The mayonnaise should be spread in a thin, even layer that covers the pastry without soaking it, with the salt and pepper distributed so each square will be seasoned. You will notice a glossy surface when the mayo is applied correctly, which helps the cheeses adhere and the top brown attractively. A typical error is over application, which leads to a limp base, so use just enough to coat. If you see pooling or sogginess, blot gently with a paper towel before cutting.
- Bake for 20 minutes, until golden brown. Top with torn fresh basil.: Cutting into neat squares creates uniform cups that bake evenly, and the precise size ensures each tart fits the muffin tin and has the right pastry to filling ratio. A sharp knife or pizza cutter will give clean edges which puff uniformly. Dull tools can compress the layers and cause ragged edges that puff unevenly. Keep your cuts straight and consistent to avoid some tarts being oversized or undersized.
- Press squares into muffin pans: Pressing each square into the cups forms the shell that will cradle the filling, and you should feel the pastry conform to the pan with gentle pressure along the sides. Work quickly so the pastry stays cool and retains its layers. If you press too aggressively you can compress the layers and reduce flakiness, so be firm but gentle. If any seams overlap too much, tuck them smoothly to avoid thick spots that bake differently.
- Divide cheese and tomatoes among tarts: When you add the cheeses and tomato halves, listen for the faint settling sounds as ingredients settle into the pastry cups, and watch for even distribution so every tart has an equal balance. The mixture should sit slightly proud of the pastry edge but not overflow. Overfilling causes cheese to bubble over and create a sticky bake; under filling yields dry tarts. Arrange the tomato halves cut side up to show color and allow juices to concentrate rather than leak excessively.
- Bake for 20 minutes until golden brown: During baking you will smell a toasty, buttery aroma as the pastry browns and the cheeses melt and begin to caramelize. Visual cues include rising edges, bubbling cheese, and a deep golden brown hue on the pastry. This color indicates Maillard reaction, which is crucial for flavor. A common mistake is pulling them out too early, leaving underbaked centers and pale pastry. If the tops brown too quickly, tent loosely with foil to allow the centers to finish cooking without burning the edges.
- Top with torn fresh basil: Right after the tarts leave the oven, adding chopped basil preserves the herb's bright aroma and color, and you will notice an immediate lift in fragrance when the leaves meet the hot pastry. The basil softens slightly from the residual heat and provides a fresh contrast to the melted cheeses. Adding the herb before baking wilts it and dulls the flavor, so always finish with fresh leaves. If you prefer a milder herb presence, add the basil sparingly and taste as you go.
Notes
- Cheese ratio swap Try adjusting the balance between cheddar cheese and mozzarella cheese to emphasize either sharper flavor or creamier melt, keeping the total amount the same so bake times remain consistent.
- Tomato arrangement Arrange the tomato halves cut side down for a caramelized top, or cut side up to keep them juicier, either choice changes texture without altering technique.
- Mayonnaise spread Apply a very thin layer of mayonnaise to prevent soggy pastry while still delivering richness, thicker layers will weigh down the shell and affect crispness.
- Basil timing Always add fresh basil after baking to preserve its aroma and color, adding it earlier will cause the leaves to darken and lose brightness.
- Muffin tin size Use standard muffin cups for snack sized tarts or mini muffin tins for bite sized appetizers, adjusting filling amounts but keeping baking time similar while watching for faster browning in smaller tins.