Mountain Mama Icebox Cake
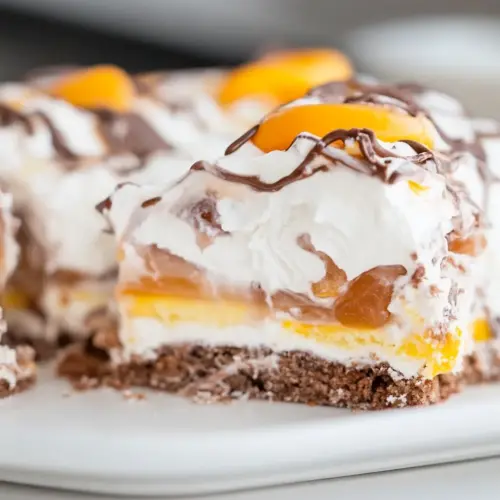
Mountain Mama Icebox Cake is a creamy, layered no bake dessert with a buttery pecan crust, tangy cream cheese, and alternating chocolate and vanilla pudding layers topped with fluffy Cool Whip. It is easy to assemble, crowd friendly, and perfect for make ahead entertaining when you need a show stopping sweet without fuss. Try it for your next gathering for a nostalgic, reliably delicious treat.
Equipment
- 9 x 13-inch pan
- Medium Bowl
- Electric Mixer
- Whisk
Ingredients
- 1 cup (125 g) all-purpose flour Provide structure and bulk to the crust and layers, contributing gluten for tenderness when combined with fat; sift or whisk to remove lumps and ensure even incorporation for a light crumb. Measure by weight for consistent results and avoid overmixing once combined to maintain a tender texture.
- 1 cup (99 g) finely chopped pecans Impart a rich, nutty flavor and crunchy texture to the crust and layers while adding natural oils that enhance mouthfeel; finely chop for even distribution and to prevent large chunks in the crust. Toast lightly if desired to deepen flavor, then cool before mixing with other crust ingredients.
- 1/2 cup (113.5 g) salted butter, melted Bind the crust ingredients together by coating flour and pecans with fat, producing a cohesive base when melted and cooled slightly before pressing; salted butter also adds savory depth that balances sweetness. Ensure melted butter is warm but not hot to avoid melting other components when combined.
- 8 ounces (226.8 g) cream cheese, at room temperature Provide creamy richness and slight tang to the filling, lending body and stability when whipped with sugar; bring to room temperature for smooth, lump-free blending and to achieve an even texture. Beat until smooth to incorporate air and ensure a silky mouthfeel in the assembled cake.
- 1 cup (120 g) powdered sugar Add sweetness and a fine texture to the filling, dissolving easily into softened dairy for a smooth, stable cream; sift if necessary to remove any lumps and prevent graininess. Adjust amount slightly to taste, keeping in mind that other components like pudding mixes contribute sweetness.
- 8 oz (226.8 ml) container Cool Whip Lighten and aerate the filling for a whipped, mousse-like consistency while adding sweetness and a soft frozen texture when chilled; fold gently into the cream cheese mixture to preserve volume. Keep chilled until assembly to maintain stability and prevent separation.
- 2 cups (488 ml) milk Provide the liquid base to hydrate instant pudding mixes and create smooth, set fillings; use cold milk for faster thickening and proper consistency. Measure accurately and whisk into pudding powder to avoid lumps and ensure even setting.
- 6.8 oz (192.78 g) instant chocolate pudding, (two packages) Deliver chocolate flavor and thickening power to form a stable, fudgy pudding layer; instant pudding sets quickly with milk and yields a glossy, sliceable texture. Whisk vigorously to fully dissolve the powder and prevent graininess before layering.
- 2 cups (488 ml) milk Supply additional liquid for the second pudding layer, ensuring proper hydration and consistency for the French vanilla pudding; cold milk promotes faster thickening and smooth texture. Measure precisely to maintain balance between layers and to prevent overly runny filling.
- 6.8 oz (192.78 g) instant French vanilla pudding, (two packages) Provide creamy vanilla flavor and structure as a set pudding layer that contrasts the chocolate, offering sweetness and stability in the frozen cake; instant pudding flakes dissolve into milk to form a firm filling. Stir until fully thickened before layering to avoid separation during assembly.
- 8 oz (226.8 ml) container Cool Whip Add a light, airy, and sweet whipped topping to finish the cake, providing creamy texture and an easy-to-spread surface that freezes well; fold gently into fillings or spread on top for a smooth finish. Keep refrigerated or frozen depending on serving timeline to retain firmness and shape.
Instructions
- Make Layer 1 (the Crust): Preheat oven to 350 degrees F. In a medium bowl, stir together the flour, pecans and butter until the mixture is evenly moistened. Press evenly into the bottom of a 9 x 13-inch pan. Cook for 20 minutes, then allow to cool completely.: Preheat oven to 350 degrees F. : The kitchen will fill with a warm, buttery aroma as you press the crumbly mixture into the pan, which signals the beginning of structure for the whole cake. After stirring the all purpose flour , chopped pecans and melted butter until evenly moistened, you should feel a damp, sandy texture that holds when squeezed; that tactile cue tells you the crust will press together and bake into a cohesive base. As it bakes for 20 minutes it will develop a light golden tint and a toasted nut scent, which is exactly what you want because that flavor underpins every bite. Allowing it to cool completely is crucial, because a warm crust can melt the next layer and ruin your neat strata. A common mistake is packing the crust too thinly, which makes the cake fragile when sliced, so press it into an even thickness across the pan to avoid weak spots.
- Make Layer 2: Using an electric mixer, beat together the cream cheese and powdered sugar until smooth and blended. Spread in an even layer over the cooled crust.: Using an electric mixer, beat together the cream cheese and powdered sugar until smooth and blended. : You will notice the cream cheese softening into a silky paste as you mix, and the powdered sugar should integrate almost instantly, leaving a glossy, lump free texture that spreads easily. This layer provides tang and a firm bed for the lighter toppings, so its consistency matters; if it feels grainy or uneven, continue beating briefly and scrape the bowl to ensure uniformity. Spread it in an even blanket over the fully cooled crust, smoothing to the edges so the next layers sit flat. Watch for signs of overbeating, which can introduce air bubbles and make the layer less stable, so stop when it is just smooth and well combined.
- Make Layer 3: Spread the Cool Whip over the cream cheese layer.: Spread the Cool Whip over the cream cheese layer. : The first container of Cool Whip should feel cool and pillowy, and as you gently spread it you'll see a soft, glossy finish that lightens the overall mouthfeel. This cushion prevents the denser puddings from sinking into the cream cheese , and it also tempers the tang with a sweet, neutral note. Keep strokes gentle to preserve the airy texture, and smooth to the edges for tidy slices later. A frequent slip is working with softened topping, which becomes too loose and will not hold the puddings; always keep the topping chilled until you are ready to spread.
- Make Layer 4: In a medium bowl, whisk together the milk and the packages of chocolate pudding mix for 2 minutes, until thick and smooth. Spread in an even layer over the Cool Whip. (It may mix a little with the Cool Whip, that's okay!): In a medium bowl, whisk together the milk and the packages of chocolate pudding mix for 2 minutes, until thick and smooth. : As you whisk the milk into the instant pudding, you will see it transform from a runny liquid to a glossy, thick custard within about two minutes; this change in viscosity is your visual confirmation that the starches have hydrated properly. The aroma will deepen to a rich chocolate scent, and the surface should show no streaks or lumps. Spread it evenly over the Cool Whip , accepting a little blending at the edge since gentle mixing keeps the layers integrated in the mouth. The reason this technique matters is that fully hydrated pudding sets to a stable texture that slices cleanly, avoiding weepy or runny layers. Avoid under whisking which leaves grainy pockets, and do not over-whisk which can make it too stiff for spreading.
- Make Layer 5: In a medium bowl, whisk together the milk and the packages of French vanilla pudding mix for 2 minutes, until thick and smooth. Spread in an even layer over the chocolate pudding layer.: In a medium bowl, whisk together the milk and the packages of French vanilla pudding mix for 2 minutes, until thick and smooth. : The French vanilla will thicken and emit a warm, creamy scent as you whisk, creating a pale, glossy custard with a silkier mouthfeel than the chocolate. Spreading it over the chocolate layer creates contrast in both flavor and color, and it should hold in a distinct band if it has proper thickness. This layer lightens the overall dessert and helps balance the deeper chocolate notes, so take care the pudding is not too loose before spreading. A typical error at this stage is using warm milk, which can prevent the pudding from setting correctly, so always start with cold milk .
- Make Layer 6: Spread the container of Cool Whip evenly over the top of the French vanilla pudding layer. Garnish with mini chocolate chips and chopped pecans, if desired.: Spread the container of Cool Whip evenly over the top of the French vanilla pudding layer. : The final Cool Whip top will create a smooth, luminous cap that seals the pudding layers and gives the cake its classic look. As you smooth it, aim for an even finish so each slice reveals tidy strata, and consider garnishing with texture like mini chocolate chips or chopped pecans for visual interest. Refrigeration for at least 30 minutes allows the layers to marry and the puddings to set fully, yielding cleaner slices and a firmer mouthfeel. Avoid serving immediately, because under chilled layers can slide and weep; patience here rewards you with a composed, sliceable dessert.
- Refrigerate for at least 30 minutes before serving. Leftover cake can be stored, covered, in the refrigerator for up to 4 days.: During refrigeration the puddings will firm and the textures will harmonize, producing that signature icebox cake mouthfeel where creamy and crunchy meet. You should notice the surface chill and slightly contract, and when sliced the layers keep their shape, providing satisfying fork work. Leftovers stored covered in the fridge for up to 4 days retain their texture best when kept cold; room temperature storage will soften the structure and alter the eating experience. A common misstep is slicing too soon, which leads to squashed pieces and mixture spreading on the plate, so give it the rest it needs for clean presentation.
Notes
- Softening the cream cheese: Remove the cream cheese from the fridge 30 to 60 minutes ahead so it blends smoothly with the powdered sugar, avoiding lumps that can mar the second layer.
- Toasting pecans: Lightly toast the chopped pecans in a dry skillet for a few minutes, stirring constantly, until fragrant; this amplifies their flavor but be vigilant so they do not burn.
- Measure flour correctly: Spoon the all purpose flour into the measuring cup and level it with a knife to prevent packing, which can make the crust dense instead of crumbly and tender.
- Whisk puddings fully: Whisk the instant pudding mixes with cold milk for the full two minutes called for, creating a glossy, thick consistency that spreads without running into the layer below.
- Chill between steps if warm kitchen: If your kitchen is warm, briefly chilling the assembled pan between major layers keeps the structure stable and prevents sliding.