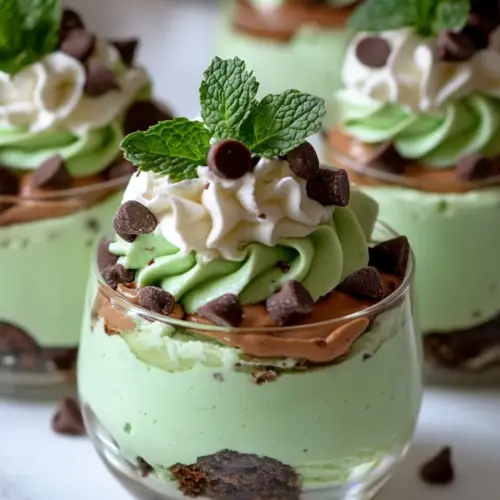
Mint Chip Cheesecake Mousse
Mint Chip Cheesecake Mousse is a creamy, airy dessert that combines whipped heavy cream and tangy cream cheese with crunchy Oreo crust and chopped semi sweet chocolate. Bright mint and peppermint flavors mingle with silky texture to create an easy make ahead treat, perfect for gatherings or a special weeknight dessert, and it looks as pretty as it tastes.
Equipment
- Mixing Bowl
- Food Processor
- electric hand mixer
- Microwaveable bowl
- Spatula
- Piping Bag
Ingredients
- 13 (150 g) regular Oreos, finely crushed in a food processor Finely crushed to form a sturdy, flavorful base that provides chocolatey texture and structure for the cheesecake mousse crust; mixes easily with melted butter to bind and creates contrast with the creamy filling.
- 2 tbsp (28 g) butter, melted Melted to bind the crushed cookies into a compact crust; adds richness and helps the base hold its shape when chilled or sliced.
- 2 tbsp (30 ml) cold water Cold water used to bloom the gelatin powder, ensuring it dissolves fully and sets the mousse to a silky, stable consistency without altering flavor.
- 1 1/2 tsp gelatin powder Bloomed and dissolved to provide structure and stability to the mousse; sets the cream cheese mixture gently so the airy texture holds its shape when chilled.
- 1 1/2 cups (350 ml) heavy cream Whipped to soft peaks to incorporate air and lightness into the mousse; contributes richness, creaminess, and a smooth mouthfeel while helping the dessert hold volume.
- 2 (8 oz) pkg. cream cheese, softened Softened to a smooth, spreadable texture to form the tangy, creamy foundation of the mousse; provides body, flavor depth, and balances the sweetness.
- Green and yellow food coloring (optional) Used sparingly to tint the mousse for a classic mint-chip appearance; adds visual appeal without affecting flavor when omitted or adjusted.
- 1 tsp mint extract Added for clear, concentrated mint flavor that defines the dessert’s profile; balances sweetness and complements the chocolate components.
- 1/2 tsp peppermint extract Added for a brisk, cooling peppermint note that enhances the mint profile; used in small quantity to avoid overpowering the extract from the mint.
- 1 1/2 cups (200 g) powdered sugar, divided Divided to sweeten the cream cheese mixture and adjust sweetness to taste; powdered form dissolves smoothly for a silky texture in the mousse.
- 1 (3.5 oz) bar good quality semi-sweet chocolate, finely chopped (or more to taste) Finely chopped to create rich, semi-sweet chocolate chips dispersed throughout the mousse; adds texture contrast and a bittersweet balance to the mint and cream.
- Sweetened whipped cream, mint leaves and finely chopped chocolate for garnish (optional) Used as optional garnishes to finish and enhance presentation; whipped cream, mint leaves, and finely chopped chocolate provide extra texture, freshness, and visual appeal.
Instructions
- In a mixing bowl stir together crushed Oreos and butter, divide mixture among 8 small dessert cups and gently press into an even layer.: You will notice a fragrant, chocolaty aroma as the Oreos meet the warm melted butter , and when you press the crumbs into the bottoms of the cups they should compact into an even, firm layer that holds together when lifted. The sensory cue to look for is a uniformly glossy sheen where the butter has coated the crumbs, and the crust should feel tacky, not greasy. This pressing step matters because a loose crust will fall apart when you spoon the mousse on top, so press firmly using the back of a spoon or a small measuring cup to tamp it evenly. A common mistake is not compacting enough, which leads to crumbly bases, so take an extra 15 to 30 seconds per cup to ensure a solid foundation.
- Add water to a small bowl then sprinkle gelatin evenly over top, let rest 5 - 10 minutes.: This blooming process allows the gelatin granules to hydrate and swell, producing a slightly firm, opaque gel when touched. You will feel tiny, soft granules absorb the cold water , and visually the surface will look speckled and thicker than plain water. Blooming is essential for even dissolution later, because if gelatin is added dry to hot liquids it can clump. Avoid the pitfall of rushing this step, as inadequately bloomed gelatin will yield uneven texture in the mousse.
- Meanwhile, pour heavy cream into a medium mixing bowl and whip until soft peaks form. Add 1/4 cup (35 g) of the powdered sugar and whip until stiff peaks form (shake excess on beater blades into bowl, no need to rinse), set aside.: As you beat the heavy cream , pay attention to how it transforms from glossy to billowy; soft peaks will gently fold over, while stiff peaks will stand straight when the beaters are lifted. After adding the 1/4 cup of powdered sugar , the cream will take on a slightly sweeter aroma and will become firmer. The sound of the mixer will change from a high pitched to a deeper, more resistant hum as the cream thickens. This whipped cream is the lift of the mousse and overbeating can turn it grainy or into butter, so stop as soon as you reach stiff peaks. A common error is to under whip, which leads to a runny mousse, or to over whip, which creates a curdled mouthfeel.
- Add cream cheese to a separate mixing bowl and mix with electric hand mixer until smooth and fluffy, about 2 minutes. Add remaining 1 1/4 cups (164 g) powdered sugar and mix until combined.: When you beat the softened cream cheese , aim for a light, pillowy texture with no visible lumps. The mixture should smear smoothly across the bowl and smell tangy yet sweet once the powdered sugar is incorporated. The rhythm of the mixer will feel even and the bowl sides should be scraped periodically to ensure homogeneity. This step builds the cheesecake character of the mousse, and if the cream cheese is too cold it will stay lumpy, so always start with it at room temperature. A frequent mistake is skipping the thorough mixing and ending up with pockets of unblended cream cheese in the final mousse.
- Add in mint and peppermint extract, and food coloring if using and mix until combined, set aside.: The extracts will perfume the bowl immediately, releasing a cooling, minty aroma that can become intense quickly. Adding them now lets the aromatic oils integrate evenly into the sweetened cream cheese base before the whipped cream is folded in. If you choose to use food coloring, add a few drops and stir until the color is uniform; the visual cue is a consistent pastel green. Be cautious with extracts, particularly the peppermint extract , because a little goes a long way; adding too much can make the mousse taste medicinal. A standard slip up is over flavoring, so I often start with slightly less and taste, then adjust.
- Heat gelatin mixture in microwave on high power for 30 seconds then remove and whisk 1 minute to ensure it dissolves well.: After blooming, heating the gelatin briefly will transform it from a cloudy gel to a clear, viscous liquid. Heat until you see it shimmer and steam slightly, but do not let it boil, as boiling can degrade gelatin's setting power. Whisking after heating helps fully dissolve any remaining granules and cools small hot spots. The tactile sign that it is right is a smooth, glossy liquid without specks. Overheating or boiling the gelatin can result in a weaker set, so resist the urge to extend the microwave time.
- Let cool 3 minutes (not longer or it may start to set) then pour gelatin mixture into cream cheese mixture and immediately blend with hand mixer to combined.: The gelatin should be warm but not hot, and when poured it will slightly loosen the cream cheese mixture. Immediately blending ensures it disperses evenly before it begins to thicken. You will see the batter take on a slightly more fluid texture and a subtle gloss from the gelatin. Timing is key, because if the gelatin cools and begins to gel you will get streaks or lumps. A typical mishap is waiting too long and having the gelatin set on contact, which creates uneven texture.
- Add whipped cream mixture and chopped chocolate to cream cheese mixture and fold just until evenly combined.: At this stage, the whipped heavy cream brings airiness back into the base and the chopped chocolate offers texture. Folding should be done with a gentle hand using a spatula, making broad, slow motions to preserve volume. You want the mixture to look uniformly light green with specks of dark chocolate , and you should hear only soft swishing sounds. Overmixing will deflate the mousse and produce a dense result, while undermixing will leave streaks of cream. Avoid vigorous stirring which knocks out the air you just worked to create.
- Pour mixture in batches into a piping bag and pipe mousse over Oreo crust layer (or just spoon it into cups). Chill 3 hours.: Piping allows for neat presentation and helps the mousse sit atop the crust without compressing it. As you fill the cups, watch for a smooth, satiny surface on each dollop; small air pockets are fine, but large gaps indicate the mousse was overfolded. If spooning, use gentle scoops and level the tops with a spoon to create an attractive finish. A common error is overfilling, which can make chilling uneven and messy when serving.
- Serve chilled and if desired (just before serving) pipe sweetened whipped cream over top, garnish with mint and chopped chocolate.: During chilling the mousse firms and flavors meld, producing a pleasant, spoonable set that holds a piped shape. You will notice condensation on the cup exteriors if your fridge is cool, and the surface of the mousse will become slightly denser to the touch. This resting time is crucial because it allows the gelatin to fully set while the cream cheese and extracts marry. A mistake to avoid is cutting short the chill time, which yields a runny mousse that will not pipe or hold garnish well.
- Serve chilled and if desired (just before serving) pipe sweetened whipped cream over top, garnish with mint and chopped chocolate: When you bring the cups out, they should feel cool and the mousse should hold a defined shape. Piping fresh sweetened whipped cream adds a fresh cloud on top, and sprinkling extra chopped chocolate or a tiny mint leaf provides contrast and color. Serve immediately after garnishing for best texture, because whipped cream and garnishes lose their lift if left too long. The main pitfall is garnishing too far in advance, which can lead to soggy or wilted toppings.
Notes
- Room temperature is important Make sure the cream cheese is soft before beating to avoid lumps and to achieve a perfectly smooth base.
- Bloom gelatin properly Sprinkle gelatin over cold water and let it rest to fully hydrate, this prevents gritty spots and ensures even setting.
- Whip cream to the right stage Aim for stiff peaks after adding the first portion of powdered sugar, then stop immediately to avoid over whipping into butter.
- Adjust mint cautiously Start with the recommended extracts and add more sparingly after tasting, especially with peppermint extract which is potent.
- Chop chocolate finely Small shards of semi sweet chocolate distribute evenly and give texture without large hard bites, enhancing the mint chip effect.