Mini Vanilla Bean Cakes
Mini Vanilla Bean Cakes are tender, fragrant little treats with a pillowy crumb and a silky butter frosting, perfect for spring gatherings and sweet gift boxes. The scent of real vanilla bean and the creamy frosting create a nostalgic, comforting bite that feels both elegant and approachable, ideal for easy entertaining or a special everyday indulgence.
Equipment
- Oven
- Cupcake Pan
- Stand mixer
- Wire Rack
Ingredients
- 2 1/4 cups cake flour Sift and aerate to produce a light, tender crumb in the cakes; cake flour's lower protein content helps create a delicate texture and fine grain when combined with the other dry ingredients.
- 1 tablespoon baking powder Leaven gently by providing lift and structure; baking powder reacts with moisture and heat to help the mini cakes rise evenly and become fluffy.
- 1/2 teaspoons salt Season subtly to enhance overall flavor balance; salt strengthens batter structure and rounds out sweetness while intensifying vanilla notes.
- 1 1/4 cups whole milk room temperature Warm slightly before using to encourage smooth incorporation and prevent curdling; room-temperature whole milk adds richness, moisture, and helps achieve a tender crumb.
- 4 large egg whites room temperature Whip to incorporate air and lighten the batter; using large egg whites at room temperature ensures better volume and stability when beaten into the mixture.
- 1 stick 8 tablespoons unsalted butter, at room temperature Cream until smooth to contribute fat and moisture; unsalted butter at room temperature helps create an even, tender texture and allows control over saltiness.
- 1 1/2 cups sugar Dissolve for sweetness and structure; sugar not only sweetens but assists in tenderization, browning, and stabilizing whipped egg whites if used.
- seeds scraped from one vanilla bean Scrape to impart pure aromatic vanilla flavor; seeds from one vanilla bean offer intense, natural vanilla intensity and tiny specks for visual appeal.
- 2 teaspoons pure vanilla extract Add for concentrated vanilla aroma and depth; pure vanilla extract enhances and amplifies the bean seeds' flavor throughout the batter.
- 2 sticks unsalted butter softened Soften and beat to create a silky frosting base; unsalted butter softened produces a creamy consistency and neutral flavor for icing the mini cakes.
- 1 pound 16 ounces powdered sugar, sifted Sift and blend to form a smooth, lump-free frosting; powdered sugar gives structure, sweetness, and spreadability to buttercream when combined with butter.
- 2 teaspoons clear vanilla extract this helps maintain the bright white color Use for bright, neutral vanilla flavor without discoloration; clear vanilla extract preserves a white appearance while contributing vanilla notes to frostings.
- 2 -4 tablespoons heavy cream or milk Adjust to achieve desired frosting consistency; heavy cream or milk thins buttercream slightly, adding richness and helping create a smooth, pipeable texture.
- edible Easter grass Garnish playfully to create a festive presentation; edible Easter grass adds color, texture, and seasonal decoration when arranged around cakes or serving platters.
- pastel sprinkles Decorate minimally to add color and crunch; pastel sprinkles provide visual charm and a slight textural contrast when scattered over frosted cakes.
- 12 Campfire® EggSwirlers Serve as a topper or accompaniment to enhance presentation; Campfire® EggSwirlers offer a playful, marshmallow-style garnish that complements the mini vanilla cakes.
Instructions
- Center a rack in the oven to 350°F. Spray a nonstick cupcake pan or mini cake pan with nonstick cooking spray.: The warm oven gradually encourages even rise and caramelization, while the sprayed pan prevents sticking and keeps the bottoms intact. You will smell a faint toasty warmth as the oven reaches temperature, and preparing the pan now saves time later. One common mistake is inserting pans before the oven is fully preheated, which can lead to uneven baking, so wait until the oven registers the correct temperature.
- In a large bowl, sift together the flour, baking powder and salt.: Sifting aerates the flour and distributes the baking powder and salt evenly, which promotes a consistent rise and tender crumb. You should notice a light, powdery texture and a faint wheaty scent as you work. Avoid packing the flour into measuring cups, as this can make the cakes dense.
- In a medium bowl, whisk together the milk and egg whites.: Combining room temperature milk and whipped egg whites ensures a smooth emulsion that blends into the batter without clumping. The mixture should look glossy and uniform, and it will help hydrate the dry ingredients. A frequent error is using cold liquids, which can cause uneven mixing and a heavier texture.
- In the bowl of a stand mixer fitted with the paddle attachment, or with a hand mixer, beat the butter, sugar and vanilla bean seeds at medium speed for 3 minutes, or until the butter and sugar are very light.: Creaming butter , sugar , and scraped vanilla bean seeds aerates the fat and creates tiny air pockets that translate into lift. You will see the mixture lighten in color and become fluffy, and the room will smell warmly sweet. Avoid under-creaming, because it can result in a tighter, denser crumb.
- Add in the vanilla extract and one third of the flour mixture, still beating on medium speed. Beat in half of the milk-egg mixture, then beat in half of the remaining dry ingredients until well incorporated. Add the rest of the milk and eggs, beating until the batter fully incorporated and smooth, then add the last of the dry ingredients.: Layering wet and dry ingredients helps prevent overmixing, which keeps the cake tender. You will see the batter come together in stages, smooth and slightly glossy, and it should fall slowly from the paddle. Overworking at this stage develops gluten and makes the cake chewy, so mix only until combined.
- Once ingredients are thoroughly incorporated, give the batter a good 2-minute beating to ensure that it is thoroughly mixed and well aerated. Using a large scoop (about 3 tablespoons), distribute the batter between 24 cupcake wells, filling each well 2/3 full.: That final beat helps homogenize the batter and build a consistent structure. As you scoop, the batter should hold a soft mound and glide off the scoop. Filling to two thirds gives room for rise without overflow. A common misstep is overfilling, which causes domed, split tops.
- Bake for 18-22 minutes, or until a toothpick inserted into the centers come out clean. Cool on wire rack.: As they bake, the cakes will set at the edges and develop a faint golden top, releasing a comforting vanilla scent. Use a toothpick to confirm doneness, and transfer to a wire rack so air circulates and prevents soggy bottoms. Opening the oven too frequently can cause uneven rise, so resist peeking until the time nears completion.
- In the bowl of a stand mixer fitted with the paddle attachment, cream the butter on medium speed until light and fluffy; about 5 minutes. With the mixer on low speed, slowly add in the powdered sugar, and continue beating until well blended.: Whipping the frosting butter invites air into the mixture, producing a light texture. Gradually adding sifted powdered sugar prevents a dusty cloud and ensures a silky consistency. If you add the sugar too quickly, the kitchen will be messy and the frosting may be grainy.
- Add in vanilla, and 1 tablespoon of heavy cream or milk. Blend on low speed until moistened.: Introducing clear vanilla extract and a small measure of heavy cream softens the frosting and layers in flavor. The frosting will sheen slightly as it becomes moist, signaling the right balance. Too much liquid at once can make the frosting runny, so add slowly.
- Beat at high speed until frosting is smooth and fluffy; about 5 minutes. If desired, add in additional milk or heavy cream, one teaspoon at a time, until you reach the desired consistency.: High speed whipping builds a cloudlike structure that pipes and spreads easily; you will hear a steady whir and see the frosting double in volume. Adjustments by teaspoon help you dial in spreadability without over thinning. A typical error is adding too much cream too fast, which makes the frosting collapse.
- Use a knife to cut the domed portion off of each cupcake to create a flat surface. These scraps can be used to snack on or make cake balls.: Trimming creates a stable base for stacking and ensures even layers; the cut surfaces should feel springy but set. I always taste a scrap or two to check texture. Cutting while cakes are still warm can cause tearing, so wait until they are cooled to the touch.
- Pipe prepared frosting onto the cut surfaces of 12 of the mini cakes. Place another mini cake directly onto the frosting to create 12 mini layered cakes.: When you pipe, use steady pressure to form an even cushion of frosting, then gently press the second layer down to bond. You will hear a soft squish and see the frosting spread to the edges, visually confirming adhesion. Pressing too hard can squeeze out filling and make the cakes unstable.
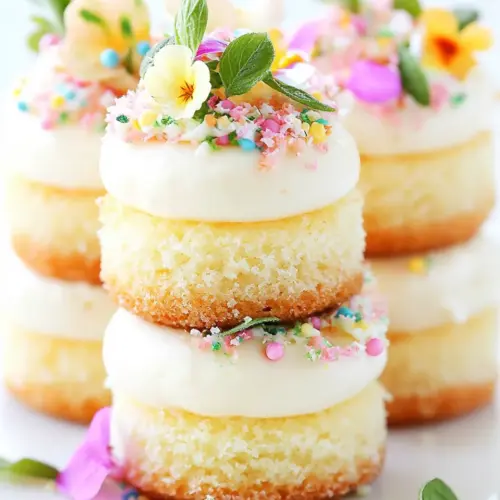
- Top with additional frosting and decorations such as edible Easter grass, pastel sprinkles and Campfire® EggSwirlers.: The final adornment adds color, texture, and whimsy, turning simple cakes into a festive presentation. Place decorations lightly so they rest on the frosting rather than sinking, and enjoy the playful crunch and look. Avoid heavy decorations that tip the cakes or dampen the frosting.
Notes
- Use real vanilla bean: Scrape the seeds for deeper aroma and visual appeal, especially in the batter where the little black flecks look beautiful.
- Clear vanilla in frosting: Choose clear vanilla extract if you want a bright white frosting, it preserves color while adding flavor.
- Adjust frosting thickness: Add heavy cream by the teaspoon to reach a spreadable or pipeable consistency without overshooting.
- Decorate lightly: Use edible Easter grass and pastel sprinkles sparingly for a balanced appearance that does not overpower the cake flavors.
- Repurpose scraps: Save the trimmed domes for cake balls or a sweet snack to reduce waste and add a bonus treat.