Mini Strawberry Shortcake Pies
Mini Strawberry Shortcake Pies are bite sized, creamy and crisp crowd pleasers with tender shortcake filling, flaky pie crust, and cloud like whipped cream topped with fresh strawberries. These easy treats deliver bright fruit flavor and nostalgic charm, perfect for spring gatherings and easy weeknight desserts. Make a batch to impress guests without much fuss, and enjoy the convenience of make ahead options.
Equipment
- Mini Muffin Pans
- Stand mixer
- Whisk
- Wooden Spoon
- Round cookie cutter
- Pastry bag
Ingredients
- 1 pie crust from a pack of two or from scratch Provide a ready-made or homemade buttery pastry base that forms the shell for the mini pies; roll and cut to fit small tart pans and blind-bake if the recipe requires a crisp bottom. Enhance texture and flavor by chilling before filling to prevent sogginess from the filling. Handle gently to avoid stretching and shrinking during baking.
- 1/2 cup + 1 tablespoon all-purpose flour Add structure and tenderness to the batter or dough by contributing gluten and starch; measure accurately to maintain proper crumb and consistency in the filling or shortcake base. Combine with the leavening and liquid ingredients to form a smooth batter without overmixing to avoid toughness.
- 1/4 teaspoon baking powder Lighten the batter slightly by introducing a mild lift when combined with the flour; balance measurement to prevent overly dense texture in the shortcake component. Sift or mix evenly with the flour so the leavening disperses throughout for uniform rise.
- 1/8 teaspoon salt Enhance overall flavor and balance sweetness by bringing out other ingredients; also reinforces the leavening’s effectiveness by controlling taste. Dissolve or mix thoroughly to ensure even distribution in the dough or batter.
- 3 tablespoons unsalted butter melted Contribute rich flavor and tenderizing fat while providing moisture when melted into the batter or crust; helps create a tender, slightly crisp texture in baked components. Allow melted butter to cool slightly so it incorporates smoothly without cooking the eggs.
- 1/3 cup granulated sugar Provide sweetness and help with browning and structure in the batter or crust; adjust slightly to taste to avoid overpowering the delicate strawberry flavor. Cream or whisk well with the butter and egg to achieve a smooth, aerated mixture.
- 1 large egg Bind the batter and add moisture and richness while helping with leavening and structure; incorporate at room temperature for even mixing and best texture. Beat lightly into the batter to combine without overworking.
- 1/2 teaspoon vanilla extract Impart aromatic sweetness and enhance other flavors by adding a warm, vanilla note; use pure extract for best results. Mix into wet ingredients to distribute flavor evenly throughout the filling or batter.
- 1/4 cup milk Moisten and loosen the batter to achieve the desired consistency while contributing subtle richness; choose whole or low-fat milk as specified for texture preference. Add gradually to prevent over-thinning and to reach a smooth batter.
- 1 cup heavy whipping cream cold Create a stable, fluffy whipped topping when cold and beaten, providing richness and a creamy finish for the strawberry shortcake pies. Keep very cold until whipping to reach stiff peaks and to ensure volume and stability when assembled.
- 2 tablespoons powdered sugar Sweeten and stabilize whipped cream slightly while dissolving easily for a smooth texture; use powdered sugar to avoid graininess that can occur with granulated sugar. Sift if needed before adding to the cream to prevent lumps.
- 1 teaspoon vanilla extract Enhance the whipped cream with a concentrated aromatic note, elevating the overall flavor with a warm, sweet vanilla presence. Add cautiously and taste as you go to avoid overpowering the strawberries.
- 1 16 ounce package Driscoll’s strawberries hulled and sliced in half Deliver fresh, juicy fruit with natural sweetness and slight acidity that complements the cream and pastry; hull and slice to ensure even-sized pieces for presentation and easy eating. Gently toss with a touch of sugar if extra sweetness or maceration is desired.
Instructions
- Preheat oven to 350°F. Spray two mini muffin pans with cooking spray (I like using the kind with flour for these pies).: When you turn on the oven you will notice an immediate shift in the kitchen air as it warms, creating the right environment for even baking and golden edges. A properly preheated oven ensures the tiny crusts set quickly and prevents excess spreading of the filling. If the oven is not hot enough the crusts can become soggy, so always allow the oven to fully reach temperature before baking.
- Unroll your pie crust and cut 2 1/2” circles using a round cookie cutter. Press one into each mini muffin cavity. You should get about 18-20 with re-rolling the dough. Chill until filling is ready.: The light coating of spray with flour helps the pies release cleanly and creates a subtle, crisp exterior. You will hear a faint sizzle as you prepare the pans, and that thin film prevents sticking without affecting flavor. Too much spray can pool and make bottoms greasy, so use a thin, even layer.
- Whisk flour, baking powder, and salt in a small bowl. Set aside.: The act of cutting small circles gives you uniform shells that bake evenly, and the smooth edges will crisp up nicely. Pressing each circle into the mini muffin cavity creates a cozy bowl for the batter, and you should feel a slight resistance as the dough conforms. Avoid stretching the dough too much, or the crust can shrink away while baking.
- Whisk melted butter, sugar, and egg until thick and yellow (about 30 seconds by hand). Whisk in the vanilla extract.: As you press the crust, notice how the dough settles and forms a neat rim that browns attractively. If you re roll scraps to get more circles, the second batch will be slightly less tender but still tasty. Keep any extra dough chilled briefly before re rolling to maintain flakiness; overworked dough will become tough.
- Switch to a wooden spoon or spatula and add the milk and the dry ingredients alternately, stirring in between each addition.: Chilling firms the dough so it holds shape when the batter hits it, preventing gaps or collapsing. A chilled crust also bakes to a flakier texture because the fat remains solid longer in the oven. If you skip chilling, the crust may shrink or lose its defined edge.
- Place 1 tablespoon of the batter in each prepared pie crust. You will have some batter left over; you can bake these in the remaining mini muffin tin cavities not being used for your pies (2 tablespoons per cupcake).: Dry whisking aerates the mixture and ensures even distribution of the lift agent and salt, which creates a uniform crumb. You will notice the flour lightening in color and becoming more powdery; this is a good signal that it is ready to combine with the wet ingredients. Undermixing dry ingredients can cause pockets of baking powder or salt, leading to uneven rise or flavor.
- Bake mini shortcake pies for 10-13 minutes, until a toothpick comes out clean. Let cool before removing from the pan.: Letting this bowl rest keeps your mise en place organized and makes it easier to add the dry mix in measured portions. This small pause lets you focus on the next steps without scrambling, and it reduces the chance of accidental over mixing later. Don’t leave it exposed to moisture or it can clump.
- They should pop right out, but if needed you can use the tip of a knife to help ease them out.: The moment you combine these you will see the mixture emulsify into a glossy, pale ribbon. That short whisk softens the sugar and distributes the egg for a cohesive batter. If you stop too soon it may not fully combine, leaving small streaks of butter.
- Make the topping by placing the whipping cream in the bowl of a stand mixer and whipping on high using the whisk attachment. Add the powdered sugar and vanilla while mixing. Whip until peaks form (just a few minutes in a stand mixer; longer with a hand mixer).: Vanilla blooms in the wet base, adding aroma that you will notice instantly. A quick whisk incorporates it so each bite carries that warm note. Measure carefully, as too much can overwhelm the delicate strawberry flavor.
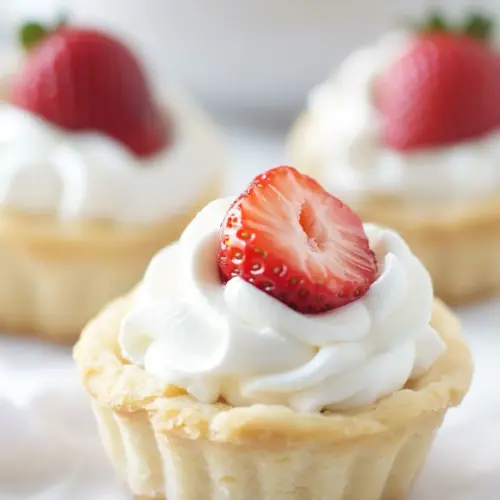
- Right before serving, place whipped cream in a pastry bag or gallon size ziploc bag and pipe onto each mini shortcake pie. (I used a 1 M tip to make the swirls; just snip off the tip of the bag and insert the tip before adding the whipped cream.) Top with half a strawberry.: Alternating keeps the batter tender by preventing over development of gluten. With each addition you will see the batter thicken slightly, and the wooden spoon gives you control to fold gently. Over stirring at this point can lead to a tougher interior, so stop mixing as soon as the flour streaks disappear.
- The whipped cream can be made a few hours ahead and stored in the refrigerator. I recommend cutting the berries close to when you are serving them. The mini shortcake pies (without their topping) can be stored in an airtight container for up to 3 days, or frozen for up to 1 month.: Scooping batter into the chilled shells, you will notice the contrast between the firm dough and soft batter. The small spoonfuls bake into a tender shortcake that sets against the crisp shell, creating the signature texture contrast. Avoid overfilling, as the batter will rise and could overflow the tiny crusts.
- You will have some batter left over; you can bake these in the remaining mini muffin tin cavities not being used for your pies (2 tablespoons per cupcake).: Using remaining batter for little cupcakes is a great way to avoid waste, and those extra bites bake with golden tops and slightly different chew. They also help gauge baking time since cupcake centers show doneness similarly to the pies. If you attempt to cram too much into the cups, the middle may remain underbaked.
- Bake mini shortcake pies for 10 to 13 minutes, until a toothpick comes out clean.: During baking the kitchen will fill with a warm aroma of butter and sugar, and the little crust rims will turn a light golden brown. The toothpick test gives a reliable cue for doneness without overbaking; if it comes out with wet batter continue to bake in short increments. Overbaking dries the interior and harms the tender texture you want.
- Let cool before removing from the pan.: Cooling allows the filling to set and the crust to firm up, making removal clean and simple. You will notice steam dissipating and the pies pulling slightly away from the pan edges, which helps release them. If you rush this, the pies can break apart when you pop them out.
- They should pop right out, but if needed you can use the tip of a knife to help ease them out.: Gently running a thin knife around the edge will free any stuck spots without damaging the crust. You might hear a soft pop as air slips under the shell, and the surface will feel set and slightly springy. Forcing them out can crack the sides, so be gentle and patient.
- Make the topping by placing the whipping cream in the bowl of a stand mixer and whipping on high using the whisk attachment.: As you whip, the sound changes from liquid sloshing to a thicker, whooshing rush and you will see soft peaks form. Cold cream whips faster and achieves better volume, and the whisk attachment incorporates air efficiently for a light texture. If you over whip you can reach butter stage, so stop as soon as peaks hold.
- Add the powdered sugar and vanilla while mixing.: Adding the sugar and vanilla as the cream thickens helps dissolve the sugar evenly and distributes flavor. The powdered sugar stabilizes the peaks slightly so the topping keeps its shape on the pies. Adding sugar too early can deflate the cream, so sprinkle it in while whipping.
- Whip until peaks form (just a few minutes in a stand mixer; longer with a hand mixer).: You want glossy, billowy peaks that hold but are still soft, and the visual cue is a sheen on the cream as you lift the whisk. If you see graininess or butter forming, you have gone too far. Pause to check texture frequently toward the end.
- Right before serving, place whipped cream in a pastry bag or gallon size ziploc bag and pipe onto each mini shortcake pie.: Piping gives a pretty, professional finish and a satisfying textural contrast. The rhythmic squeeze creates swirls that catch the light and hold the strawberry in place. If you prefer, a spoonful works too, but piping looks special.
- (I used a 1 M tip to make the swirls; just snip off the tip of the bag and insert the tip before adding the whipped cream.): Using a piping tip gives consistent swirls and helps control portion size. The tip leaves a small ridged pattern that adds a decorative touch and helps the cream adhere to the pie. If you skip the tip, aim for tidy, centered swirls to keep the presentation neat.
- Top with half a strawberry.: The fresh strawberry adds a burst of acidity and vibrant color that contrasts the sweet cream. Placing the half on each swirl completes the visual story and adds a juicy bite. Cut the berries close to serving to avoid sogginess.
- The whipped cream can be made a few hours ahead and stored in the refrigerator.: Chilling your whipped cream helps it keep structure, and making it ahead saves hands on serving time. Cover it tightly to prevent fridge odors from seeping in. If it loses volume, rewhip briefly to revive texture.
- I recommend cutting the berries close to when you are serving them.: Freshly sliced strawberries maintain their bright flavor and texture, and they will not release excess juice that could make the pies soggy. If you slice early, pat them dry and store separately to keep the pies crisp.
- The mini shortcake pies (without their topping) can be stored in an airtight container for up to 3 days, or frozen for up to 1 month.: Storing unfrosted pies preserves their texture, and freezing is convenient for making batches ahead. Thaw in the refrigerator and add whipped cream and berries right before serving for best results. Avoid freezing already topped pies, as the cream and berry texture will degrade.
Notes
- Use chilled pie crust: If you want a flakier shell try making or chilling your dough longer, pressing cold rounds into the pan yields the best crisp edges.
- Adjust sweetness of whipped cream: Reduce the powdered sugar to one tablespoon if your strawberries are very ripe and sweet to keep balance between cream and fruit.
- Make ahead storage: Bake the pies and store unfrosted in an airtight container for up to three days, adding cream and berries right before serving to preserve texture.
- Substituting milk: If you only have a different milk on hand use it in the same measure, but note it may slightly change the batter tenderness and flavor.
- Whipping by hand: If you do not have a stand mixer whip the cream in a metal bowl set over ice for quicker results and more volume with a hand whisk.