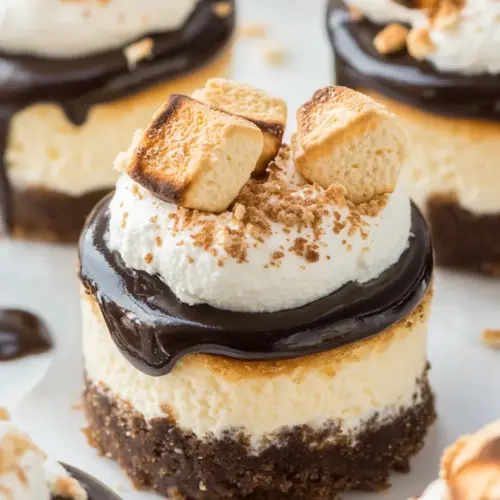
Mini S'mores Cheesecakes
Mini S'mores Cheesecakes are creamy, crunchy, and playful bites that combine a buttery graham crust with a tangy cream cheese filling and glossy chocolate ganache, finished with a toasted marshmallow. These easy, crowd friendly treats are perfect for parties or cozy nights, offering an elegant take on a campfire classic. Make them ahead and finish with a dramatic torch for instant wow factor.
Equipment
- Muffin Pan
- Mixing Bowl
- Hand Mixer
- Microwave-safe Bowl
- kitchen torch
Ingredients
- 1 1/4 cups Graham Cracker crumbs Provide a crisp, slightly sweet base texture that binds the crust together when combined with melted butter; press firmly into cupcake liners or a muffin tin to form individual crusts. Offer a classic graham flavor that complements the creamy cheesecake filling and toasty marshmallow topping in s'mores-style desserts.
- 3 tablespoons granulated sugar Add subtle sweetness and help balance the savory notes in the crust; when mixed with graham cracker crumbs and butter, it enhances structure and mouthfeel. Ensure even distribution to avoid overly dense or bland crusts and to create a pleasant contrast with the rich filling.
- 5 tablespoons unsalted butter melted Melt to moisten and bind the graham crumbs into a compact crust; fat contributes richness and a tender bite to the base. Use warm melted butter so the crumbs absorb it evenly, producing a stable shell that holds the cheesecake filling during baking.
- 8 ounces Challenge Cream Cheese softened Provide a rich, tangy, and creamy base for the cheesecake filling while supplying structure and smoothness when beaten until silky. Soften at room temperature for even incorporation, which prevents lumps and helps achieve a dense yet creamy mini cheesecake texture.
- 1/4 cups sour cream room temperature Contribute a mild tang and extra creaminess to the filling, helping to balance the richness of the cream cheese and add a slightly lighter mouthfeel. Bring to room temperature so it blends smoothly with the cream cheese and egg, improving the filling's consistency.
- 1 egg room temperature Bind the filling components, add richness and stability during baking, and help set the cheesecake with a tender, custard-like texture. Use at room temperature to ensure it incorporates uniformly and prevents curdling or overmixing of the batter.
- 1/4 cup granulated sugar Sweeten the filling to taste and help balance the tang of the cream cheese and sour cream while contributing to a smooth, palatable finish. Measure carefully to avoid an overly sweet result that could overpower the s'mores elements.
- 1 teaspoon vanilla extract Add warm aromatic notes and enhance the overall flavor profile by accentuating the sweetness and rounding out the dairy flavors in the filling. Use a small amount to avoid overpowering the chocolate and marshmallow components.
- 2/3 cup chocolate chips Melt into a glossy ganache or be stirred with cream to create a chocolate topping or swirl that provides deep cocoa flavor and a silky texture. Use quality chips that melt smoothly for even coverage and a classic s'mores contrast against the creamy filling.
- 1/4 cup heavy whipping cream Thicken and loosen melted chocolate to form a smooth ganache or drizzle that adheres to the cheesecake surface and sets with a shine. Warm gently and combine with chocolate chips to create a luscious topping or dip for marshmallows.
- 12 large marshmallows Toast to create the characteristic smoky-sweet s'mores finish, adding chewy, caramelized edges and a cloud-like texture atop each mini cheesecake. Place on top and broil briefly or torch carefully to achieve a golden-brown exterior without melting the cheesecake filling.
Instructions
- Preheat oven to 350°F. Line 12 muffin pan holes with liners.: You will notice the warm air fill the kitchen and the oven beginning to hum, a small signal that we are starting. Getting the oven to exactly 350°F matters because it ensures even cooking and avoids cracking in the tiny cheesecakes. Lining muffin holes keeps removal simple and creates tidy portions. A common misstep is skipping liners, which can make extraction sticky and ruin the crust. Check that each liner sits snugly so the crust will press evenly.
- Stir together graham cracker crumbs, sugar, and melted butter. Press about 2-2 1/2 tablespoons of the mixture into the bottom of each muffin liner and press to compact.: As you stir the crumbs with the melted butter and sugar , the mixture should glisten slightly and hold together when squeezed. Pressing firmly creates a confident base that will support the filling and provide a satisfying crunch. You should hear a slight compaction sound and feel resistance under your fingertips. A frequent error is pressing too lightly, which leads to crumbly bottoms, or packing too hard, which makes the crust overly dense. Aim for a compacted, even layer that reaches the edges of the liner.
- Beat room temperature cream cheese with a hand mixer until fluffy. Beat in room temperature sour cream. Beat in egg, sugar, and vanilla extract. (Room temperature ingredients are a must to avoid lumps!): The batter transforms from chalky to velvety as you beat the softened cream cheese . Whipping introduces air that keeps the texture light, while the room temperature sour cream folds in smoothly, lending silkiness. Adding the room temperature egg , sugar , and vanilla creates a unified, glossy batter. You will see small peaks and a smooth sheen when it is right. The why is simple, warm ingredients combine seamlessly, preventing lumps. If you start with cold components, you will end up with lumps and an uneven bake. Scrape the bowl often to ensure even mixing.
- Evenly divide (about 2-2 1/2 tablespoons each) cheesecake among crusts. Bake for 18-20 minutes, until they just begin to brown. Cool completely and refrigerate for at least 3 hours or overnight.: As the cheesecakes bake you will notice the edges set first while the centers remain slightly jiggly, which is perfect. That gentle wobble indicates a creamy interior after chilling. Browning should be minimal; a pale golden edge is ideal. Cooling completely before refrigeration prevents condensation, which can alter texture. The chilling time firms the filling, improving sliceability and mouthfeel. A common mistake is underbaking or skipping the chill, which results in runny centers when sliced. Patience here pays off with perfect consistency.
- Make the ganache (about 2-3 hours before you're ready to serve): place cream and chocolate chips in a microwave safe bowl or measuring cup. Heat for 45 seconds, then whisk until completely smooth (may take more or less time depending on your microwave). Let sit until it's thick enough that you can spread it but it's not drippy.: place cream and chocolate chips in a microwave safe bowl or measuring cup. Heat for 45 seconds, then whisk until completely smooth. : When the hot heavy whipping cream meets the chocolate chips , you should see glossy ribbons form as you whisk. The aroma will be rich and inviting, with cocoa notes blooming in the warm steam. Letting the ganache rest until it thickens to a spreadable consistency is crucial, because a runny ganache will slide off chilled cheesecakes. If it stiffens too much, warm gently in short bursts. A common pitfall is overheating, which can cause separation or scorch the chocolate. Whisk patiently until silky.
- To assemble: spread ganache over the chilled cheesecakes. Toast a marshmallow over a gas stove or BBQ and place on top (or use a kitchen torch). Serve immediately after you've placed the marshmallow on top.: spread ganache over the chilled cheesecakes. Toast a marshmallow over a gas stove or BBQ and place on top or use a kitchen torch. Serve immediately after you've placed the marshmallow on top. : The ganache should glide across the chilled tops, creating a shiny, even blanket that sets slightly against the cool filling. Toasting a large marshmallow produces a smoky aroma and a golden, slightly crisp exterior with a pillowy interior. The contrast of warm marshmallow and cool cheesecake is sensory perfection. Toast just long enough to get color without burning; charred flavor can overpower. If you serve later, the marshmallow will soften and lose its toasted edge, so assemble right before serving for best texture and presentation.
- Cheesecakes can be made and frozen for up to one month before topping. Once topped with ganache and marshmallow, serve immediately.: Freezing preserves the texture and allows you to prepare in advance, the frozen centers holding structure beautifully. When thawed in the refrigerator, they retain creaminess but can be more fragile during topping, so wait until just before serving to finish. Label trays so you use them within a month for the best flavor. A misstep is refreezing after assembly, which can ruin the marshmallow and ganache textures. Thaw slowly in the refrigerator for best results.
Notes
- Swap crust texture — Gently pulse the Graham Cracker crumbs finer or coarser to adjust crunch. Finer crumbs pack more densely and mimic a shortbread base, while coarser crumbs create a more rustic bite. Be careful not to overpack or the crust becomes hard.
- Temperature patience — Always bring cream cheese, sour cream, and egg to room temperature. This guarantees a lump free batter and even bake. If you are short on time, set items in a warm water bath briefly, but avoid melting them.
- Ganache consistency — If your ganache is too thin, let it cool longer; if too thick, whisk in a teaspoon of warm cream until spreadable. Keep in mind slight adjustments affect shine and set time.
- Toast safely — Use a kitchen torch for controlled charring of the marshmallows, or toast over a gas flame for smoky flavor. Always watch closely to prevent flare ups or burning.
- Make ahead strategy — Bake and freeze undecorated cheesecakes up to one month. Thaw in the refrigerator before adding ganache and toasting, this preserves the best texture and ease of handling.