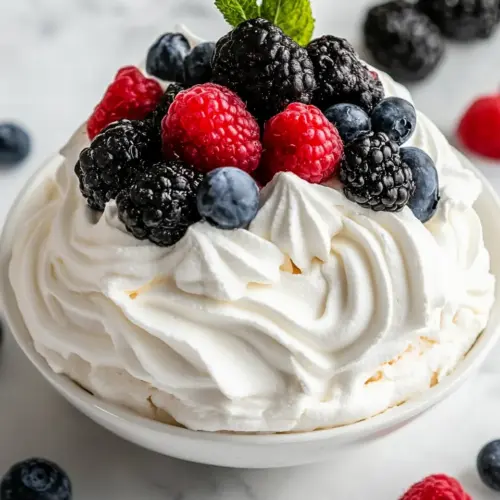
Mini Pavlova
Mini Pavlova is a crisp and airy dessert topped with whipped cream and vibrant fruit, offering a perfect contrast of textures. Light, elegant, and easy to assemble, it makes an ideal easy party dessert or special occasion treat. The marshmallow like interior and crisp shell pair beautifully with tart berries and tropical passionfruit, giving a bright reason to make it.
Equipment
- half sheet pan
- Hand Mixer
- Stand Mixer (optional)
- Silicone Baking Mat, optional
- Parchment Paper Sheets
- 1 M Piping Tip, optional
- Piping Bag, optional
Ingredients
- 4 large egg whites (130 ml/g) Whip vigorously to create stable foam and volume; provides structure and lift to the pavlova when beaten to stiff peaks. Ensure eggs are at room temperature for maximum volume and to help the meringue dry properly during baking.
- 1/4 teaspoon cream of tartar Stabilize meringue by strengthening whipped egg white proteins and helping maintain glossy peaks; aids in preventing collapse. Use sparingly to avoid altering flavor while improving texture and stability.
- 1 teaspoon vanilla extract Flavor subtly and enhance the meringue's aroma; adds a warm, sweet note that complements the cream and fruit toppings. Add near the end of whipping so the vanilla distributes evenly without deflating the foam.
- 2/3 cup granulated sugar (134 g) Sweeten and stabilize the meringue while contributing to a crisp outer shell and tender interior; dissolves into the egg whites to give structure and shine. Add gradually while whipping to ensure a smooth, glossy meringue with proper sweetness.
- 1 1/2 teaspoons cornstarch Absorb surface moisture and help create a slightly marshmallow-like interior by tenderizing the meringue; contributes to the classic soft center of pavlova. Sift in to avoid lumps and ensure even texture in the finished shell.
- 1 1/4 cups heavy whipping cream (284 g) Whip to soft peaks to create the cloud-like cream topping that pairs with the meringue; provides richness and a silky mouthfeel against the crisp shell. Keep chilled and do not overwhip to maintain lightness for dolloping over mini pavlovas.
- 1/3 cup powdered sugar (40 g) Sweeten and stabilize the whipped cream while adding a fine texture; helps the cream hold shape when piped or spooned atop the pavlovas. Sift in to prevent graininess and adjust to taste for balanced sweetness.
- 1 teaspoon vanilla extract Enhance the whipped cream's flavor and bring aromatic warmth to the topping; pairs well with fruit and complements the meringue's sweetness. Fold in gently after whipping to distribute flavor without deflating the cream.
- strawberries, raspberries, blueberries, blackberries, diced mango, passionfruit pulp, pineapple, kiwi, fresh cherries Provide bright, tart, and tropical flavor contrasts along with vibrant color for garnish; offers a mix of textures from juicy berries to firmer mango and kiwi. Chop or arrange attractively so each mini pavlova gets a balanced combination of fruit flavors.
- fresh mint leaves or edible flowers Add fresh herbal aroma or decorative color contrast to the pavlovas; elevates presentation and offers a subtle palate-cleansing note. Use whole or small leaves sparingly so the delicate pavlova appearance remains uncluttered.
- chopped pistachios Introduce a crunchy, nutty element and vibrant color contrast while offering a hint of savory richness; complements the sweet cream and fruit. Use chopped pistachios as a scattered garnish to add texture without overwhelming the dessert.
- toasted coconut flakes Provide a toasty, sweet crunch and tropical aroma that contrasts with creamy and soft components; enhances visual appeal and mouthfeel. Toast lightly to deepen flavor and sprinkle sparingly over each pavlova for balance.
Instructions
- Separate Eggs: Use cold eggs to separate the yolks from whites (easier to separate when they’re cold), and add to liquid measuring cup. Measure 130 ml of egg whites (since egg white sizes can vary). Make sure NO egg yolk gets in with the whites, or they wont whip properly.: The whites should be pristine and free of any fat to whip properly, and when you separate eggs in a cold state it is easier to keep the yolk intact. As you crack each egg, listen for the clean snap and slide the whites into a dry bowl, watching the liquid stream with a faint gloss. If just a trace of yolk slips in the foam will resist rising, so stop and remove the yolk right away with the shell edge or a clean spoon. One common mistake is using a bowl that is not perfectly dry, which can introduce moisture or oil that deflates the foam, so always dry your equipment thoroughly.
- Bring to Room Temperature: Set egg whites aside to come to room temp, about 15 minutes (room temp egg whites will whip to fluffier volume than cold ones).: Allowing the egg whites to warm for about 15 minutes makes them whip to a higher, fluffier volume, because warmer whites stretch and trap air more readily. You may notice the whites lose their chilled stiffness and become more fluid, a subtle, glossy sheen forming as you prepare the next steps. Avoid skipping this because cold whites take longer to reach soft peaks and can undermine the volume you need for a lofty interior.
- Prepare Pan: Preheat oven to 225 degrees F (110 degrees C). Line a 18×13 inch bakers half sheet pan with parchment paper or a silplat liner. Parchment Tip: Use a dot of the whipped meringue after it's whipped, to “glue” the parchment paper to the baking sheet.: Preheat the oven to 225 degrees F, lining an 18×13 inch half sheet pan with parchment or a silpat liner so the meringues can bake without sticking. Press a tiny dab of whipped meringue on the corners of the parchment to glue it down so it does not flutter while you pipe or spoon. You'll hear a faint sizzle as you arrange hot trays, and the lined surface ensures even heat distribution. A typical pitfall is using an unlined tray, which can make removal difficult and risk tearing the fragile pavlovas.
- Beat Egg Whites: Grab a clean, dry mixing bowl and pour in cream of tartar and egg whites. Use a hand mixer (or stand mixer) with a whisk attachment on high speed for 1-2 minutes, until they reach soft peaks. With the mixer running, add vanilla and then sugar, a little at a time, mixing after each addition (should take about 5 minutes). Continue mixing until the egg whites are glossy and reach stiff peaks (when you lift the beaters out of the mixture, the peaks that form should stand straight), about 1 to 4 more minutes. Stop mixing when the egg whites are glossy and at stiff peaks, to avoid over-beating them.: Combine the room temperature egg whites and 1/4 teaspoon of cream of tartar in a clean, dry mixing bowl, then whisk on high until they reach soft peaks, which takes roughly 1 to 2 minutes. As the mixer hums, the whites will transform from glossy to billowy, and you can feel the motor engage as air is incorporated. With the mixer running, add 1 teaspoon of vanilla and then add the 2/3 cup granulated sugar slowly, a spoonful at a time, allowing each addition to dissolve so the mixture becomes glossy and smooth. When you lift the beaters, stiff peaks should stand straight, crisp at the tip, signaling readiness. Overbeating is a real danger here, which can cause the whites to become dry and granular, so stop when you hit that glossy stiffness.
- Add cornstarch and fold it in using a rubber spatula.: Gently fold in 1 1/2 teaspoons of cornstarch using a rubber spatula, using soft scooping motions to preserve the air you just incorporated. The batter should look marshmallow like, slightly thickened but still airy, with tiny glossy ribbons when you lift the spatula. This step helps the center remain tender while the exterior crisps, so be gentle to avoid deflating the volume. If you stir vigorously you will lose much of the lift, resulting in flatter pavlovas, so use delicate strokes.
- Immediately Shape Pavlova: Divide mixture into 6 mounds of whipped meringue spaced apart on lined baking sheet. Use the back of a spoon to smooth each mound into a circle dome, with a flat top, about 3 1/2 inches wide. (Or you can pipe the mixture, with a piping bag and large tip): Divide the meringue into six mounds spaced on the lined sheet, shaping each into a dome about 3 1/2 inches wide, using the back of a spoon or a piping bag for precision. As you shape, the meringue will feel cool and satiny, and smoothing each dome creates the crisp shell that bakes evenly. Leave space between mounds since they will dry in place rather than expand. A common misstep is making them too close together, which can cause them to fuse during baking.
- Create a shallow indent in the top of each mini pavlova with the back of a spoon (to allow a place to add filling after they’re baked).: Use the back of a spoon to make a shallow well in the center of each dome, forming a cradle for the whipped cream and fruit after baking. You will notice the surface becoming slightly matte where you press, which is fine because the indentation holds fillings without collapsing the sides. Be careful not to press so deeply that you deflate the dome, which would reduce the air pocket that gives the interior its marshmallow texture.
- Bake at 225 F (110 degrees C) for 60 minutes, but don’t remove from oven. Turn oven off and allow to cool completely, inside the oven, at least 1-2 hours, or up to overnight. Do NOT open the oven door during baking or cooling!: Place the tray in the oven set to 225 degrees F and bake undisturbed for 60 minutes, then turn the oven off and allow the pavlovas to cool completely inside for at least 1 to 2 hours, or up to overnight. As they bake you may notice a gentle crackling sound from the surface as moisture escapes, and the scent will be faintly sweet and toasty. Do not open the oven door during baking or cooling, because sudden temperature changes can cause them to crack or collapse. A frequent error is checking too soon, which invites a draft and can ruin the fragile structure.
- Remove: Use a metal spatula to very gently release and lift each pavlova onto serving plates or tray (the edges are very delicate, so best to release from the bottom and not touch the sides.: Use a thin metal spatula to very gently release each pavlova from the parchment, sliding under the base to lift without touching the sides which are fragile. The edges are crisp and may flake slightly, so support from the bottom and transfer to serving plates or a tray. If you handle them roughly they can chip, so move deliberately and with steady hands.
- Whipped Cream: Mix cream, sugar, and vanilla until whipped into fluffy cream. Spoon whipped cream onto each pavlova and top with fresh fruit. Serve immediately or refrigerate up to 30 minutes.: Whip 1 1/4 cups heavy whipping cream with 1/3 cup powdered sugar and 1 teaspoon vanilla until it forms soft, billowy peaks that still feel silky, then spoon or pipe onto each pavlova and top with the prepared fruit. The cream should smell fresh and dairy sweet, and when you lift the whisk you want soft, pillowy peaks rather than stiff, chalky ridges. Overwhipping turns the cream grainy and reduces the luxurious mouthfeel, while underwhipping makes it runny and unable to support fruit.
- Serve immediately or refrigerate up to 30 minutes: Once assembled, serve the pavlovas right away so the shells remain crisp and the fruit is fresh; if you need a short delay refrigerate for up to 30 minutes. The contrast of the chilled cream against the slightly warmed meringue base is delightful, but leaving them filled too long invites the fruit juices to soften the shell. A common oversight is assembling too far in advance, which results in a soggy base rather than crisp edges.
Notes
- Clean Equipment: Always ensure bowls and beaters are spotless and completely dry before whipping egg whites, because even a trace of oil will stop them from achieving full volume.
- Room Temperature Whites: Let the separated egg whites sit for about 15 minutes to reach room temperature, which helps them whip up lighter and faster.
- Sugar Addition: Add granulated sugar a little at a time while mixing to allow it to dissolve fully, producing a glossy, stable meringue instead of a gritty one.
- Shape Gently: When shaping the meringue into domes, handle them with soft, deliberate motions to keep maximum air in the mixture, which creates that marshmallow interior.
- Cooling Patience: After baking, turn the oven off and let the pavlovas cool inside for at least 1 to 2 hours, or overnight if possible, to avoid cracking and to set the texture.
- Assemble Last Minute: Fill and top the pavlovas shortly before serving to keep the shells crisp and prevent fruit juices from making them soggy.