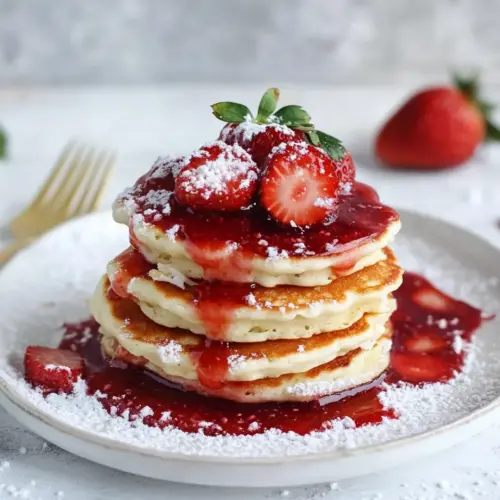
Mini Coconut Ricotta Pancakes
Mini Coconut Ricotta Pancakes are creamy, slightly chewy, and irresistibly fluffy with a bright strawberry syrup on top. These easy, small pancakes are perfect for a relaxed spring brunch or a cozy weekend breakfast, offering tropical coconut notes and a tender ricotta center that melts on the tongue. Make them for company or a special solo morning, they invite sharing and second helpings.
Equipment
- Skillet
- Electric griddle
- Food Processor
- Saucepan
- Mixing Bowls
Ingredients
- 2/3 cup whipped ricotta cheese Provide creamy base and moisture while lending a mild tang that lightens batter texture; whipped ricotta helps create tender, airy mini pancakes with rich dairy flavor. Fold gently to maintain fluffiness and prevent overmixing for best rise and mouthfeel.
- 2 large eggs slightly beaten Bind wet ingredients and add structure while contributing richness and lift; slightly beaten eggs help steam during cooking to create a light interior. Whisk until just blended to keep pancake texture delicate and soft.
- 1 cup all-purpose flour Supply bulk, structure, and gluten to form the pancake crumb; all-purpose flour creates a dependable framework that browns evenly. Sift or whisk before combining to avoid lumps and ensure uniform batter consistency.
- 1/2 cup unsweetened shredded coconut Add chewy texture and tropical flavor with subtle sweetness and nuttiness; unsweetened shredded coconut introduces contrast to the tender pancakes. Toast lightly if desired to deepen flavor without adding extra sweetness.
- 2 tablespoons sugar Sweeten the batter to balance tang and coconut flavors while aiding browning during cooking; sugar also helps achieve a pleasant crust. Adjust amount to taste based on toppings and syrup used.
- 1 teaspoon baking powder Provide leavening and gentle lift to produce fluffy pancakes; baking powder reacts during cooking to expand air pockets. Combine with other dry ingredients to distribute evenly and ensure consistent rise.
- 1 teaspoon baking soda Contribute additional leavening and react with acidic components for extra lift; baking soda helps lighten texture and promotes browning. Measure carefully to avoid metallic or soapy taste in final pancakes.
- 1/4 teaspoons salt Enhance overall flavor balance by cutting sweetness and amplifying other tastes; salt strengthens the batter's flavor profile and improves perception of richness. Dissolve into wet ingredients to ensure even seasoning.
- 1 1/4 cups coconut milk Supply liquid to hydrate dry ingredients while adding coconut flavor and creaminess; coconut milk creates a slightly richer batter and tender crumb. Use full-fat for best texture or a lighter version if preferred.
- 1/2 teaspoon vanilla extract Impart sweet aromatic notes and round out flavors with warm vanilla scent; vanilla extract complements coconut and ricotta without overpowering. Add with liquids so flavor disperses evenly through the batter.
- 2 tablespoons unsalted butter melted Add richness and promote golden-brown crust when melted into the batter or brushed on the griddle; unsalted butter contributes a clean, buttery taste. Use unsalted to control overall salt level and prevent excess sodium.
- 1 1/2 cups chopped strawberries Provide bright, fresh fruitiness and a juicy contrast to tender pancakes; chopped strawberries add color, acidity, and natural sweetness as a topping or filling. Macerate with a touch of sugar or syrup if desired for extra juiciness.
- 1/4 cup maple syrup Act as a flavorful sweetener and finishing drizzle to complement coconut and berries; maple syrup adds depth with caramel notes. Warm slightly for easier pouring and to meld flavors atop the cooked pancakes.
- coconut whipped cream Offer light, airy topping with pronounced coconut flavor and creamy texture; coconut whipped cream enhances richness without dairy heaviness and pairs well with tropical pancakes. Pipe or dollop just before serving to maintain volume.
- powdered sugar Provide a delicate dusting of sweetness and eye-catching finish; powdered sugar brightens presentation and adds a subtle melt-in-mouth sugar coating. Sift lightly over warm pancakes to avoid clumping and achieve even coverage.
- flaked coconut Add a crunchy, toasted coconut element that intensifies coconut flavor and adds texture contrast; flaked coconut works well sprinkled over finished pancakes. Toast gently to deepen flavor but watch closely to prevent burning.
- fresh mint Contribute fresh herbal aroma and a pop of color to finish the dish; fresh mint leaves balance sweetness and add a cooling note. Place whole leaves or chiffonade over plated pancakes just before serving for best visual appeal.
Instructions
- To make the whipped ricotta, add it to a food processor and blend until smooth.: As you process the whipped ricotta cheese , you will notice it becoming silkier and glossy, almost like a loose cream; this smoothness ensures pockets of ricotta do not create uneven texture in the batter. The why here is simple, a smooth ricotta incorporates more evenly into the batter which yields a consistently tender crumb. You should be able to scrape the sides clean with a spatula, and the bowl will hold a pale, even paste. One common mistake is underprocessing, which leaves grainy ricotta and little lumps in pancakes; if you still see bits, pulse a few more times until velvet smooth. Also, watch for overheating the motor by running it too long, give short pulses if your processor heats up. The aroma at this stage is milky and slightly tangy, a pleasant hint of what the finished pancakes will taste like.
- In a large bowl, combine the flour, coconut, sugar, baking powder, soda and salt. Whisk together until combined. In a smaller bowl, whisk together the ricotta, milk, vanilla extract and butter. Add the wet ingredients to the dry, mixing until smooth and combined.: You will immediately sense the dry mixture has a faint sweet and toasty smell from the unsweetened shredded coconut . Sifting or whisking these ingredients together not only distributes the baking powder and baking soda but also aerates the all purpose flour , which helps the pancakes remain light. The reason this step matters is even leavening prevents dense spots and ensures an even rise. A troubleshooting tip, if you notice clumps of coconut or flour, press them through the sieve or break them apart with the whisk; lumps can create uneven pockets and affect batter consistency. Visually the mixture should look uniform and pale, and when you lift the whisk you should see a soft flow back into the bowl.
- Heat a large skillet or electric griddle over medium heat. Add a bit of butter if desired, then pour 2 tablespoons of batter on the hot skillet and repeat, leaving an inch between pancakes. Cook until the pancakes bubble on the top and edges, about 2 minutes. Flip and cook for another minute or two until golden and set.: As you whisk, the mixture will loosen and thin, taking on a creamy, aromatic quality from the vanilla extract and melted unsalted butter . The purpose of combining the wet ingredients separately is to create a uniform wet base that can be added gently to the dry mix without overworking the batter. Pay attention to texture here, it should be smooth and pourable but not watery. A common error is adding very hot melted butter which can cook the eggs or change the ricotta texture, so allow the butter to cool slightly before mixing. You should hear a subtle whisk sound and see small bubbles form, indicating aeration.
- Combine the strawberries and syrup in a saucepan and heat over low heat until bubbling. Cook for 5 to 6 minutes, until the strawberries break down and the mixture is syrupy. You can mash the strawberries with a fork if needed!: When the wet mix meets the dry, the batter will transform, thickening into a spoonable consistency dotted with flecks of shredded coconut . You want to fold gently so you preserve air in the batter; overmixing activates gluten in the all purpose flour which can make pancakes chewy rather than pillowy. The ideal batter is slightly thick but still flows when scooped, with no streaks of flour. If it seems too thick, a splash more coconut milk will help, and if too thin, a tablespoon of flour can rescue it. Watch for the small lumps from the ricotta to disperse visually, and stop mixing when everything looks evenly combined. A common mistake is vigorous beating which tightens the batter and reduces fluffiness.
- Heat a large skillet or electric griddle over medium heat: As the skillet warms you will hear a faint hum and soon a droplet of water will sizzle and dance on the surface, signaling it is ready. Add a bit of butter if desired, and you will notice it melt and foaming gently, which creates an even nonstick surface and encourages golden browning. The reason temperature is important is too cool a pan yields pale, undercooked centers while too hot will char the exterior before the inside sets. A good test is to drop a small spoon of batter; it should form a round and start to bubble at the edges within a few dozen seconds. Common mistakes include crowding the pan or flipping prematurely, both of which prevent a proper rise and even color development.
- Pour 2 tablespoons of batter on the hot skillet leaving an inch between pancakes: You will hear a soft hiss as batter hits the hot surface and see glossy edges set while the center remains domed; the mini size allows quick, even cooking and makes it easier to stack and serve. This spoon measure yields uniform sizes which helps with timing. As the pancakes cook, watch for small bubbles forming across the surface and the edges turning matte, cues that they are ready to flip. If the pan is not hot enough, pancakes will absorb more fat and become greasy, so keep the temperature steady. Visually aim for a pale golden base before flipping, and avoid pressing down which compresses the airy interior.
- Cook until the pancakes bubble on the top and edges about 2 minutes then flip and cook for another minute or two until golden and set: During the first side you will hear a sequence of gentle popping as bubbles break, and the batter will transform from shiny to set, with a slightly domed shape. After flipping, the cooked surface should be an even, warm golden color with a faint toasty aroma, and the interior should bounce back slightly when touched. This brief second side finishes cooking without drying them out, preserving a tender crumb. If the pancake is still raw in the center after cooking, your pan may be too hot on the outside but too cool overall, so lower the heat and allow a little longer. Avoid overcooking which will dry the pancakes and mute the ricotta flavor.
- Combine the strawberries and syrup in a saucepan and heat over low heat until bubbling: As the chopped strawberries warm with maple syrup , they will release bright, fruity steam and the mixture will take on a glossy sheen, signaling flavors are concentrating. Cooking them slowly lets the berries break down gently while the syrup reduces, keeping some fruit texture. This step matters because a slow simmer preserves freshness while creating a sauce that clings to the pancakes. If the heat is too high, the strawberries can disintegrate into mush and the syrup may scorch, producing a burnt flavor; keep it low and stir occasionally. Smell for a fragrant, jam like aroma and look for a syrupy consistency that coats the back of a spoon.
- Cook for 5 to 6 minutes until the strawberries break down and the mixture is syrupy you can mash the strawberries with a fork if needed: As the strawberries soften you will see them collapse and release juices that thicken into a lacquered syrup, punctuated by tender berry pieces that burst with sweet tang. Mashing a few pieces creates a variety of textures so some bites are saucy and others more jammy. The why here is texture contrast, a slightly chunky syrup brings freshness to the creamy pancakes. A common mistake is undercooking which leaves a watery sauce, or overcooking which removes the bright fresh note of strawberries. Aim for a warm, spoonable consistency that glistens under the kitchen light.
Notes
- Reduce sweetness If you prefer less sweet pancakes, cut the sugar to 1 tablespoon and rely on the strawberry syrup for most of the sweetness.
- Richer pancakes Use full fat coconut milk for a deeper mouthfeel and slightly more coconut flavor in the batter.
- Make dairy free Substitute dairy ricotta with a plant based whipped ricotta alternative if you need to avoid dairy, being mindful of texture differences.
- Boost coconut flavor Toast the shredded coconut lightly in a dry pan first to intensify its aroma before adding to the dry mix.
- Adjust batter thickness If the batter is too thick add a tablespoon of coconut milk at a time until it reaches a spoonable consistency; too thin, sprinkle in a little flour.