Mini Chocolate Cheesecakes
Mini Chocolate Cheesecakes are creamy, chocolatey, and delightfully bite sized, offering a rich yet balanced dessert with a crunchy Oreo crust and glossy ganache. They are an easy party dessert that chills beautifully ahead of time, perfect for gatherings and weeknight celebrations. Make them for an elegant finish that feels indulgent without being overwhelming.
Equipment
- USA Pan 12 Well Cupcake and Muffin Pan
- Food Processor
- Microwave-safe Bowl
- Mixing Bowl
- Cupcake Scoop or Spoon
Ingredients
- 20 Oreo cookies Crush to fine crumbs to form the cheesecake base; pulse in a food processor or place in a sealed bag and crush with a rolling pin. Bind with melted butter, press into muffin tin cups, and chill to set before adding filling.
- 1/4 cup butter, melted Melt and pour over the crushed cookies to create a sturdy, flavorful crust; let it cool slightly so it firms up. Use unsalted butter for better control of sweetness and to avoid altering cheesecake texture.
- 6 ounces semi-sweet chocolate, I like Baker's chocolate bars Melt and temper to fold into the filling for a rich chocolate flavor; chop and melt gently over a double boiler or in short microwave bursts. Use high-quality semi-sweet bars for deep cocoa notes and smooth incorporation.
- 28 ounce packages cream cheese, room temperature Soften to room temperature and beat until smooth for a creamy, stable cheesecake filling; avoid overmixing to prevent excess air. Start with fully softened cream cheese to ensure a lump-free texture and even bake.
- 2/3 cups sugar Dissolve into the cream cheese to add sweetness and structure to the filling; measure accurately and mix until fully incorporated. Adjust slightly for taste but maintain the balance so the cheesecake sets properly.
- 2/3 cups sour cream Fold in to provide tang, moisture, and a silkier texture; gently combine with the cream cheese and sugar to maintain a smooth batter. Choose full-fat sour cream for best richness and to prevent cracking during baking.
- 1 tablespoon vanilla Add for aromatic depth and enhance the overall flavor profile; measure precisely and stir into the filling just before adding eggs. Pure vanilla extract gives a cleaner, more balanced flavor than imitation.
- 2 eggs, room temperature Incorporate one at a time to bind, add richness, and help the filling set while baking; beat lightly to combine without overworking. Use room-temperature eggs to ensure a uniform, smooth batter and to minimize curdling.
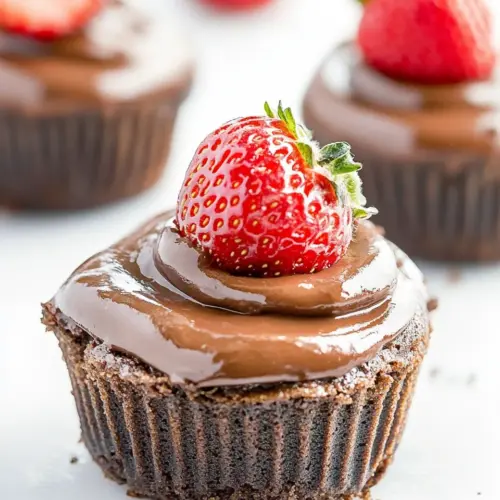
- Chocolate Ganache: Prepare separately to make a glossy topping that elevates the mini cheesecakes visually and flavor-wise; make the ganache by melting chocolate with cream and pour over cooled cheesecakes. Allow ganache to set briefly before serving for a professional finish.
- 2 ounces semi-sweet chocolate, like Baker's chocolate bars Melt and combine with cream to form the ganache base, delivering concentrated chocolate flavor and a shiny finish. Chop small for even melting and to prevent overheating, which can seize the chocolate.
- 2 tablespoons heavy cream Warm and whisk into the chopped chocolate to create a smooth, pourable ganache; heat just until steaming to protect the chocolate's texture. Use heavy cream for a luxuriously silky consistency and stable set at room temperature.
- optional halved strawberries Garnish by halving and arranging on top for a fresh, colorful contrast and light acidity that cuts the richness; place gently after the ganache has set. Use ripe strawberries for the best flavor and visual appeal, optional based on preference.
Instructions
- Preheat the oven to 325 degrees and line a muffin tin with 12 paper liners.: When you preheat to 325 degrees , you create an even environment so the edges cook gently while the center stays creamy. You should feel the oven hum as it reaches temperature, and the air will carry a faint warmth that signals readiness. Placing liners in the muffin tin ensures easy release and clean presentation, and it helps the individual cheesecakes set uniformly. A common mistake is skipping the liners which makes removal messy, or preheating too low which leads to underbaked centers. If your oven runs hot, consider using an oven thermometer to confirm true temperature.
- In a food processor, pulse the Oreos into fine crumbs and mix together crumbs and melted butter. Press a heaping tablespoon of crumbs into the bottom of each muffin tin. You can easily do this with the bottom of the tablespoon or measuring cup.: Pulsing creates uniform crumbs that will compact nicely into a crust, and when combined with the warm melted butter the mixture will smell faintly of toasted cocoa and butter. You want fine, sandy crumbs not a powder or large chunks, because consistency affects how the crust holds together. The tactile cue is slightly tacky crumbs that clump when pressed between fingers. If you overprocess into powder, the crust can become pasty, so stop pulsing as soon as fine crumbs appear. Another pitfall is using cold butter which will not bind; warm, fully melted butter is key.
- Break 6 ounces of the chocolate into pieces and place in a microwave safe bowl. Microwave in 30 second intervals until melted.: When pressing the crumb mixture, aim for an even, compact base about a quarter inch thick, and you should hear a faint, compacting sound as crumbs compress. Use the back of a tablespoon or a measuring cup to press gently but firmly so the crust stays intact during baking and when you remove the liners. Visual cues include an even surface and slightly glossy sheen from the butter . Avoid overpacking, which can yield a hammerlike texture, or underpacking, which causes the crust to crumble when serving.
- In a large bowl, beat the cream cheese, melted chocolate, and sugar until fluffy. Mix in the sour cream and vanilla. Mix in the eggs one at a time at a low speed until combined. Do not overmix.: Breaking chocolate into uniform pieces ensures even melting; smaller fragments soften quickly and consistently. Arrange the pieces in a shallow bowl so they absorb gentle, even heat. A microwave will warm the chocolate with soft popping and gentle gloss forming on top when ready. Microwaving in short bursts prevents scorching. If you rush and overheat, the chocolate may seize and become grainy, so stop when small glossy pools remain and stir until smooth.
- Using a cupcake scoop (or spoon), scoop into all the paper lined cupcake tins.: Heating in 30 second increments allows you to monitor the texture as it shifts from solid to molten, and between bursts stir to distribute the heat. The chocolate will transform into a glossy, viscous ribbon when stirred, and you should smell a toasty cocoa aroma. If you skip stirring or microwave too long, you risk burning which gives a bitter note. Always pause and stir at each interval to encourage smoothness and prevent hot spots.
- Bake for 20-25 minutes or until tops are not glossy. Cool completely and chill in the fridge.: As you beat the cream cheese with the melted chocolate and sugar , the mixture will lighten in color and become airy, producing a soft, spreadable texture. The sound of the mixer will be steady and even, and the scent will turn deeply chocolatey with a hint of tang. Fluffiness indicates trapped air which contributes to a creamy lift. Avoid working with cold cream cheese , which resists smoothing and creates lumps. If you see tiny curdled bits, stop and scrape the bowl then continue at low speed to reincorporate.
- For the ganache, melt the 2 ounces of chocolate and cream in a microwave safe bowl stirring together until smooth. Place a dollop on top of each cheesecake. Top with half a strawberry if desired or other topping. Chill until ganache is firm and keep cheesecakes chilled until serving.: Folding in the sour cream and vanilla brings silkiness and a bright, rounded flavor. The batter will thin slightly and become glossy, and you will notice a subtle tang that balances the chocolate richness. Mixing at low speed prevents over aeration, which can cause cracks in the final product. A common mistake is skipping sour cream; without it, the filling may be denser and less nuanced in flavor.
- Mix in the eggs one at a time at a low speed until combined: Adding each egg individually helps them incorporate smoothly without overwhipping the batter; you want cohesion not foam. After each addition, mix until the yellow streaks disappear and the batter regains a satiny sheen. Listen for a quieter motor sound as the batter becomes more uniform. Overmixing here will introduce too much air, which can cause the tops to puff and crack during baking, so stop as soon as eggs are combined.
- Using a cupcake scoop (or spoon), scoop into all the paper lined cupcake tins: A scoop ensures even portions so each mini cheesecake bakes at the same rate; you should hear the batter drop with a soft plop into the liners. The batter surface will be glossy and slightly domed when filled correctly. Consistent portions prevent some from overbaking while others remain underdone. One misstep is uneven filling which leads to inconsistent bake times, so take the extra minute to level each cup.
- Bake for 20 to 25 minutes or until tops are not glossy: During baking you will notice the edges set and the centers wobble slightly, while the glossy shine of the batter dissipates; that loss of gloss is your cue to check doneness. The tops should be matte and hold a gentle wobble, not liquid. The aroma will deepen to toasted chocolate and cream. Overbaking leads to dry texture and cracks, so err on the side of slightly underbaked if unsure, because they will finish setting while cooling and chilling.
- Cool completely and chill in the fridge: Cooling allows the centers to contract gently without cracking, and chilling firms the texture so slices hold cleanly. The chilled cheesecakes will feel dense yet yielding, and the flavors mellow and meld. Rush this step and you risk a runny center or a ganache that slides off. Patience here yields the right body and a pleasant mouthfeel.
- For the ganache, melt the 2 ounces of chocolate and cream in a microwave safe bowl stirring together until smooth: Warm the heavy cream slightly before adding to chopped chocolate , then let them sit for a minute and stir to create a glossy, velvety ganache. The aroma should be rich and inviting, and the texture should flow slowly off the spoon in a thick ribbon. If the ganache looks grainy or separated, a quick whisk with a splash of warm cream can bring it back. Overheating can scorch the chocolate , so melt gently.
- Place a dollop on top of each cheesecake: Spoon a small amount of the warm ganache onto each chilled cheesecake and let it settle into a smooth button, observing how the glossy top spreads and then matures into a shiny cap. The contrast of cold cheesecake and slightly warm ganache creates a delightful mouthfeel. If you dollop when the cheesecakes are too warm, the ganache will run, so ensure they are properly chilled.
- Top with half a strawberry if desired or other topping: Adding a halved strawberry gives a bright color and tartness that cuts through the richness. Fresh fruit also adds a pleasant aroma and a slight textural contrast. Use ripe but firm strawberries to avoid sogginess. If you apply toppings too early, moisture can weep into the ganache; add them just before serving for best presentation.
- Chill until ganache is firm and keep cheesecakes chilled until serving: Final chilling sets the ganache and integrates flavors fully, producing a neat, sliceable mini cheesecake. The cold will tighten textures and sharpen flavors, giving a clean bite. Leaving them out too long will soften the ganache and allow toppings to slide, so keep refrigerated until the moment of serving.
Notes
- Swap crust texture Use crushed Oreo filling removed before processing if you prefer a milder crust, or pulse for slightly larger crumbs to add crunch.
- Chocolate intensity Adjust the amount of semi-sweet chocolate in the batter to tweak the cocoa intensity, remembering that more chocolate makes the filling denser.
- Make ahead strategy Bake and chill the cheesecakes a day in advance, but add the ganache and strawberries only before serving to maintain freshness.
- Ganache finish For a thinner glaze, warm the ganache slightly before pouring and for a thicker cap, allow it to cool to a spreadable consistency first.
- Presentation trick Pipe a small rosette of leftover ganache or a tiny swirl of sour cream on top for a professional look just prior to serving.
- Dietary swap idea If you need to reduce richness slightly, try using a lighter sour cream while keeping the proportions the same, and note the texture will be a touch less dense.