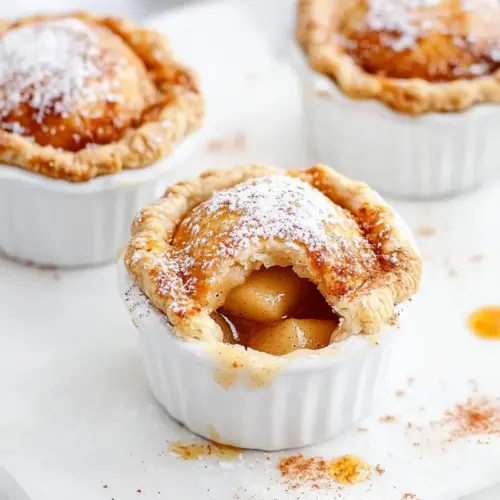
Mini Apple Pies
Mini Apple Pies are crisp edged, warmly spiced, and perfectly portioned for sharing. With a tender, flaky crust and a brown sugar cinnamon apple filling, these small pies offer a comforting, easy dessert or snack. Ideal for fall gatherings or an easy weeknight treat, they are quick to assemble and irresistible straight from the ramekin, making them a must try for cozy baking.
Equipment
- 2 ramekins
- Sheet pan (15" x 10")
Ingredients
- Cooking spray Coat a muffin tin or baking surface evenly to prevent sticking and ensure easy release of mini pies after baking. Use a light, even spray to avoid excess pooling and maintain crust texture.
- 1 cup flour Provide structure and bulk to the pastry when combined with fat to form a tender crust. Measure accurately and sift if desired to avoid lumps and promote even mixing.
- 1/4 teaspoons salt Enhance overall flavor balance by slightly offsetting sweetness and helping dough develop a subtle savory note. Dissolve evenly into the flour to avoid pockets of salt.
- 1/3 cups shortening butter-flavored Tenderize the pastry by coating flour proteins and creating flaky layers when cold and cut into the flour. Keep chilled and handle minimally to prevent melting and ensure a tender crust.
- 3 tablespoons ice-cold water Bind the dough and hydrate the flour proteins to allow the pastry to come together without becoming tough. Add ice-cold water slowly and chill the dough briefly if needed to maintain flakiness.
- 2 small apples I like Honeycrisp! 1 3/4 cups Provide the main filling element with sweetness, moisture, and texture once peeled and diced or sliced. Choose a crisp, flavorful apple and toss with acid and spices to maintain shape and flavor during baking.
- 1 teaspoon lemon juice Brighten the fruit filling by adding acidity to prevent browning and enhance flavor contrast. Mix into the apple pieces to distribute flavor and help the fruit hold its color.
- 1 teaspoon flour Thicken the fruit filling juices slightly to prevent a runny filling and help the pie set. Toss with the apples so the flour coats fruit evenly and absorbs excess moisture while baking.
- 1/2 teaspoon ground cinnamon Warm and deepen the apple filling flavor with earthy, sweet spice that complements brown sugar. Mix thoroughly with the fruit so the cinnamon infuses evenly during baking.
- 1/8 teaspoon nutmeg Add aromatic warmth and a hint of nutty sweetness for complexity in the filling. Use sparingly and distribute evenly to avoid overpowering the other spices.
- 2 tablespoons granulated sugar Sweeten the apple filling with clean, straightforward sweetness that caramelizes slightly during baking. Combine with the apples and sugars to create a balanced, well-rounded filling.
- 2 tablespoons light brown sugar Contribute moisture, richness, and deeper caramel-like flavor to the filling when cooked. Mix with granulated sugar and apples to create a lightly sauced, flavorful interior.
- 1/2 tablespoon unsalted butter Enrich the topping or filling with creamy, savory richness that melts to create a glossy finish and added flavor. Cut cold and place on top of filling so it browns during baking.
- 1/4 tablespoon unsalted butter Add a small dot of richness or to finish the baked mini pies, offering a delicate buttery note. Place sparingly on top prior to baking or on warm pies to melt into the crust edges.
- 1/2 tablespoon granulated sugar Provide a light finishing sweetness for sprinkling on the assembled pies to enhance caramelization and surface texture. Distribute evenly for consistent sweetness and slight crunch after baking.
- 1/2 teaspoon ground cinnamon Offer a finishing sprinkle of warm spice to enhance the crust or topping after sugar application. Dust lightly for balanced aroma and flavor without overwhelming the filling.
Instructions
- Preheat the oven to 425℉. Spray two 4-ounce ramekins with cooking spray and set aside.: As the oven warms you will notice a dry, anticipatory heat filling the kitchen, which primes the baking environment so the crust begins to set immediately, producing a flakier bottom. Preheating ensures accurate bake times and consistent browning, and spraying the ramekins prevents sticking so the crust lifts out smoothly. A typical error is under heating the oven, which yields a soggy bottom crust, or over spraying the ramekins which can pool and soften pastry edges, so use a light, even coat and wait for the full heat to build.
- Combine flour and salt in a small bowl. With a pastry cutter, cut in the shortening until the shortening pieces form small bits. Slowly add in water 1 tablespoon at a time. Knead the dough as little as possible and shape into a large ball. Wrap the ball of dough in plastic wrap and place in the fridge.: Right away you will sense the tactile contrast between flour and cold shortening, and the cutting action should leave pea sized bits of fat coated in flour, which melt in the oven to create flakiness. Adding ice cold water one tablespoon at a time lets you control moisture, bringing the dough together without making it wet. Wrapping and chilling firms the fat, reducing gluten development, and makes rolling much easier. Avoid over kneading, which warms the fat and activates too much gluten, resulting in a tough crust; if the dough feels elastic rather than tender, rest it longer in the fridge.
- Peel, core, and chop apples into small pieces and lightly toss them in lemon juice. In the same bowl, add flour, cinnamon, nutmeg, granulated sugar, and brown sugar, stirring until apples are evenly coated with the spiced mixture.: When you cut the apples you will hear a crisp snap and see glistening white flesh, then the lemon juice will brighten the fruit and halt browning. Tossing with the dry mix coats each piece so spices and sugars penetrate during baking, producing a cohesive filling. The tiny grains of sugar begin to draw juice from the apples as you mix, which is why uniform piece size matters for even cooking. A common slip is chopping unevenly, which can leave some pieces undercooked and others falling apart; aim for consistent small dice for uniform texture.
- Remove dough from fridge and roll it out. Using the ramekins inverted, cut out 2 circles of dough. Place the circle of dough in the bottom of the ramekins. Rip off some dough and place the dough around the edges of the ramekins. Make sure dough is thin so it cooks properly.: The chilled dough should roll smoothly without tearing, and when you lift the circle it will hold shape, a sign it is properly rested. Inverting the ramekin as a template guarantees a perfect fit, and pressing a thin strip of dough around the rim creates a neat edge that browns attractively. Thin dough cooks evenly and prevents raw pockets; too thick a crust will stay doughy, too thin will crisp and possibly break when filled. If the dough resists stretching, let it rest five to ten minutes to relax the gluten.
- Stuff apple filling into ramekins and pack tightly. Cut the 1/2 tablespoon butter into tiny pieces and top the pies equally with butter.: As you fill, the sound changes from dry flour rustle to a moist, compacted mound, and pressing the apples in tightly prevents large air pockets that can steam and create a soggy interior. Dotting with small pieces of unsalted butter lets pockets of richness melt into the fruit, producing glossy, layered flavor. Over packing can force juices up under the top crust and cause leaking, while under packing yields air gaps that collapse during baking; aim for a snug, even fill.
- Cover the pie with another circle piece of dough or create a lattice top (see note 1).: A full top will seal in juices and create a classic look, while a lattice allows steam to escape and offers a crisper top texture. If you choose lattice, weaving strips produces visual appeal and more surface area for a crunchy finish after brushing with butter. A mistake here is sealing poorly, which can cause leaking during baking; moisten the rim lightly to help the top adhere and trim excess dough for neat edges.
- From the Topping section, melt butter and brush over pies with a pastry brush. Stir together the sugar and cinnamon and sprinkle on top of pies.: Brushing the surface with melted unsalted butter creates a glossy sheen that encourages even browning, and the cinnamon sugar forms a caramelized finish that crackles slightly when the pies are warm. The aroma of butter and cinnamon intensifies as they hit the hot crust, signaling a nearly done bake. Skip the brushing or use too much butter and the topping can pool and burn; aim for an even, light coat and an even sprinkle of the sugar mixture.
- Place pies on a sheet pan and bake for 8 minutes at 425℉, then reduce to 350℉ and bake for 25-30 minutes. Cover pies with a foil tent if they brown too much.: The initial high heat gives an immediate lift and fast set to the crust, and lowering the temperature allows the filling to cook through without over browning the top. You will notice the filling begin to bubble at the edges and the crust take on a warm golden color. If the tops brown too quickly, a foil tent protects them while the interior finishes cooking. A common pitfall is skipping the temperature reduction, which can scorch the crust before the apples become tender.
- Remove from oven, let cool, and enjoy!: After baking you will see bubbling juices and a deeply golden crust, and letting the pies rest allows the filling to set so slices hold their shape. Cooling also mellows the searing heat of the filling so you can taste the layered spices and butter without burning your mouth. Rushing to cut while piping hot can cause runny filling and burns, so give them time, roughly ten to fifteen minutes, to settle before serving.
Notes
- Chill the dough: Keeping the dough cold is the single best trick for flakiness. When the fat stays solid until it hits the oven, it creates steam pockets that separate layers. If you warmed the dough while handling it, pop it back in the fridge for ten to fifteen minutes before rolling to relax gluten and firm the fat.
- Measure like a pro: Spoon flour into your measuring cup then level it off with a knife rather than scooping directly; too much flour produces a dense crust. If your dough feels dry, add ice cold water one teaspoon at a time until it just holds.
- Apple selection matters: I prefer Honeycrisp for texture, but any firm baking apple works. Softer varieties can break down, so adjust your chop size and watch bake time closely to avoid a puree like filling.
- Pack but don’t overfill: Tightly packed apples reduce air pockets and ensure a steady bubble of juices, but overfilling can lead to leaks. Fill to just below the rim so the top can sit without spilling.
- Lattice option: If you choose a lattice top, weave strips over the filling and brush with melted unsalted butter for a crisp, attractive finish. Trim and crimp edges to seal the pie and prevent leakage.