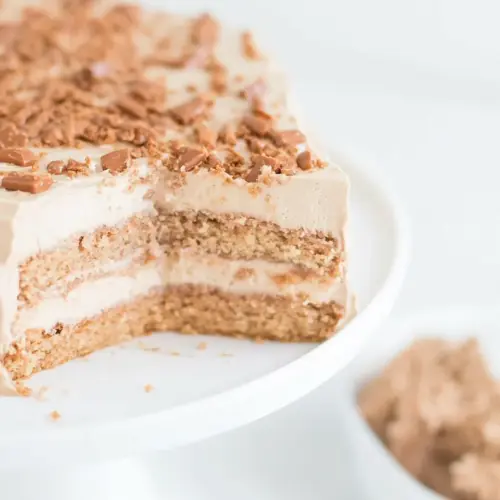
Milky Way Cake
Milky Way Cake is a rich, nostalgic layered dessert that combines melted candy bars with tender cake and a glossy marshmallow chocolate frosting, creating creamy and indulgent slices. This candy bar inspired cake yields moist layers and a fudgy top, perfect for an easy weeknight celebration or a crowd pleasing dessert. Make it for gatherings when you want a show stopping, comforting treat.
Equipment
- Oven
- 9-inch cake pans
- Electric Mixer
- Double boiler or heatproof bowl over saucepan
- Medium Saucepan
Ingredients
- 8 regular sized Milky Way candy bars Provide chopped chocolate and nougat pieces to fold into batter or layer on top, contributing chewy texture and sweet caramel-chocolate flavor that defines the cake. Enhance visual appeal when cut and add pockets of gooey richness that contrast with the crumb. Handle gently to preserve chunk integrity during mixing.
- 1 1/2 cups (3 sticks) butter (at room temperature) divided Contribute creaminess and structure when creamed with sugar, promoting a tender crumb and moist mouthfeel; using room-temperature butter ensures it incorporates smoothly for optimal aeration. Divide as specified to allow separate roles: part in the batter and part in the topping or sauce. Measure and soften precisely to maintain emulsion and texture.
- 2 cups granulated white sugar Sweeten and tenderize the cake batter while helping to create a fine crumb when creamed with butter; sugar also aids in browning and caramelization during baking. Use the full amount specified to balance richness from candies and chocolate. Dissolve adequately for uniform sweetness in the batter.
- 4 large eggs well-beaten Incorporate moisture and provide structure and leavening through protein coagulation; beating eggs well helps distribute air and contributes to a consistent crumb. Add at room temperature to prevent curdling of the batter when combined with butter and buttermilk. Eggs also enrich flavor and color.
- 2 1/2 cups all-purpose flour Provide the primary dry structure and bulk for the cake, supplying gluten that forms the framework when mixed with wet ingredients; sift or whisk to ensure even distribution. Use all-purpose flour for a balance of tenderness and strength appropriate for layered cakes. Measure accurately to avoid a dense result.
- 1/2 teaspoon baking soda Act as a leavening booster in combination with acidic buttermilk, helping the cake rise and become light; measuring precisely prevents uneven texture or metallic taste. Dissolve or whisk into the dry ingredients to ensure even lift throughout the batter. Avoid overuse to prevent excessive crumb coarseness.
- 1 1/4 cups buttermilk Contribute acidity and moisture while reacting with baking soda to produce carbon dioxide for leavening, also imparting a subtle tang that balances sweetness. Warm or room-temperature buttermilk blends more smoothly into batter and helps maintain tender crumb. Use the specified amount to achieve proper chemical balance.
- 1 teaspoon vanilla extract Provide aromatic depth and subtle sweetness that enhances and rounds other flavors, especially chocolate and caramel; vanilla extract amplifies perceived sweetness without adding sugar. Add with wet ingredients to distribute flavor evenly. Use pure vanilla when possible for best results.
- 2 1/2 cups granulated white sugar Sweeten and balance the rich, buttery components while contributing to structure and moistness across the cake layers and filling; the second sugar amount may be for a separate component like frosting or filling. Dissolve properly when making sauces or creams to avoid grittiness. Adjust technique according to its role in the recipe.
- 1 cup evaporated milk Add concentrated milk solids and creaminess to fillings or sauces, enriching mouthfeel and contributing to a silky caramel-like sauce when reduced or combined with sugar. Warm slightly to incorporate smoothly with butter and sugar for an even sauce. Use measured amount to control consistency and sweetness.
- 1/2 cup (1 stick) butter Provide richness and fat to enrich batters, frostings, or sauces, contributing smooth mouthfeel and flavor; using a single stick allows for controlled fat content in the topping. Soften to room temperature for easier blending, or melt gently if the recipe calls for a pourable sauce. Use as directed to balance texture.
- 1 cup marshmallow cream Offer a sweet, fluffy texture and marshmallow flavor for fillings or toppings while contributing to sheen and spreadability in frostings. Stir in at low speed or fold gently to maintain airiness and prevent deflation. Use measured amount to achieve desired consistency without making the mixture overly sticky.
- 6 ounces milk chocolate chips Provide additional milk-chocolate flavor and meltable texture for glazes, chips, or garnishes; melting or folding in chips adds smooth chocolate pockets and sheen. Choose quality milk chocolate for a creamy taste that complements Milky Way pieces. Add near the end of assembly to prevent over-melting and separation.
Instructions
- Preheat oven to 325 degrees F. Grease and flour three 9-inch cake pans.: The kitchen will begin to warm, and you may notice a faint hum from the oven as it reaches 325 degrees F . Properly greasing and flouring each pan prevents the cake from sticking, so swipe the pans with butter or oil and dust with flour until evenly coated. You should see a thin, even sheen on the metal and a slight powdery fog from the flour. This step matters because a pan that sticks can tear the crumb and ruin your layered look. A common mistake is skimping on grease, which leads to stuck edges; if you skip flour, the butter alone can brown and adhere to the cake.
- In a double boiler, melt the candy bars with 1/2 cup butter. As the candy bars and butter are melting, they will begin to look almost curdled, but it will eventually come together into a smooth consistency. Remove from heat and let cool.: As the mixture heats, you'll first hear gentle bubbling and see the candy bars break down into glossy ribbons of chocolate and caramel. At first the mixture may look curdled or grainy, but continue stirring over indirect heat and it will smooth into a satiny mass. Removing it from heat and letting it cool slightly prevents scrambled eggs or melting your batter prematurely when combined. If you overheat directly, the candy can seize or scorch, producing a burnt note, so always use gentle, even heat.
- In a large bowl, use an electric mixer to combine the remaining 1 cup of butter with the sugar. Mix in the beaten eggs and cooled chocolate mixture.: When you cream butter and sugar together, aim for a pale, fluffy texture that traps air for lift. You should hear a soft whir from the mixer and see the mixture lighten in color and increase slightly in volume. This aeration is important for a tender crumb. A common pitfall is overbeating, which can cause the batter to become too soft and collapse later; stop once it is creamy and smooth.
- Sift the flour and baking soda together. Alternately mix in flour and buttermilk to the batter, blending well. Add the vanilla.: At this point, you will add the well beaten eggs and the cooled melted candy blend, folding slowly so the batter remains emulsified. The batter will take on a deeper color and richer aroma, with caramel notes rising. If the chocolate is still warm it can deflate the creamed butter , so always ensure the candy mixture is cool to the touch. A mistake here is adding hot chocolate to the eggs, which can cook them and create lumps; tempering or waiting until cooled avoids that.
- Divide the batter between the three cake pans, filling each no more than halfway. Bake 30 to 40 minutes, or until toothpick inserted in the center comes out clean. If you have extra batter, make a few cupcakes!: When you sift the flour and baking soda , you eliminate clumps and aerate the dry ingredients. Alternate adding portions of dry mix with buttermilk , mixing gently so the batter remains tender and not overworked. You will notice the batter change to a smooth, cohesive texture with a sheen from the fats. Adding vanilla at the end brightens the flavor. Overmixing after adding flour can develop gluten, resulting in a tough cake, so stop mixing once no streaks remain.
- To prepare the frosting: Combine the sugar and evaporated milk in a medium saucepan. Cook to a soft-ball stage. Remove from heat and add butter, marshmallow cream and chocolate chips, stirring until all have melted.: As you pour the batter into the pans, it should flow slowly and settle evenly. Place the pans in the preheated oven; within the first 10 to 15 minutes you may see the tops set and edges pull slightly away from the pan. The aroma will shift from sugary to warmly chocolatey, and you may hear a faint crackle as surface moisture escapes. A tester inserted in the center should come out clean or with a few moist crumbs, not wet batter. A frequent error is overbaking which dries the crumb, so begin checking at 30 minutes and rotate pans for even baking if needed.
- Place one layer of the cake on a platter. Frost the top of that layer, letting the frosting spill over the sides a bit. Add another layer of cake on top of the first. Frost that one the same way. Add the final layer of cake on top and use the rest of the frosting. Note that the sides of the cake will be "naked," and the frosting is just spread on top of each layer.: Combine the sugar and evaporated milk in a medium saucepan. Cook to a soft-ball stage. : This is a pivotal sensory moment, as the syrup will bubble energetically and steam, smelling sweet and slightly caramelized. Use a candy thermometer or the cold water test to confirm the soft-ball stage; when a small drop forms a soft, flexible ball in cold water, it is ready. Cooking to this stage creates a syrup that will thicken into a glossy frosting with body. Watch closely and stir to prevent scorching; overheating past soft-ball will yield a firmer candy texture and a less spreadable frosting.
- Remove from heat and add butter, marshmallow cream and chocolate chips, stirring until all have melted.: Once off the heat, the hot syrup will begin to steam and settle, and adding butter , marshmallow cream , and chocolate chips will create an aromatic, velvety mixture. Stir until the chips melt and the marshmallow cream is fully incorporated, producing a glossy, thick frosting. Allow it to cool slightly so it is spreadable without being runny. A common problem is adding cold ingredients too quickly, which can cause the frosting to seize or the fats to separate, so add them in measured amounts and stir gently to emulsify.
- Place one layer of the cake on a platter. Frost the top of that layer, letting the frosting spill over the sides a bit.: The first layer will feel warm to the touch if not fully cooled, so I often set a thin protective barrier under the platter. Spoon a generous portion of frosting onto the center and use a spatula to encourage it toward the edges, letting it drape over slightly for a rustic look. The glossy surface should settle into a small pool with gentle drips. If the frosting is too hot, it will melt into the cake; if too cool, it will be stiff and hard to spread, so aim for a warm, viscous texture.
- Add another layer of cake on top of the first. Frost that one the same way.: As you stack the second layer, press gently to settle it into place without compressing the crumb. The middle layer will compress slightly, creating a harmonious sandwich of cake and frosting. Spread frosting across the top so it cascades beautifully; this layered approach builds both height and flavor. A misstep here is misaligned layers, which creates a lopsided cake; take a moment to center each layer as you go.
- Add the final layer of cake on top and use the rest of the frosting. Note that the sides of the cake will be "naked," and the frosting is just spread on top of each layer.: The final layer creates a dramatic profile, with frosting pooled on top and intentionally minimal coverage at the sides. This naked aesthetic showcases the layers while keeping the cake approachable. The top will gleam and slightly firm as the frosting cools. Avoid overhandling the sides, which can create a messy crumb trail; if crumbs appear, accept a rustic finish, as it complements the cake's indulgent character.
Notes
- Reduce sweetness for balance. If you find the cake too sweet, consider slightly decreasing the sugar in the cake by a small fraction, but keep the frosting proportions intact so the structure and texture remain consistent. Taste as you go and make conservative adjustments.
- Use room temperature ingredients. Ensuring butter and eggs are at room temperature helps them incorporate smoothly, preventing a lumpy batter and improving overall rise. Cold ingredients can result in uneven texture.
- Protect from heat when stacking. If the frosting is still warm, place the assembled cake in a cooler spot to set briefly, which prevents sliding layers and gives the frosting time to thicken into a glossy finish.
- Make cupcakes with extra batter. If you have leftover batter, bake cupcakes at a slightly higher temperature and shorter time. They’re excellent for portion control and make great party favors without altering the main cake.
- Chill pans for cleaner removal. After cooling slightly, invert pans onto a rack and let them rest until just warm, then gently release. This yields cleaner edges and preserves the layers for stacking neatly.