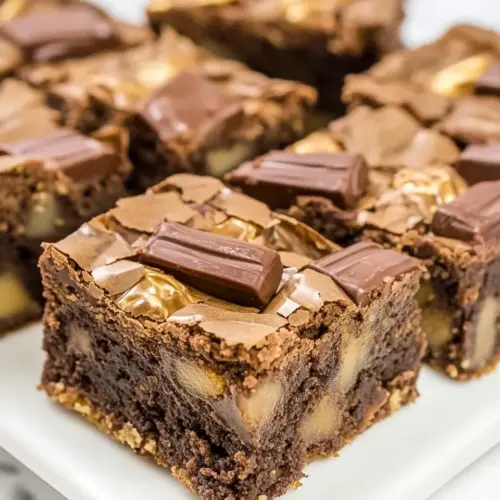
Milky Way Brownies
Milky Way Brownies marry fudgy chocolate brownie texture with chewy pockets of candy bar caramel and nougat, creating a rich and playful treat. This easy to follow recipe yields glossy ganache topped squares perfect for parties or cozy nights, and it’s an ideal choice for an easy weeknight dessert that feels special. Make a pan to share, and watch them disappear.
Equipment
- 9×9 inch Baking Dish
- Parchment Paper
- Mixing Bowls
- Microwave
- Offset Spatula
- large kitchen knife
Ingredients
- 11/3 cups all-purpose flour Measure precisely and combine with dry ingredients to provide structure and bulk to the brownie batter; sifts easily to remove lumps and ensures even mixing for consistent texture.
- 3 tablespoons unsweetened cocoa powder (I used Hershey’s cocoa powder) Add sparingly to intensify chocolate flavor and contribute a deeper cocoa profile; whisk thoroughly with dry ingredients to distribute flavor evenly throughout the batter.
- 1/2 teaspoons salt Season lightly to balance sweetness and enhance the chocolate notes; dissolve into the batter to help control overall flavor and strengthen gluten formation subtly.
- 11/4 cups semisweet chocolate chips Melt or fold in to create rich pockets of chocolate that add fudginess and concentrated sweetness; mixes smoothly when warmed and helps produce a dense, decadent crumb.
- 1 cup salted sweet cream butter Soften to a spreadable consistency and cream with sugars to incorporate air for tenderness; contributes fat that yields moistness, rich flavor, and a smooth mouthfeel.
- 2/3 cup light brown sugar (packed) Cream together with butter and sugar to add moisture, a hint of caramel flavor, and help create a tender, chewy brownie texture; packing removes air for accurate measurement.
- 1 cup granulated sugar Cream with butter to aerate the mixture slightly and provide sweetness; granulated sugar helps create a glossy crust and balanced sweetness throughout the brownies.
- 2 extra large eggs (room temperature) Bring room temperature and beat in to bind ingredients, add moisture, and contribute to structure via coagulated proteins; allows for even incorporation and better rise.
- 2 teaspoons pure vanilla extract Add to flavor the batter with aromatic vanilla notes and enhance perceived sweetness; blends easily into wet ingredients to round out overall flavor complexity.
- 13/4 cups unwrapped Milky Way minis Scatter in for gooey caramel-chocolate pockets that add texture, sweetness, and a signature Milky Way chewiness; press lightly into batter so they stay distributed while baking.
- 1/2 cup semisweet chocolate chips Reserve to melt or sprinkle on top for extra chocolate intensity and visual appeal; melts smoothly when warmed to create glossy chocolate ribbons or chips within the brownies.
- 3 tablespoons heavy cream Stir in to create a silky ganache or drizzle when combined with chocolate chips for finishing; heavy cream adds richness and helps create a smooth, pourable chocolate topping.
- 11/2 cups unwrapped Milky Way minis Fold in as mix-ins to provide additional caramel-centered bites and varied texture; adding more minis increases candy distribution and amplifies the Milky Way flavor throughout the brownies.
Instructions
- Line a small cookie sheet with parchment paper. Unwrap 36 Milky Way minis candies (approx 13/4 cups). Place them on the cookie sheet and place them in the freezer while making the brownie batter.: You will smell the faint paper and chocolate as you unwrap each Milky Way minis , and placing them on the sheet in a single layer helps them freeze evenly. The cold candies will hold their shape during baking, which is why we freeze them first. A common mistake is skipping the freeze step, which can cause candies to melt into the batter rather than remain chewy.
- Preheat the oven to 350°F. Line a 9×9-inch baking dish with parchment paper or heavy-duty aluminum foil, making sure to leave an overhang to help lift the brownies out of the pan. Lightly spray the lined baking dish with baking spray (Baker’s Joy or a generic version). Set it aside.: The oven should feel steady and warm, and lining the 9×9 inch pan with parchment lets you lift the slab out easily later. Spraying the lined pan helps the brownie release cleanly. Don't crowd the oven or open the door frequently, as temperature swings can change baking time and texture.
- Using a small mixing bowl (3-4 cups), whisk together the flour, cocoa powder, and salt. Set it aside.: As you whisk, you will see the dry mix take on an even chocolate tone, and the texture will be airy which helps distribute the cocoa. This step prevents lumps and ensures an even crumb. Overmixing when combining dry and wet ingredients later will make the brownies tougher, so be gentle.
- Using a medium-sized microwave-safe mixing bowl (2-3 quarts), combine the semisweet chocolate chips and butter. Microwave for 1 minute, stir, and heat in 15-second intervals until the mixture is melted and smooth.: You will notice the chips soften and the butter melt into a glossy mass, giving off a warm, chocolate aroma. Stirring between bursts prevents hot spots and keeps the melt silky. A typical error is overheating, which can make the chocolate grainy, so use short intervals.
- Add the light brown and granulated sugars to the chocolate mixture, and continue stirring until incorporated.: The sugars will dissolve partially and the mixture will take on a thicker sheen, with a slightly grainy feel that smooths as you continue stirring. This step builds sweetness and helps create a tender crust. Leaving large sugar grains undissolved can cause small crunchy pockets in the finished brownie.
- Stir in the eggs, one at a time, until no egg streaks are visible.: As the eggs join the warm chocolate, you will notice the batter become more glossy and fluid, forming a cohesive, elastic mixture. Adding eggs slowly helps maintain a smooth emulsion and prevents the batter from appearing separated. Adding cold eggs or too quickly can cause the batter to curdle.
- Stir in the vanilla.: The scent of vanilla will bloom, rounding and deepening the chocolate profile, and the batter will look a touch silkier. Vanilla amplifies sweetness and highlights the chocolate notes. Using artificial or low quality vanilla can result in a flatter aroma.
- Stir in 1/2 of the flour mixture at a time. Stir just until all the flour mixture is added, and do not overmix.: As you fold in the flour mix, the batter will matte slightly and thicken, showing fine streaks until fully combined; stopping as soon as no streaks remain keeps the crumb fudgy. This technique avoids gluten overdevelopment. Overworking here will yield a cakier texture rather than the desired dense fudginess.
- Spoon 1/2 of the brownie batter into the prepared pan. Spread the batter to the edges of the pan.: When you spread the batter, notice its weight and feel the surface smooth under your spatula. This first layer anchors the candies so they sit partly embedded and partly exposed later. If you smear the batter too thin in places, candies can sink and the bake will be uneven.
- Remove the Milky Way minis from the freezer and evenly place them on top of the batter.: The chilled Milky Way minis will feel firm to the touch and contrast with the soft batter, and they should be spaced so every piece gets a candy. The candies will soften during baking but remain distinct. If they are too close together, they can fuse into a single, very chewy area.
- Spoon and spread the remaining batter over the top of the Milky Way minis layer. Bake for 30-35 minutes, until a toothpick inserted comes away clean. (All stoves cook differently, so begin checking at the 25-minute mark): As the brownies bake, you will smell deepening chocolate and notice edges pulling slightly from the pan; the center will set without drying out if you watch for the toothpick cue. Start checking at 25 minutes because ovens vary. Overbaking will produce drier, crumbly brownies rather than a fudgy interior.
- Using a small heat-safe mixing bowl, add the 1/2 cup semisweet chocolate and heavy cream. Microwave for 30-40 seconds. Stir until the ganache is smooth.: The heavy cream will heat and loosen the chocolate into a pourable, glossy ganache with a warm dairy aroma. Stirring until silky ensures a smooth top coat that will set to a gleaming finish. If you heat too aggressively, the chocolate can seize and become grainy.
- Once the brownies are baked, pour the ganache over the top of the brownies. Use an offset spatula or silicone spatula to spread the ganache to the edges.: The ganache should flow evenly, creating a shiny mirror like surface and a faint, warm chocolate scent. Use an offset spatula to coax it into corners so the whole top is covered uniformly. Applying ganache while the brownies are extremely hot can cause it to sink into the surface rather than remain visible.
- Evenly space the remaining 11/2 cups of Milky Way minis over the top of the ganache. Allow the brownies to cool completely.: Pressing the candies lightly ensures they adhere as the ganache sets, creating a compelling visual and textural contrast. Cooling fully is key so slices hold shape. Cutting too soon will cause the ganache to smear and slices to collapse.
- Use the parchment paper to lift the brownies out of the pan. Use a large sharp kitchen knife to carefully cut 4 slices x 4 slices before serving.: The cooled slab will slide out easily on the parchment, and a sharp large kitchen knife gives clean edges, revealing pockets of candy and glossy ganache. Wiping the knife between cuts reduces drag and keeps slices neat. A dull knife or cutting while warm are common errors that produce ragged pieces.
Notes
- Line the pan with parchment to lift the entire slab out for easy cutting and cleaner slices, this simple step saves effort during plating.
- Avoid overmixing after adding the flour and cocoa, since excessive mixing develops gluten and leads to cakier brownies instead of a fudgy texture.
- Calibrate your oven if you suspect it runs hot or cool, and always start checking at 25 minutes to prevent overbaking that dries the interior.
- Freeze or chill the candies before baking to keep them intact and prevent them from fully melting into the batter, preserving chewy pockets.
- Use a sharp large knife and wipe it between cuts for clean edges and pretty squares, especially with a glossy ganache that can smear.