Meat Piroshki
Meat Piroshki combines a crispy golden shell with a juicy, herbaceous meat filling, rich from ground beef and lightened by ground turkey. This easy, crowd friendly snack works for weekends or an easy weeknight dinner, offering comforting textures and savory aromas. Make a big batch to feed friends and family, it’s a hands on, rewarding recipe you will return to again and again.
Equipment
- Large Skillet
- Stand mixer or bread maker
- Heavy bottomed pan or cast iron dutch oven
- Thermometer
Ingredients
- 1 1/2 tbsp oil Heat-adding oil used to enrich dough and provide moisture, aiding gluten development and extensibility during mixing; contributes subtle richness and helps the finished crust brown when baked or fried.
- 15 oz warm water Add-warm water used to activate yeast and hydrate flour, creating the proper dough consistency and temperature for fermentation; ensures even hydration and improves dough elasticity for easy shaping.
- 4 cup s + 2 Tbsp all-purpose flour, divided Measure-multipurpose all-purpose flour measured as specified and divided to allow initial dough development and later dusting or adjustment; provides structure through gluten formation and balances hydration for correct texture.
- 1 tsp salt Season-add salt helps regulate yeast activity and strengthens gluten structure while enhancing overall flavor balance in the dough; it also controls fermentation rate to prevent overproofing.
- 1 tbsp Active Dry Yeast Activate-yeast Active Dry Yeast used to leaven the dough by producing carbon dioxide during fermentation, giving the piroshki their airy interior; must be dissolved or proofed in warm liquid to ensure viability.
- 1 lb ground turkey Brown-cook ground turkey used as a lean protein filling base that provides a mild flavor and tender texture when sautéed; absorbs seasonings and vegetables, creating a moist savory interior for the piroshki.
- 1 lb ground beef, Fat content: 80/20 Brown-cook ground beef with specified fat content used to add richness, juiciness, and savory depth to the filling; fat contributes mouthfeel and helps bind filling components during sautéing.
- 2 tbsp olive oil Sauté-olive oil used for cooking the filling ingredients, imparting a fruity flavor and preventing sticking while helping to soften vegetables and brown the meats evenly.
- 1/2 tsp salt Season-add salt used within the filling to amplify flavors and balance the natural sweetness of vegetables and fats; helps proteins retain moisture during cooking.
- 1/4 tsp pepper Season-add pepper used to introduce mild heat and aromatic complexity to the filling, complementing other spices and enhancing the savory profile of the meats and vegetables.
- 1/2 tsp garlic powder Season-add garlic powder used to impart concentrated garlic flavor to the filling without adding moisture, distributing aroma evenly throughout the mixture and providing a base savory note.
- 1/2 large onion, finely diced Sauté-dice onion finely to provide a sweet, aromatic base for the filling that softens during cooking and integrates into the meat for consistent texture and enhanced flavor.
- 1 medium carrot, finely grated Grate-add carrot finely to contribute natural sweetness, color, and moisture to the filling while adding subtle texture; balances savory meats and helps retain juiciness.
- 3 tbsp dill Chop-add dill used to introduce a fresh herbaceous note and bright, slightly citrusy flavor that complements rich meats and mayonnaise in the filling, adding complexity and freshness.
- 2 tbsp mayonnaise Bind-add mayonnaise used as a creamy binder and flavor enhancer in the filling, contributing moisture, richness, and a smooth mouthfeel that helps hold ingredients together.
- 1/2 cup warm water Hydrate-warm water used to adjust filling consistency or finish dough hydration, ensuring proper texture and temperature for mixing or shaping; assists in dissolving seasonings if combined.
- Enough canola oil to go half-way up the side of the piroshky when frying. Fill-frying oil used in sufficient quantity to reach halfway up the piroshky sides so they fry evenly, creating a crisp golden exterior while cooking the filling thoroughly inside.
- Lots of extra flour to dust the cutting board, I probably use at least 1/2 cup extra flour Dust-flour extra used liberally to prevent dough sticking during rolling and shaping on the cutting board, facilitating smooth handling and maintaining dough integrity without altering the recipe proportions.
- this is for one serving, so increase it accordingly Multiply-note indicating the ingredient list quantities are for a single serving and should be increased proportionally for multiple servings; helps scale the recipe while keeping ingredient ratios intact.
- 1/4 cup warm water Hydrate-warm water used again in small measure for dough or filling adjustments, aiding final consistency and ensuring proper temperature for any finishing steps or dough seams.
- 1 tbsp olive oil, you can use any kind of oil really Brush-olive oil used to finish or enrich dough edges or as a light frying aid; provides a subtle flavor and prevents drying, and can substitute for other neutral oils if needed.
- 1 garlic clove, pressed Press-garlic clove used freshly pressed to add bright, pungent garlic aroma and flavor to dressings or filling, offering a livelier taste than powdered forms and enhancing overall savoriness.
- 1/2 tsp salt Season-add salt used here to fine-tune the final seasoning of a sauce, dressing, or filling; balances flavors and brings out the natural taste of other ingredients without overpowering them.
Instructions
- Heat a large skillet over medium/high heat. Brown ground beef and turkey, breaking it up into small pieces with a spatula. Season meat with 1/2 tsp salt, 1/4 tsp pepper and 1/2 tsp garlic powder.: You will hear a steady sizzle as the ground beef and ground turkey hit the hot pan, and that sound tells you the Maillard reaction is working to develop deep savory flavor. As pieces brown they will darken to a rich mahogany, and small caramelized bits will cling to the pan, offering concentrated flavor when deglazed or stirred back into the mixture. The aroma evolves from raw meat to roasted and nutty, and that shift is your cue to keep cooking until much of the moisture has evaporated but before any burning occurs. A common mistake is overcrowding the skillet, which causes steaming rather than browning, so work in a wide pan and keep the heat steady. Use a spatula to break the meat into small pieces, aiming for an even texture that will fit neatly inside the dough pockets.
- When the meat is almost done, add diced onion and saute 5 minutes, stirring occasionally.: As the diced onion hits the pan, it will hiss softly and begin to soften, releasing sweet, sulfurous aromas that mellow as they caramelize. After a few minutes the onion becomes translucent, then edges will pick up a golden tint, giving a sweeter, nuttier flavor that complements the meat. Stirring occasionally ensures even cooking and prevents any bits from sticking or burning, which can add unwanted bitterness. Watch for the sound to quiet as moisture leaves the onion; that indicates it is becoming tender. Avoid rushing to high heat, because scorched onion will taint the filling. Properly cooked onion brings layered sweetness that balances the savory meat.
- Add shredded carrots and saute another 3 minutes, stirring occasionally.: Introducing the shredded carrot adds a bright, vegetal sweetness and a moist texture that helps bind the filling. You will see the carrot soften and meld with the onion, and the pan will give off a gentle sweet aroma. The sound remains a low sizzle, and steam rises slightly as the carrot releases its juices into the mixture. Keep stirring now and then so the carrot softens evenly and does not cling to the pan. A typical error is adding too large pieces that take longer to cook, so grating the carrot fine ensures it integrates smoothly and contributes moisture without large crunchy bits.
- Add 3 tbsp dill, mix well.: When you fold in the dill , a fresh, herbaceous note will lift the heavier meat flavors, creating an aromatic contrast that makes the filling feel lighter. The green flecks should distribute evenly, and you will notice the scent become more fragrant and gardenlike. Mix thoroughly so every spoonful has bits of herb, which brightens the overall profile. Overusing dill could overpower, so stick to the measured amount for balance. One pitfall is adding dried dill as if it were fresh, which can change potency, so adjust cautiously.
- Add mayo, stir well.: Stirring in the mayonnaise creates a silky emulsion that coats the meat and vegetables, giving the filling body and preventing it from drying out when fried. The texture becomes glossy and cohesive, and the binding effect helps the filling hold together when scooped. A note of tang subtly enhances the meatiness, and the mixture should feel moist but not soupy. Avoid overloading with mayo, because excess fat can make sealing the dough slippery and prone to leaks.
- Stir in 1/2 cup water to moisten the meat mix. Transfer meat mix to a bowl and let cool to warm or room temperature.: Adding warm water loosens the mixture just enough so it spreads easily inside the dough without crumbling, adding a steamy richness that helps the filling remain juicy after frying. As the mixture cools in a bowl you will notice steam tapering off and aromas calming to a warm, cohesive scent. Cooling is essential so the dough does not become soggy or begin to cook when assembled. A common trap is stuffing while the filling is too hot, which melts the dough and causes leaking during frying, so allow it to reach warm or room temperature before assembling.
- The easiest way to do this is in a bread maker. If you have one, set it to the dough setting and add the ingredients in the following order: oil, water, 2 cups flour, salt, 2 cups + 2 Tbsp flour, yeast. A bread maker will do the following: mix, let dough rise, mix again and let the dough rise (It takes about 1 to 1 1/2 hours) and once it’s done in the bread maker, its ready to go.: oil, water, 2 cups flour, salt, 2 cups + 2 Tbsp flour, yeast. : Using a bread maker gives you a predictable process, where the machine mixes, kneads, and proofs the dough with consistent temperature and timing. As the cycle runs you will hear gentle whirring and notice the dough form into a smooth ball, tacky but not sticky. The programmed rest periods allow the gluten to relax and rise, which builds structure and flavor. Be mindful to add the ingredients in the correct order so the yeast activates properly. One mistake is using water that is too hot, which can kill the yeast, so aim for comfortably warm liquid to the touch.
- You can also make this dough using a stand mixer with a dough hook on speed 2 (mix all the ingredients together, let rise, mix again and then let it rise in a warm place (like the oven). (It should be 2 to 2 1/2 times in volume). While it's rising, work on the meat filling for piroshki - see below.: In a stand mixer you will hear the hook knead and feel the bowl's vibration as the gluten develops, and the dough will transition from shaggy to elastic and smooth. Proofing in a warm environment speeds rising and gives a predictable volume increase, which you can watch through the bowl or by the touch test when it springs back slowly. This method gives excellent control over dough texture, but avoid overmixing which can make the dough tough. If your kitchen is cold, create a warmed oven environment to encourage even proofing.
- Put the finished dough onto a well floured cutting board, dust the dough with flour and with well-floured hands, shape it into a large log. It will rise more as you make the piroshki.: When you transfer the dough to a floured board it should feel springy and smooth; dusting prevents sticking while shaping. As you form a log you will notice the surface become more uniform and slightly taut, which helps when portioning. The dough will continue to rise slightly as you work, so expect a gentle puffiness. A common issue is using too much flour while shaping, which can dry the dough, so flour sparingly and keep a bowl of extra flour at hand for adjustments.
- Cut off pieces one at a time about 3/4" thick.: Portioning into 3/4 inch thick pieces gives consistent sizes that fry evenly and fill predictably. The cut surfaces reveal a tender crumb, and the pieces should spring back a little when pressed. Work methodically to keep sizes uniform so cooking times do not vary. A frequent mistake is slicing irregular pieces, leading to some piroshki undercooked while others are overdone; use a bench scraper for clean cuts and consistent dimensions.
- Place the piece of dough over your well-floured hand (dough will be sticky) and shape it into a 3" to 4" circle using your hands. Do not put flour on the side where you are going to put the meat, otherwise the sides won’t seal.: As you press the dough into a circle the edges should thin slightly and the center remain thicker to hold the filling. The tactile feedback is important, you should feel a soft elasticity and slight resistance. Keep the side where the filling will sit free of excess flour so the edges seal reliably when pinched. If you add flour to the sealing edge, the dough may not stick and the piroshki can open during frying, so clean hands on the sealing side are essential.
- Stir the meat mix to distribute the juices. Place 1 heaping tablespoon of meat filling in the center. Cover the meat with the sides of the dough (being careful not to let oils or juices seep out), and pinch the edges together to seal the dough. Flatten the pirojki slightly to make them a more uniform size.: The filling should be moist but not runny; when you scoop a heaping tablespoon it will mound slightly and feel cohesive. As you bring the dough edges up, the sealed seam should be firm and continuous without gaps. You will hear a faint tearing sound if you stretch the dough too thin, and that signals a weak seal that could burst during frying. One common mistake is overfilling, which leads to leaks; err on the side of slightly less filling for a secure seal. Gently flattening creates uniform contact with the oil for even browning.
- Heat oil in a large, deep, heavy-bottomed pan or cast iron dutch oven. There should be enough oil to cover the pirojki half-way up the side.: As the canola oil warms you will see faint wisps of steam and tiny shimmering on the surface, indicating it is nearing frying temperature. Using a heavy-bottomed pan keeps the heat steady and prevents hot spots that can burn the exterior before the interior cooks. Fill the pan so the oil reaches half the height of the piroshki; this gives an even fry that crisps the bottom and sides. Avoid using too little oil, which causes uneven cooking and soggy dough. Monitor the oil closely and adjust the heat to maintain consistent temperature.
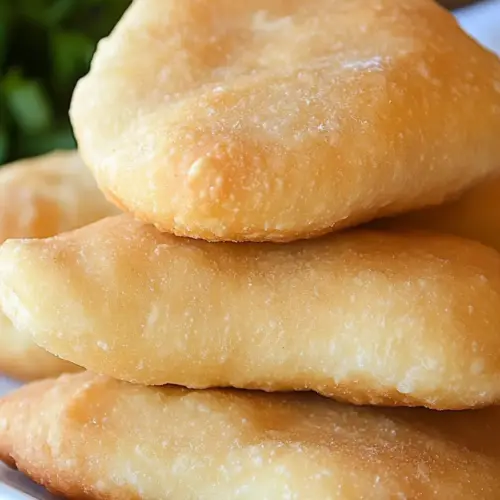
- Place them in the hot oil (about 330° F) and fry until deep golden brown on each side. Sometimes they puff up a lot on one side so you may end up with a third side that needs to be fried.: When the piroshki hit the oil you should hear a lively sizzle, and the exterior will begin to blister and set within seconds. The color will progress from pale to golden, then to deep golden brown as the crust develops. Flip carefully to brown each side evenly, and if one side puffs dramatically, tilt and fry the exposed area so the whole piece attains a balanced color and texture. Use a thermometer if possible to keep the oil around 330 degrees Fahrenheit for controlled frying. Avoid crowding the pan because it reduces oil temperature and leads to greasy results.
- Place on paper towels to cool and enjoy!: As the piroshki drain on paper towels, they will lose excess oil and the crust will crisp further as they cool. The internal steam continues to settle, and when you bite in you should get a contrast of crisp shell and savory, warm filling. Let them rest a few minutes before serving to avoid scalding and to let the juices set slightly. A common oversight is serving immediately straight from the oil, which can cause burns and a soggy texture. Serve warm for the best balance of crunch and juicy interior.
Notes
- Hand washing and flouring: Wash your hands halfway through shaping to prevent the dough from getting gummy on your palms. Keep a small dish of extra flour handy so you can dust as needed, but avoid burying the sealing edge in flour which prevents a tight seam.
- Scaling for company: The recipe notes mention one serving guidance; if you are feeding a group, multiply the batches and use a bread maker or stand mixer to manage large dough volumes consistently.
- Oil choice and level: Use neutral canola oil for frying and fill the pot so the oil comes halfway up the piroshki sides, which yields even crisping without deep frying fully submerged.
- Temperature control: Keep the oil temperature steady around 330 degrees Fahrenheit, adjusting the burner between batches to maintain consistent frying and avoid greasy results.
- Cooling and storage: Drain on paper towels and let cool slightly before serving, and store any leftovers in an airtight container in the fridge for up to two days, reheating in a skillet to refresh the crust.