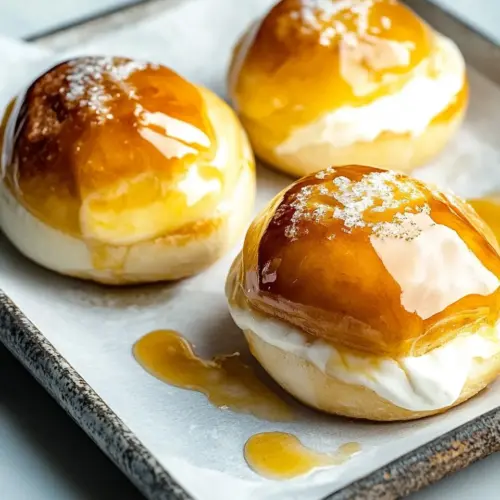
Maple Cream Filled Crème Brûlée Buns
Maple Cream Filled Crème Brûlée Buns are pillowy enriched buns topped with a crisp caramelized glaze and filled with silky maple cream. These bakery style treats combine creamy filling and crunchy top for a textural delight, perfect for a leisurely brunch or special breakfast. Make them for a crowd and enjoy the seasonal warmth in every bite.
Equipment
- Stand mixer
- Dough Hook
- Paddle attachment
- Baking Sheets
- Parchment Paper
- Pastry Brush
- Wire Rack
- Instant read thermometer
- Pastry bag
- 1/4 inch Round Piping Tip
Ingredients
- 1 cup (240 grams) warm whole milk (105°F/40°C to 110°F/43°C) Warm and gently heated to activate yeast and help dissolve sugars, providing the ideal temperature for proofing dough and ensuring proper rise during fermentation.
- 2 1/4 teaspoons (7 grams) active dry yeast Activated by warming liquid and sugar, used to leaven the dough by producing carbon dioxide and creating an airy, tender bun structure during proofing.
- 1/2 cup (100 grams) plus 1 teaspoon (4 grams) granulated sugar, divided Divided to provide initial yeast food for activation and later sweetness in the dough, contributing to flavor, browning, and tender crumb through controlled sugar levels.
- 3 cups (458 grams) all-purpose flour, plus more for dusting Measured and lightly mixed into the dough to provide structure through gluten development while offering enough texture and strength to hold fillings and shape during baking.
- 1 teaspoon (3 grams) kosher salt Kosher coarse salt used to season the dough, regulate yeast activity for controlled fermentation, and strengthen gluten for improved dough handling and final texture.
- 2 large eggs (100 grams), room temperature and divided Beaten and divided to add richness, moisture, and structure; yolks contribute fat and tenderness while whites add protein for binding and lift in the enriched dough.
- 1 tablespoon (13 grams) vanilla extract Aromatic extract added to enhance and deepen overall flavor, contributing warm, sweet vanilla notes that complement the maple and crème brûlée elements.
- 1/2 cup (76 grams) unsalted butter, cubed and softened Softened and cubed butter incorporated to enrich the dough, adding tenderness, flavor, and a soft crumb while improving extensibility and mouthfeel of the buns.
- 1 tablespoon (15 grams) water, room temperature Room-temperature water used to adjust dough consistency, help dissolve ingredients, and ensure proper hydration for gluten development and yeast activity.
- Crème Brûlée Glaze (recipe follows) Described as a finishing element that provides a caramelized, crackly topping similar to classic crème brûlée; used to glaze the baked buns for texture and visual appeal.
- Maple Cream Filling (recipe follows) Creamy maple-flavored filling that adds a sweet, rich center to the buns, contributing moisture, flavor contrast, and a custardy element to the pastry.
Instructions
- In a small bowl, stir together warm milk, yeast, and 1 teaspoon (4 grams) sugar until well combined. Let stand until foamy, about 10 minutes.: You will notice the milk go from still to shimmering with tiny bubbles and then a cap of foam as the yeast wakes up, releasing a yeasty, slightly sweet aroma. This foaming is your visual confirmation the yeast is active, and that aroma should smell faintly bready and fresh. If it does not foam within 10 to 15 minutes, the yeast may be old or the milk too hot or cold; discard and start again to avoid a failed rise. Avoid stirring aggressively or using water that feels uncomfortably hot to your wrist, because that can kill the yeast and yield no rise.
- In the bowl of a stand mixer fitted with the paddle attachment, whisk together 2 cups (250 grams) flour, salt, and remaining 1/2 cup (100 grams) sugar. Add yeast mixture, and beat at low speed until combined. Add 1 egg (50 grams) and vanilla, beating until combined. With mixer on low speed, gradually add remaining 1 cup (208 grams) flour, beating just until dough comes together and stopping to scrape sides of bowl.: As the ingredients come together, you will see a shaggy mass that slowly smooths, and the scent shifts from raw flour to a faintly sweet, bready perfume thanks to the vanilla and egg . The texture should feel tacky but not overly sticky; scraping the bowl often prevents dry pockets. A common mistake is adding too much extra flour at this stage which can make the final dough dry and heavy. Trust the recipe measurements and only add small dustings of flour if the dough is impossibly sticky.
- Switch to the dough hook attachment. With mixer on low speed, add butter, 1 cube at a time, beating until combined after each addition. Beat until dough is elastic and smooth, 8 to 10 minutes.: As you add each cube of softened butter , the dough will go through phases from shaggy to glossy and elastic, and you should feel it pull away from the bowl slightly. When it becomes smooth and springs back when poked, you have developed good gluten structure which creates that tender, airy crumb. Overworking at high speed can heat the dough and make the butter too soft, resulting in greasy dough, so keep the speed low. If the dough looks greasy, chill it briefly, then continue to knead gently.
- Spray a large bowl with cooking spray. Place dough in bowl, turning to grease top. Cover and let rise in a warm, draft-free place (75°F/24°C) until doubled in size, 2 to 2 1/2 hours. (Alternatively, cover and refrigerate overnight.): During this rise, the dough will visibly expand and take on a pillowy look, with a slightly fermented scent that deepens flavor. The surface will feel delicate to the touch and leave an indentation when gently pressed. If your kitchen is cooler than 75°F, expect a slower rise; if it is warmer, watch closely to avoid overproofing which can collapse the structure. Refrigerating overnight gives more complex flavor and allows flexibility in timing, but bring the dough back to room temperature before shaping for optimal elasticity.
- Line 2 baking sheets with parchment paper.: Preparing your pans ahead ensures a smooth transfer and prevents the shaped buns from sticking. Parchment also helps distribute heat evenly on the bottom crust so you get a uniform golden color. A common oversight is not spacing the buns properly on the sheet which can cause them to bake into each other, so measure out the spacing before placing them.
- Lightly punch down dough. Cover and let stand for 10 minutes. Turn out dough onto a very lightly floured surface. Divide dough into 12 portions (about 75 grams each). Using the palm of your hands, gently shape each portion of dough into a smooth ball, lightly flouring your hands as needed. Using the palm of your hand, firmly press down on dough to flatten slightly. Place 3 to 4 inches apart on prepared pans. Cover with lightly greased plastic wrap, and let rise in a warm, draft-free place (75°F/24°C) until doubled in size, 1 1/2 to 2 hours.: When you punch down, you are releasing large air bubbles to create even crumb. The dough should feel soft and slightly tacky, and rolling into smooth balls creates surface tension that helps the buns rise up rather than spread. Leave enough space on the sheet since they will expand; otherwise, they will bake into one another. Avoid kneading excessively at this point because it will deflate the dough and tighten the crumb.
- Preheat oven to 375°F (190°C).: You will notice the oven stabilizing at temperature and a warm, dry air when you open the door. Preheating ensures the rolls receive an immediate burst of heat for proper oven spring and color development. Putting unheated pans in a cold oven leads to underbaked interiors and pale crusts, so give your oven time to reach the set temperature.
- In another small bowl, whisk together 1 tablespoon (15 grams) water and remaining egg (50 grams) until well combined. Using a pastry brush, brush egg wash on top and sides of dough.: The egg wash creates that glossy, richly colored surface that looks bakery fresh. As you brush, you should see the dough take on a slight sheen and a deeper tone. Work gently so you do not deflate the risen buns, and if the wash pools, blot lightly; too much liquid can impede browning. A common slip is overbrushing which results in uneven coloration.
- Bake until golden brown and an instant-read thermometer inserted near center registers 190°F (88°C), 8 to 10 minutes. Let cool on pans for 5 minutes. Remove from pans, and let cool completely on wire racks.: During baking you will smell rich, toasty aromas and see the tops develop a deep golden hue. The instant read temperature gives a reliable indicator of doneness without overbaking. After a short rest on the pans, transfer to racks so bottoms remain crisp and steam does not condense. A mistake to avoid is leaving them on the hot pan too long, which can lead to soggy bottoms.
- Carefully dip top of each cooled bun into Crème Brûlée Glaze. Return to wire racks, and let stand until glaze is set, about 10 minutes.: Dipping yields a thin, caramelized layer that becomes crisp as it sets; you should hear a faint tack as it cools and see a glossy, glass like finish. If the bun is warm, the glaze may not set properly, so ensure they are cooled. Avoid applying the glaze too thickly as it can crack off in large shards instead of forming the intended brittle top.
- Carefully poke bottom of each bun with a paring knife. Transfer Maple Cream Filling to a pastry bag fitted with a 1/4-inch round piping tip. Pipe filling into buns. Best served same day. Refrigerate in an airtight container for up to 3 days.: When piping, you will feel a gentle resistance as the filling enters the soft interior, and you may hear a faint hollowing sound as the cream fills the cavity. The maple cream should taste cool and silky; if it is too runny, it may leak, and if too stiff, it will tear the bun. One common error is overfilling which causes leaks and messy presentation, so fill steadily and stop when you feel subtle back pressure. Store chilled to keep the filling stable, and bring to room temperature briefly before serving for best texture.
Notes
- Warm Milk Test Always test warmed milk on the inside of your wrist to ensure it feels warm not hot, this protects the yeast and sets the stage for a lively proof.
- Measure by Weight Weigh your flour and sugar when possible for consistent dough texture, since volume measurements fluctuate by scoop method.
- Butter Temperature Use softened but still cool butter so it blends evenly; melted butter makes the dough greasy and changes the structure.
- Watch the Dough Rely on visual cues like elasticity and pass the poke test for proofing rather than strict timers, since ambient temperature affects rise time.
- Cool Before Glazing Always cool the buns completely before dipping in the Crème Brûlée Glaze, otherwise the glaze will slide off and not set correctly.