Mama Dips Carrot Cake
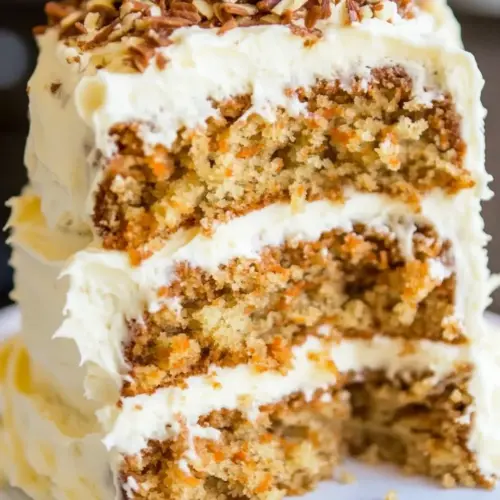
Mama Dips Carrot Cake is a moist, warmly spiced layer cake topped with rich cream cheese frosting and toasted walnuts. This classic dessert delivers tender crumb, balanced sweetness, and a delightful crunch, making it perfect for gatherings and celebrations. Easy to assemble and crowd pleasing, it’s a comforting choice for an easy weekend bake or special occasion.
Equipment
- 39-inch cake pans
- Electric Stand Mixer
- Offset Spatula
Ingredients
- 2 1/4 cups self-rising flour, I use White Lily Provide the structure and bulk for the cake while already containing leavening agents; self-rising flour simplifies mixing by combining flour, salt, and baking powder, yielding a tender crumb when properly folded with wet ingredients.
- 1 1/2 teaspoons ground cinnamon Add warm, fragrant spice that deepens the cake's flavor profile; ground cinnamon pairs with carrots and nuts to create classic carrot-cake aroma and balances sweetness.
- 1 teaspoon baking soda Activate rising by reacting with acidic ingredients, contributing to a light texture; baking soda helps batter expand during baking when combined with the sugar and moisture in the recipe.
- 1/4 teaspoons salt Enhance overall flavor balance and slightly strengthen gluten formation; salt heightens sweetness perception and brings out the individual flavors of the cake components.
- 2 cups sugar Provide primary sweetness and moisture management while aiding in browning; granulated sugar contributes to crumb tenderness and supports the cake's structure during baking.
- 1 cup vegetable oil Supply fat for moistness, tenderness, and emulsification throughout the batter; vegetable oil keeps the cake soft and helps distribute flavors evenly.
- 4 large eggs Contribute richness, structure, and emulsification through proteins and fats; large eggs bind ingredients, trap air during mixing, and help the cake set as it bakes.
- 1 teaspoon vanilla extract Impart fragrant, sweet aroma and deepen flavor complexity; vanilla extract enhances other flavors and rounds out the cake's taste.
- 3 cups grated carrots Add moisture, texture, and natural sweetness while providing classic carrot-cake identity; grated carrots also contribute color and distribute fine vegetable fibers throughout the batter.
- 2 cups chopped walnuts, toasted and divided Introduce crunchy texture and nutty flavor while contributing to visual appeal; toasted walnuts bring toasty depth and are divided so some fold into the batter and some garnish the top.
- 2 (8-ounce) packages cream cheese, softened Create the creamy, tangy foundation for the frosting with smooth texture and stable body; softened cream cheese combines with butter and sugar to make a rich, spreadable icing.
- 1/2 cup butter, softened Provide rich, silky fat that lends smoothness and stabilizes the frosting; softened butter whips with cream cheese to create a lighter, spreadable consistency.
- 1 (16-ounce) box powdered sugar Sweeten and thicken the frosting to a spreadable consistency while adding smoothness; powdered sugar dissolves easily into the cream cheese and butter for a stable frosting.
- 1 teaspoon vanilla extract Add aromatic sweetness and enhance the frosting's overall flavor; vanilla extract complements the cream cheese and balances powdered sugar's sweetness.
Instructions
- Line the bottoms of 3 9-inch cake pans with parchment paper. Spray with baking spray.: The air in the kitchen fills with a faint scent of oil as you press parchment into each pan, ensuring the paper sits flat with no folds. This step prevents the cakes from sticking and makes turning them out effortless, which preserves the perfect edges and layered look. A frequent mistake is skipping the parchment and relying only on spray, which can cause the cake to tear when you invert it. Lightly press the paper so it conforms to the pan, and tap out any wrinkles, because a smooth base yields evenly baked rounds and clean presentation. You should feel confident when lifting the batter later, knowing the bottom will release cleanly.
- Preheat oven to 350 degrees.: Warmth begins to spread through the oven and you can almost smell the faint hint of heat as it reaches temperature, which primes the pans for a predictable rise. Preheating matters because a cold oven causes uneven lift and longer bake times, while an oven that's too hot will brown the exterior before the center sets. A common oversight is not allowing the oven to fully stabilize; use an oven thermometer if yours fluctuates. When the oven reads steady, slide the pans in for reliable, even structure and an appealing golden hue.
- Sift first 4 ingredients together.: Sifting the self rising flour , ground cinnamon , baking soda , and salt aerates the dry mix and ensures even distribution of leavening and spice. You will see a light, fluffy pile replacing the denser scoop you started with; that visual cue signals a well blended base. If you skip sifting, pockets of baking soda or dense flour can create tunnels or uneven texture. Use a gentle motion to combine, and scrape the bowl sides to catch every speck of the dry mix for consistent results.
- Using an electric mixer, beat sugar and oil until mixed well.: As the mixer spins, the sugar and vegetable oil form a glossy, cohesive mixture that smells faintly sweet and takes on a silky sheen. This action coats the sugar crystals and builds a foundation for moisture retention in the batter. Overbeating is not a dramatic risk here, but under mixing will leave you with pockets of oil or sugar. Stop when the mixture looks homogeneous and smooth; that texture predicts an even crumb once the dry ingredients are folded in.
- Add eggs one at a time, beating until blended after each addition.: With each egg incorporated, the batter becomes creamier and slightly more aerated, creating a smoother texture that supports a uniform crumb. Adding eggs slowly ensures emulsification, preventing separation of oil and wet ingredients. A common error is adding them too quickly, which can cause a curdled texture. After each addition, scrape down the bowl to catch any stray yolk or batter, maintaining an even mixture so every slice bakes consistently.
- Beat in vanilla extract.: The kitchen fills with a warm, inviting scent as the vanilla extract disperses, enhancing the batter's depth. Vanilla acts as a flavor bridge, highlighting the sweetness and spices without dominating them. Add it after the eggs so it becomes evenly distributed. If you add it too early or too late relative to the temperature of the mixture, the scent might not integrate as fully; aim for harmonious smell and flavor in the completed batter.
- With mixer on low speed, add flour mixture, beating just until blended.: Bringing the mixer to a low setting protects the batter from developing too much gluten, which would create a tough cake. You should see the mixture smooth out and thicken, yet still be soft and ribbon like. Overmixing at this stage is the most common cause of a dense, chewy cake, so stop as soon as the streaks of flour vanish. The gentle low speed keeps the crumb tender while still incorporating the leaveners evenly.
- Stir in carrots and 1 cup walnuts.: The grated carrots add flecks of orange and a fresh vegetal sweetness, while the tucked in walnuts offer little pockets of toasted crunch. When you stir them in, use a folding motion to distribute without overworking the batter. The visual cue to look for is an even scatter of carrots and nut pieces, not clumps or streaks. A frequent slip is overcrowding the batter with add ins, which can weigh it down; measure accurately so the texture remains balanced.
- Pour batter evenly into prepared pans.: As you spoon or pour, the pans begin to take on a soft gold surface dotted with carrot flecks. Level each pan gently with a spatula so they bake evenly and produce flat layers that stack with minimal trimming. Uneven filling leads to domed or lopsided layers, which complicates assembly. If one pan looks lighter, reallocate batter to maintain similar heights; that small step saves time and stress during frosting.
- Bake for 30 to 35 minutes or until a toothpick inserted in the middle comes out clean.: The oven hums and the batter sets from the edges inward, giving off a warm, spicy aroma as the surface browns slightly. The right moment to remove the cakes is when a toothpick emerges clean, signaling the center has set without drying out. Leaving the cakes in too long will yield a drier crumb, while removing them too soon risks a gummy center. Rotate pans halfway through if your oven bakes unevenly to avoid one layer finishing before the others.
- Cool in pans 10 minutes and then remove from pans and cool completely on wire racks.: Ten minutes allows the crumb to firm up enough to turn out without breaking, and transferring to wire racks prevents steam from softening the bottoms. You will notice the cake relax slightly as it cools and the aroma becomes more pronounced. Trying to frost while still warm is a frequent culprit of runny frosting, so patience here protects your final appearance and texture. Cool completely for a stable base before assembling.
- To make frosting, beat cream cheese and butter until smooth and fluffy.: The mixing bowl transforms as cream cheese and softened butter become pale and aerated, producing a silky base for the frosting. That light, whipped texture is crucial for spreadability and mouthfeel. If either component is too cold, you will end up with lumps; too warm, and the frosting will be slack. Aim for a light, creamy consistency that holds gentle peaks when lifted with a spatula.
- Gradually beat in powdered sugar.: Adding the powdered sugar slowly prevents clouds of dust and allows the frosting to reach a smooth, stable sweetness. As you incorporate the sugar, the frosting thickens and becomes pipeable or spreadable depending on how much you add. Adding it too quickly can create a gritty texture or make your mixer struggle, so add in batches and scrape the bowl frequently to ensure an even, silky result.
- Beat in vanilla.: A final touch of vanilla rounds the frosting, amplifying its sweet and tangy notes. The aroma will bloom and the flavor will balance the richness of the cream cheese . Mix just enough to combine and avoid overworking the frosting, which can incorporate too much air and make it fragile when chilled. Taste and adjust only if necessary to keep the profile harmonious with the cake.
- Spread frosting between layers and on top and sides of cake using offset spatula.: The action of spreading creates satisfying swirls and smooth planes, and the offset spatula helps you achieve an even coat with minimal crumbs. Use a crumb coat first if you want ultra smooth sides, chilling briefly between coats for stability. A common mistake is piling on frosting without a level foundation, which can cause uneven layers and slippage; take your time to press layers gently together and build up frosting gradually.
- Press remaining 1 cup walnuts along the bottom of the bake, going about 2 inches up.: The final flourish of pressing toasted walnuts around the base adds a rustic, tactile finish that contrasts with the soft frosting. The nuts cling to the icing and create a pleasing ring of crunch. Be mindful not to press too hard, which can smear the frosting; instead, tap them lightly into place for an even band. This decorative step also adds a textural cue when slicing, giving a nutty welcome with every piece.
Notes
- Extra frosting tip If you want as much frosting as in the picture, add another 8 ounces of cream cheese, 1/2 stick of butter, and 2 cups of powdered sugar when making the frosting. This creates a thicker, more spreadable batch that covers the cake more lavishly and gives a professional look. Mix slowly at first to avoid a cloud of sugar, and chill briefly if the frosting becomes too soft while assembling.
- Pan preparation tip Use parchment rounds and a light coating of baking spray to ensure each layer turns out cleanly. Press the parchment flat so the bottom is smooth, and spray after placing the paper to tack it down if needed. This minimizes tearing and keeps the cake rounds intact for easy stacking and even layers.
- Walnut handling tip Reserve some larger walnut pieces for decoration and chop the rest coarsely to fold into the batter. Toast them until they release a nutty aroma and then let them cool completely before adding to avoid steaming the batter. This preserves crunch and avoids soggy nuts in the cake.
- Carrot prep tip Grate the carrots finely for consistent moisture and a fine crumb. I use a box grater and rotate the carrot to get uniform shreds. If the pieces are too large, they can create uneven pockets of moisture and affect how the cake slices.
- Frosting texture tip If your frosting is too soft, chill it briefly and then rewhip to bring back structure. If it is too stiff, add a teaspoon of milk at a time until spreadable. Temperature control is key; room temperature frosting spreads smoothly while cold frosting tears the cake surface.
- Storage tip Refrigerate leftover slices in an airtight container for up to five days to maintain frosting stability and cake freshness. Bring slices to room temperature before serving for best texture. For longer storage, freeze individual slices wrapped tightly and thaw in the fridge overnight.