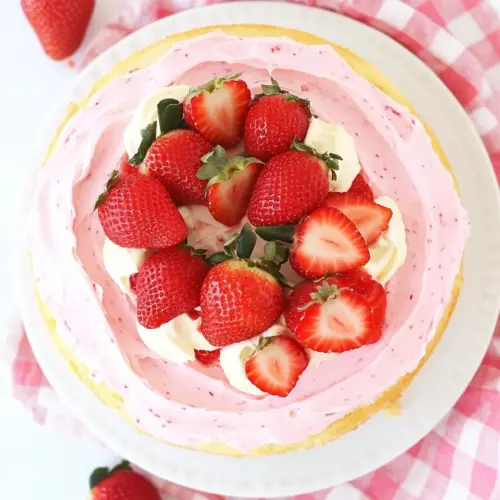
Lower Sugar Vanilla Cake with Fresh Strawberry Frosting
Lower Sugar Vanilla Cake with Fresh Strawberry Frosting is a tender, lightly sweet vanilla layer cake with a bright, tangy cream cheese and strawberry frosting. The texture is moist from Greek yogurt and milk, while honey and reduced sugar keep sweetness balanced. Perfect for spring gatherings or casual celebrations, this cake feels elegant and approachable, giving you a compelling reason to bake it.
Equipment
- 8-inch round baking pans
- Parchment Paper
- Mixing Bowls
- Wire Rack
- Mixer
- Spatula
Ingredients
- 1/3 cup Greek yogurt, plain Adds tangy moisture and tender crumb while contributing protein to help structure the cake; fold gently to maintain airiness and avoid deflating the batter.
- 4 tablespoon butter, unsalted Provides rich flavor and fat that creates a soft, tender texture and aids in browning; cream with sugar for a light, aerated batter before adding wet ingredients.
- 1/2 cup granulated sugar Sweetens the cake while keeping overall sugar lower than traditional recipes; combine with butter to dissolve crystals and incorporate air into the mixture.
- 3 large eggs + 1 egg white Enriches the batter with structure, lift, and moisture; beat eggs into the batter to trap air, and add the extra egg white for additional lift and stability.
- 1 teaspoon vanilla extract Imparts warm vanilla aroma and enhances overall flavor depth; stir into the wet ingredients so the flavor distributes evenly throughout the cake.
- 1/4 cup honey Contributes natural sweetness and moisture with floral notes, helping reduce granulated sugar while adding a subtle caramel-like flavor when baked.
- 3/4 cup milk Adds liquid for proper batter consistency and contributes to tenderness; use room temperature milk to blend smoothly with other wet ingredients.
- 2 1/2 cups flour white whole wheat Provides bulk, structure, and whole-grain nutrition while maintaining a light crumb; sift or whisk with leavening to ensure even distribution before mixing into the batter.
- 1 tbsp baking powder Leavens the cake by producing carbon dioxide when activated, creating lift and a lighter texture; measure accurately and mix with dry ingredients to avoid over-activation.
- 1/2 teaspoons salt Balances sweetness and enhances flavor while strengthening gluten slightly; dissolve into dry ingredients to ensure even seasoning throughout the batter.
- 1 1/2 cups cream cheese room temperature Contributes creamy tang and stability to the frosting while adding richness; beat at room temperature for a smooth, spreadable consistency.
- 3/4 cup pureed strawberries Provides fresh strawberry flavor and natural color to the frosting, adding both moisture and fruity brightness; strain if a smoother texture is desired.
- 1/4 cup powdered sugar Adds powdered sweetness and helps stabilize frosting texture without graininess; sift into the cream cheese mixture to achieve a silky finish.
- 5 ounces strawberry Greek yogurt Enhances strawberry flavor and adds creaminess and slight tang to the frosting; fold into the cream cheese base to boost fruitiness and texture.
- 15 medium strawberries Supplies fresh berry pieces for garnish, flavor, and a bright, juicy contrast to the cake and frosting; slice or halve as desired for decoration.
Instructions
- Preheat the oven to 350 F and grease two 8-inch round baking pans well. Use the pans to trace rounds of parchment paper, cut out, set inside the pans, and grease again. Set aside.: The warm, slightly sweet smell of your oven coming up to temperature is an early sign you are ready. Greasing the pans and lining them with parchment ensures the cakes release cleanly, and the faint sizzle when butter meets pan is reassuring. Trace the pans carefully on parchment so the rounds sit snugly, preventing batter from seeping under. One common error is not preparing both pans at once, which can force you to work hurriedly when the batter is ready. If your oven runs hot, place racks in the middle so the heat is even and rotate pans halfway through baking for uniform color.
- In a large bowl, beat together yogurt, butter, sugar, eggs, vanilla, honey and milk until well mixed.: You should notice the mixture becoming smoother and slightly glossy as the butter emulsifies with the eggs and yogurt . The aroma of vanilla will lift as the sugar dissolves, and the batter will feel airy when beaten adequately. This step develops creaming action and helps trap tiny air bubbles that support rise. Avoid overbeating once the flour is added later, but here beat until ingredients are homogeneous. If the batter looks curdled, a short whisk will usually bring it together, but do not panic; room temperature ingredients prevent curdling initially.
- In a medium bowl, whisk flour, baking powder and salt together. Add the dry ingredients into the wet, and stir until combined.: As you whisk the dry mix, you are dispersing the baking powder evenly, which helps uniform lift. When folding into the wet mix, watch for streaks to disappear and the batter to become smooth but not overworked. The texture should be slightly thick and ribboning off the spoon instead of runny. Overmixing will tighten the crumb by developing gluten, so fold gently until just combined. If the batter seems too stiff, a tablespoon of milk can soften it, but add cautiously so the batter stays stable.
- Divide the batter evenly between the two pans, shaking gently to ensure that the batter is spread to the edges. Bake for 24-26 minutes or until golden brown around the edges and a cake tester inserted into the center comes out cleanly. Let cool in pans on a wire rack for 5 minutes, then invert carefully onto a wire rack and let cool completely.: You will see the tops turn a pale golden color and the edges pulling slightly from the pan when the cakes are ready. The smell at this stage is rich, with a honeyed vanilla note and toasted flour aroma. Allowing the cakes to rest five minutes stabilizes the crumb and reduces tearing when removing from the pan. The common mistake is leaving them too long in the pan, which can cause condensation and sogginess, or flipping before they set, causing breakage. Cool fully before frosting so the cream cheese topping does not melt and slide.
- To make frosting, in a large bowl beat cream cheese until smooth. Add the remaining ingredients and beat until fluffy and creamy.: The cream cheese should become silky, with a faint tang and smooth texture that promises tenderness on the palate. As you add the pureed strawberries , the mixture gains color and a fresh floral fragrance. Beat until the frosting is light and airy, which will make spreading easier and give a pleasing mouthfeel. A lump in the frosting usually means the cream cheese was too cold, so let it warm a bit and rebeat. If the frosting seems runny, chill briefly; if too stiff, a spoonful of strawberry Greek yogurt loosens it without losing creaminess.
- Place one cake onto a serving plate and top with about 1/3 of the frosting. Layer on sliced strawberries. Add another 1/3 of the frosting onto the second cake and invert on top of the strawberries, sandwiching the berries between the frosting. Add the remaining frosting to the top of the cake and spread evenly to the edges. Top with whole berries if desired. Chill in the refrigerator until ready to serve. Serves 12-14.: When assembling, the faint scent of fresh strawberries rising from the layers is one of my favorite moments. The contrast between cool, tangy frosting and the slightly firm berry slices creates textural interest. Pressing the top layer gently ensures even contact without squashing the berries. A typical mistake is using too much filling so the layers slip, so the recommended thirds help maintain stability. Chilling sets the frosting and makes slicing neater, revealing tidy layers and a clean crumb when you serve.
Notes
- Room temperature ingredients help the batter come together smoothly and prevent curdling when combining wet and dry components.
- Fresh strawberries give the brightest flavor for frosting, but if they are not in season, slightly macerate them with a touch of honey to intensify the taste.
- Sift powdered sugar into the frosting to avoid lumps and to keep the frosting mirco smooth and spreadable.
- Rotate pans halfway through baking if your oven has hot spots to ensure even browning and consistent cake height.
- Drain excess liquid from overly ripe strawberries before pureeing to maintain frosting stability and prevent runniness.
- Chill briefly after assembling to firm the frosting and make cutting neat slices for serving.