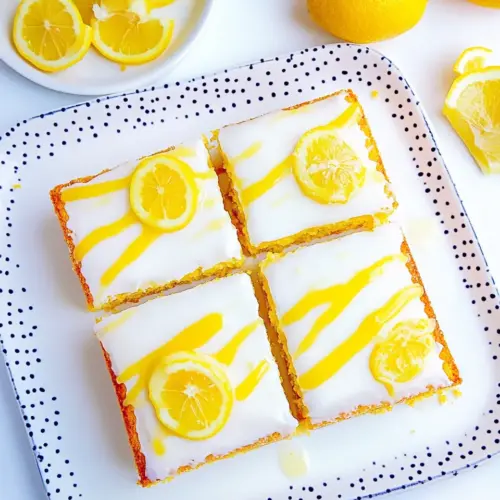
Lemon Sheet Cake With Lemon Glaze
Lemon Sheet Cake With Lemon Glaze is an easy, bright sheet cake that combines a tender, pudding enhanced crumb with a glossy, lemony icing. The citrus aroma and silky glaze make it ideal for potlucks and casual gatherings, offering a dependable, crowd pleasing dessert that feels homemade. Make it when you want a fast, impressive sweet that brightens any table.
Equipment
- 9x13 cake pan
- Non stick spray
- Stand mixer or hand electric mixer
- Large Bowl
- Spatula
- Stiff whisk
Ingredients
- 1 box vanilla or lemon cake mix dry mix, do not make cake according to package directions Provide a light, pre-mixed cake base that supplies flour, sugar, leavening, and vanilla flavor; acts as the primary structure for the sheet cake and keeps preparation quick and consistent. Combine with wet ingredients to create the batter and ensure an even crumb when baked in a sheet pan.
- 1/4 cup instant lemon pudding mix Offer concentrated lemon flavor and help thicken the batter slightly while contributing to a tender crumb; instant pudding mix also adds body and moisture retention to the cake. Fold into the dry mix so it dissolves uniformly and enhances overall lemon character.
- 3/4 cup lemon juice Contribute bright, acidic lemon flavor and liquid needed to hydrate the dry ingredients; acidity balances the sweetness and amplifies citrus aroma. Use measured juice to maintain batter consistency, adjusting subtly if pulp is present.
- 1/3 cup butter melted Introduce fat and richness while improving mouthfeel and tenderness; melted butter also helps carry flavor and promotes a tender crumb in the baked cake. Combine with other wet ingredients so the fat disperses evenly throughout the batter.
- 4 large eggs Provide structure, lift, and added richness while helping to emulsify the batter for a smooth, cohesive texture. Beat into the wet mixture to incorporate air and ensure uniform distribution for an even rise.
- 4 cups powdered sugar Supply bulk sweetness and create a smooth, pipeable glaze or icing texture when mixed with lemon juice; powdered sugar dissolves easily to form a glossy finish. Sift if needed to avoid lumps and achieve a silky glaze.
- 4 tablespoons lemon juice more can be used if a thinner glaze is desired Adjust glaze consistency and intensify lemon flavor while adding liquid to powdered sugar to form a pourable topping; additional lemon juice can be used to thin the glaze to the desired thickness. Add gradually and whisk until smooth and shiny for an even coat.
- 2 tablespoons lemon zest Deliver concentrated citrus aroma and bright flavor; zest contains essential oils that enhance freshness without adding additional liquid. Finely grate and incorporate into the glaze or batter to distribute fragrant lemon notes evenly.
Instructions
- Start by preheating your oven to 350 degrees and prepare a 9×13 cake pan using a non-stick spray.: As the oven warms you will notice a faint hum that signals steady heat, and a consistent oven temperature is vital so the cake rises and bakes evenly. When you grease the pan, the batter releases cleanly, which prevents tearing and keeps the glaze application simple. A common mistake is not preheating long enough, which can lead to uneven bake and a dense center, so wait until the oven reads 350 degrees on a reliable thermometer. The warm pan will make the batter sizzle slightly on contact, and that immediate heat helps set the edges, giving a neat, slightly caramelized rim.
- In a large bowl, pour in the dry cake mix, dry lemon pudding mix, lemon juice, eggs and melted butter. Then combine cake mix using a stand or hand electric mixer. Make sure the batter is completely combined by scraping the sides of the bowl with a spatula.: When you combine these elements the batter comes alive, smelling of citrus and butter, with the powdered mixes dispersing into a cohesive mass. Use a stand mixer on low, or a hand mixer, to prevent splatter and over aeration. You want the batter smooth and uniform, not foamy, because gentle mixing preserves moisture and keeps the crumb tender. A frequent misstep is over mixing which makes the cake tough, so scrape the bowl and fold gently until no streaks remain. The sound of the mixer will change as the mixture smooths, and the batter should be thick but spoonable.
- Pour batter into the prepared cake pan and smooth it out with a spatula. Batter will be thick and fluffy. Make sure the batter is even because it won’t level out on its own.: You will notice pockets of dry mix if you skip this, which can leave floury bites after baking. Scraping ensures even distribution of flavor and rise agents, giving a uniform texture throughout. The spatula glide becomes smoother when the mixture is homogeneous, and the surface will look glossy from the melted butter. If you skip scraping, you might end up with dense spots. Take a moment to turn the bowl and check the bottom, because the mixer can miss ingredients that hide low in the bowl.
- Bake for 20 minutes, then check doneness with a toothpick. If the toothpick doesn’t come out clean, bake for 3-5 minutes more, or until it’s set. Once fully baked, remove from the oven and set the pan aside to let it cool.: When you spread the batter, aim for an even layer; the thick texture means it will not self level, so gentle nudges are necessary. Visually the surface should look even and slightly domed, with small air pockets that flatten while baking. Smooth edges help the cake bake uniformly and make glazing simpler. A common issue is uneven leveling, which leads to a lopsided cake; correct this now before it goes into the oven. You can gently tap the pan on the counter to release large air bubbles, and you will hear a soft thud as bubbles escape.
- While the cake is cooling, begin making the glaze. In a large bowl pour in the 4 cups of powdered sugar. Next add the lemon zest and 3 tablespoons of lemon juice. Using a stiff whisk or a hand mixer at a low speed, stir these ingredients together. If needed, slowly add the last tablespoon of lemon juice. You’re looking for a consistency that is thick but will still pour nicely. If the icing becomes too thin and runs easily, add more powdered sugar until you get the consistency you want.: The aroma of baked butter and citrus will intensify around the 15 to 20 minute mark, and the top will take on a pale golden hue. Insert a toothpick into the center to test doneness; the cake should spring back slightly when touched and the toothpick should come out clean or with a few moist crumbs. If the toothpick has wet batter, continue baking in short increments of a few minutes. A common mistake is opening the oven too often, which causes temperature drops and uneven rise, so only check once at the recommended time. The edges should pull away slightly from the pan when it's ready, producing a subtle crackle sound as the crust sets.
- Once the cake has fully cooled, you can either pour the icing glaze over the cake while it’s still in the baking dish, or remove the cake from the pan, put it on a tray, cut it, then pour on and lightly spread the icing. If desired, top with lemon slices. Serve and enjoy!: As the cake cools you will notice steam lifting from the surface, and the interior will finish setting, which makes slicing and glazing easier. Cooling in the pan helps the cake keep its shape and prevents the crumb from tearing. Leaving it too long to cool before glazing can reduce glaze adhesion, while glazing too hot can cause the icing to sink in; aim for warm to room temperature for best results. Avoid pulling the cake from the pan while it is piping hot, as that can cause it to break and release crumbs.
- While the cake is cooling, begin making the glaze: The powdered sugar will initially feel dry and powdery, but as you whisk in the lemon juice and lemon zest it will transform into a silky, glossy icing. Use a stiff whisk or a hand mixer on low to avoid aerating the glaze which can create tiny bubbles. You want a consistency that will drizzle but still cling, and if it is too thin, it will run off the sides, while too thick will resist spreading. A common pitfall is adding too much juice at once; add it slowly and stop when you have a pourable glaze. The scent of fresh zest should brighten the bowl and tell you the glaze is flavorful enough.
- In a large bowl pour in the 4 cups of powdered sugar. Next add the lemon zest and 3 tablespoons of lemon juice: Combining these ingredients releases a strong citrus perfume, and the powdered sugar quickly absorbs the moisture to form a smooth mixture. If you whisk too vigorously you may introduce air, making the glaze appear fluffy rather than glossy; gentle strokes give a glassy finish. If the texture seems too thick, add the final optional tablespoon of lemon juice sparingly until the desired pourability is reached. The balance of sweet and tart should be apparent on your fingertip when you taste a tiny dab.
- Using a stiff whisk or a hand mixer at a low speed, stir these ingredients together: The motion should be steady and controlled; you are looking to dissolve any lumps and achieve a satin sheen. Slow mixing prevents splatter and ensures the glaze settles into a smooth, even coating when poured. If you overbeat, the glaze can incorporate air and dry with a matte, cracked surface, so stop once smooth. A good test is to lift the whisk and watch the ribbon fall; it should stream slowly and merge back into the bowl without breaking.
- If needed, slowly add the last tablespoon of lemon juice: Adding liquid gradually helps you fine tune viscosity. As you drip in that last tablespoon, watch how the glaze loosens and becomes more fluid, and remember you can always thicken with more powdered sugar if it becomes too thin. The goal is a pourable, glossy glaze that will settle into the cake’s nooks without completely running off. A common misstep is overshooting liquid and ending up with a puddled glaze, which is harder to recover from than a slightly thick one.
- Once the cake has fully cooled, you can either pour the icing glaze over the cake while it’s still in the baking dish, or remove the cake from the pan, put it on a tray, cut it, then pour on and lightly spread the icing: Pouring while the cake is in the pan lets the glaze pool around the edges for a casual look, while glazing after removing the cake yields cleaner slices for serving. When you pour, watch the glaze cascade and fill tiny crevices, creating a glossy surface that catches light. If you spread, use a light hand to avoid pushing the glaze into the crumb too much. A typical error is trying to move the glaze with a heavy hand which makes the surface uneven; a gentle tilt and small strokes work best. If desired, garnish with thin lemon slices, which add a fresh visual and aromatic touch to each piece.
Notes
- Swap cake mix variety Use a vanilla mix for a milder base or a lemon mix for an extra citrus punch. This small change shifts the overall lemon intensity without altering technique.
- Boost citrus aroma Add an extra teaspoon of lemon zest to the glaze for a more aromatic finish. The essential oils in the zest elevate scent without changing sweetness.
- Adjust glaze texture If you want a thicker finish, whisk in more powdered sugar gradually. For a thinner, shiny glaze add the optional extra tablespoon of lemon juice sparingly until you reach a pourable consistency.
- Presentation tweak Pour glaze in the center and gently spread toward the edges for a smooth top, or drizzle decoratively for a casual look. Both approaches produce different visual styles that suit varied occasions.
- Make ahead tip Bake a day ahead and glaze the morning of serving to lock in freshness while minimizing last minute stress. This also allows the glaze to set slightly for cleaner slices.