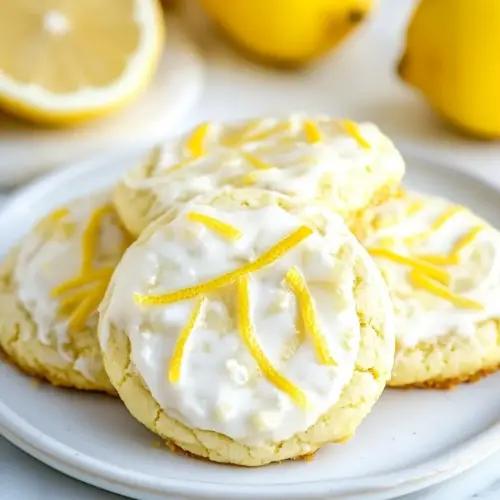
Lemon Ricotta Cookies
Lemon Ricotta Cookies offer a creamy, tender bite with bright citrus notes and a soft, pillowy texture. These easy to love cookies are great for spring gatherings or an easy weeknight dessert, combining fresh lemon zest and ricotta for a unique, melt in your mouth experience. Make a batch to impress guests or lift a regular afternoon with a fragrant, buttery sweet treat.
Equipment
- Mixing Bowls
- Electric Mixer
- Measuring Cups
- Measuring Spoons
- Parchment Paper
- Baking Sheets
- Cooling rack
Ingredients
- 2 1/2 cups All-Purpose Flour Provide structure and bulk to the cookies, creating the foundation for texture and chewiness; combine with leaveners to form the dough and absorb moisture from wet ingredients. Sift or whisk before measuring to ensure even distribution and avoid dense spots in the batter.
- 1/2 teaspoon Baking Soda Act as a chemical leavening agent that reacts with acidic components to help cookies rise and develop a light crumb; measure precisely to prevent metallic or overly soapy flavors. Whisk into dry ingredients to distribute evenly throughout the flour mixture.
- 1 teaspoon Baking Powder Contribute additional leavening power and stability to the dough, producing a tender crumb and balanced lift; works alongside baking soda for reliable rising. Use fresh powder to avoid flat cookies and mix thoroughly with dry ingredients.
- 1 teaspoon salt Enhance overall flavor and balance sweetness while strengthening gluten interactions slightly; also plays a role in controlling yeast activity and preserving color. Dissolve or distribute evenly through the dry mix to ensure uniform seasoning.
- 1/2 cup Unsalted Butter Softened Provide richness, tenderness, and flavor while contributing to the cookie’s mouthfeel; butter helps with spreading and browning as it melts during baking. Soften to room temperature for easier creaming with sugar, which incorporates air for lift.
- 1 3/4 cups Granulated Sugar Sweeten the dough and assist in creaming with butter to create a light, aerated texture; sugar also contributes to browning and crisp edges through caramelization. Adjust amount carefully for desired sweetness and creaming time to influence cookie density.
- 2 Eggs Room Temperature Bind ingredients together, provide moisture and structure, and contribute to leavening when beaten; eggs also add richness and help emulsify fats and liquids. Bring to room temperature so they incorporate smoothly into the batter for uniform texture.
- 15 ounces Whole Milk Ricotta Cheese Add moisture, creaminess, and a subtle tang that enriches the cookie’s flavor and tenderizes the crumb; ricotta also contributes protein which can yield a delicate, soft interior. Drain excess liquid if very wet to avoid overly loose batter and fold gently into the dough.
- 3 tablespoons Lemon Juice Introduce bright acidity and lemon flavor that brightens the cookies and reacts with baking soda for lift and subtle tang; lemon juice also balances sweetness in the batter. Use freshly squeezed juice for the cleanest, most vibrant citrus character.
- 2 tablespoons Lemon Zest Deliver concentrated citrus aroma and intense lemon flavor through oils in the peel, enhancing the overall lemon profile without extra acidity. Zest finely to avoid bitter pith and fold into batter to distribute aromatic oils evenly.
- 1 1/2 cups Powdered Sugar Form a sweet glaze base that thickens and binds when mixed with liquid, adding a smooth, decorative coating to the cookies; powdered sugar also provides quick-dissolving sweetness. Sift to remove lumps for a silky glaze texture.
- 3 tablespoons Lemon Juice Provide additional bright lemon flavor and thin the powdered sugar into a pourable glaze while adding acidity to cut sweetness; helps the glaze set with a glossy finish. Add incrementally to reach desired consistency and taste balance.
- 1 tablespoon Lemon Zest Concentrate fragrant citrus oils to finish the glaze or dough with aromatic intensity and enhance overall lemon character; zest adds visual flecks and fresh scent. Use a fine grater and avoid white pith to keep flavors bright and pleasant.
Instructions
- In a medium bowl, whisk together the flour, baking soda, baking powder, and salt.: As you gently whisk, notice the subtle contrast between the pale flour and the tiny specks of leaveners, and inhale the faint bready scent that signals structure is coming together. This dry mix unifies the rising agents so they distribute evenly, preventing isolated pockets that could make the cookie rise unevenly. A smooth, homogenous powder indicates readiness; if you see clumps, sift or break them up. One common mistake is adding wet ingredients to unblended dry components, which leads to inconsistent texture, so take the extra minute to get it right.
- In a large bowl, beat together the butter and sugar until fluffy, about 5 minutes. Add the eggs one at a time, mixing each time until combined. Add the ricotta, lemon juice, and lemon zest. Beat until combined.: When creaming the butter and granulated sugar , you should see a pale, airy mixture that creates little ribbons when the beater lifts, a visual cue of incorporated air that will give lift to the dough. Adding the eggs gradually allows them to emulsify, preventing separation and ensuring a smooth batter. Once you fold in the creamy ricotta , the scent shifts toward dairy richness with bright citrus notes from the lemon . The texture becomes softly billowy, and you should avoid overmixing at this stage because vigorous beating can make the dough too dense later. A typical error is adding cold eggs straight from the fridge, which can shock the butter and create a curdled look, so bring them to room temperature first.
- Add the dry ingredients to the wet ingredients and mix until just barely combined. Cover the dough and refrigerate for at least 4 hours.: After introducing the dry mix, you want to see streaks disappear without a fully homogeneous bowl, because gentle mixing preserves air pockets and the delicate crumb. The dough will feel cool and slightly tacky. Chilling solidifies the fats and hydrates the flour, preventing excessive spread in the oven and concentrating flavors. The waiting period transforms a loose batter into a scoopable cookie dough. A common misstep is skipping the chill, which results in flat, thin cookies, so plan ahead and honor the refrigeration time.
- Preheat the oven to 375°. Line two baking sheets with parchment. Scoop about 1 1/2 tablespoons of the chilled dough onto the baking sheets, leaving about 2 inches between the cookies.: As the oven warms, you will notice a steady hum and the faint warmth that signals readiness; set racks to the center to ensure even top browning with gentle interior baking. A properly preheated oven ensures the cookies set quickly, preserving shape and creating that tender interior. If the oven is not fully hot, cookies can spread and become greasy rather than pillowy, so allow the full preheat time. Use an oven thermometer if you suspect inconsistent temperature readings, as many ovens run cool or hot compared to their dial.
- Bake for 15 minutes, until the cookies are cooked through but aren’t browning. Leave the cookies on the baking sheets for an additional 15 minutes before transferring to a cooling rack.: Lining pans with parchment helps promote even browning and makes transfer effortless. When you scoop the chilled dough, the exterior should feel cool and slightly resistant; the dough should hold its dome shape on the tray. Leaving space between each cookie lets heat circulate, so they bake into individual rounded domes instead of merging. A typical mistake is crowding the sheet, which prevents airflow and creates unevenly baked cookies, so use multiple trays if needed.
- In a small bowl combine the powdered sugar, lemon juice, and lemon zest until smooth.: While baking, watch for a pale golden hint around the bottom edge and a set center that springs back to the touch. The kitchen aroma will be a soft mix of baked butter and warm lemon , and the tops should remain mostly light without deep browning. This gentle bake ensures a tender crumb rather than a crisp, crunchy cookie. Overbaking is common, especially if you expect visible browning, so rely on the texture cue rather than color alone.
- Gently spoon about 1/2 teaspoon of glaze on each cookie. Let the glaze harden before serving.: This resting interval lets the cookies finish setting as the residual heat completes gentle cooking, and you will notice them firming slightly as they cool. Moving them too soon risks breaking or flattening the soft domes, so patience yields better shapes. The underside will firm up during this wait, making transfer easy. Many bakers pick them up immediately, causing deformed cookies, so allow the cooling time to avoid this common error.
- In a small bowl combine the powdered sugar, lemon juice, and lemon zest until smooth.: The glaze should become glossy and velvety, releasing the fragrant oils of the lemon into a sweet base. Stir slowly to avoid lumps, and adjust consistency with tiny amounts of juice if needed; you want a ribbon that glides off a spoon but holds some shape. This balance creates a delicate shell on the cookie that adds a concentrated burst of citrus. If the glaze is too thin, it will run off the cookies, so add the powdered sugar gradually to thicken.
- Gently spoon about 1/2 teaspoon of glaze on each cookie. Let the glaze harden before serving.: As you dot the glaze, watch it settle into small glossy puddles that dry to a slightly crackled finish, and enjoy the perfumed citrus scent that fills the air. The hardened glaze provides a textural contrast to the tender interior and keeps the surface from becoming sticky. Allow sufficient drying time so the glaze sets fully; serving too soon can smudge the finish. The typical pitfall is over glazing, which masks the cookie texture, so apply sparingly for the best balance.
Notes
- Switch the texture: For a cakier result, fold the dry ingredients in more gently and avoid over chilling; for denser cookies, mix a bit longer after adding the flour to develop more structure.
- Boost the citrus: Increase the lemon zest by up to one additional tablespoon for a more aromatic profile, but balance it so the cookie does not become bitter from the pith.
- Adjust sweetness: If you prefer a less sweet cookie, reduce the granulated sugar by a couple of tablespoons, and rely on the glaze to provide finishing sweetness.
- Vary the glaze: Make the glaze thicker for a pronounced crackled top by adding more powdered sugar, or thin it slightly with drops of lemon juice for a smooth sheen.
- Make ahead: The dough stores well in the fridge for up to 48 hours, or freeze scoops on a tray and transfer to a sealed bag for longer storage; bake from frozen, adding a couple of minutes to the time.