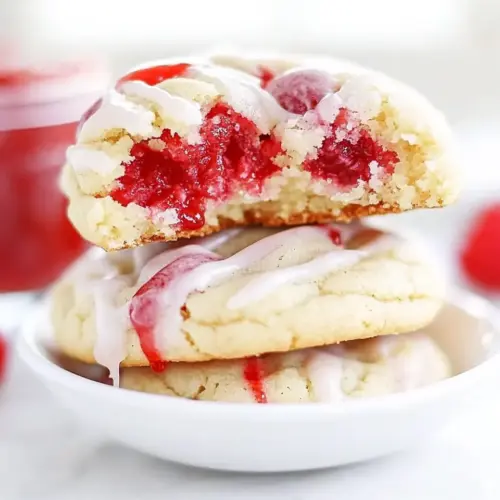
Lemon Raspberry Cookies
Lemon Raspberry Cookies are tender, bright, and lightly glazed, offering a creamy butter base with zesty lemon and tangy raspberry bursts. These easy crowd pleasing cookies are perfect for spring gatherings or an easy weeknight bake, delivering crisp edges and soft centers. Make them for a sunny treat that feels special yet approachable, and you will want to bake them again and again.
Equipment
- Mixing Bowl
- Electric Mixer
- Measuring Cups
- Measuring Spoons
- Cookie Scoop
- Baking Sheets
- Parchment Paper
- Cooling rack
Ingredients
- 1/2 cup unsalted butter (room temperature) Soften to room temperature and cream with sugar to create a light, airy base that helps incorporate air for tender cookies. Provide rich flavor and moisture while balancing the tart components in the dough.
- 1 cup granulated sugar Sweeten and tenderize the dough by dissolving into the butter, helping to create a fine crumb and golden color during baking. Control sweetness level and aid in caramelization of cookie edges.
- 1 teaspoon lemon zest (1 lemon) Provide concentrated citrus oil from zest to brighten flavor and add aromatic complexity without extra liquid. Complement lemon juice and glaze to ensure clear lemon profile throughout the cookie.
- 2 tablespoons lemon juice (1 lemon) Add fresh acidic juice to balance sweetness and activate leavening agents, contributing subtle moisture and bright lemon flavor. Help amplify the tart notes so raspberries and lemon remain prominent.
- 1 teaspoon vanilla extract Lend aromatic depth and boost perceived sweetness while enhancing the overall flavor harmony. Add a rounded background note that supports both lemon and raspberry elements in the cookies.
- 2 large eggs Bind wet ingredients together and contribute structure, moisture, and richness; eggs also assist with leavening when beaten into the batter. Help set the cookies during baking for a tender yet stable crumb.
- 2 cups all-purpose flour Provide the primary structure and bulk for the cookies by forming the gluten network when combined with wet ingredients. Control texture and density while serving as the medium for all other flavors.
- 1/2 teaspoon salt Enhance flavor by balancing sweetness and strengthening gluten structure slightly; use sparingly to avoid making cookies too salty. Also helps enhance other flavors, such as lemon and raspberry.
- 1 1/2 teaspoons baking powder Lighten texture by producing gas when activated, creating lift and contributing to a tender, cake-like crumb in these cookies. Work in tandem with baking soda and acidic ingredients for optimal rise.
- 1/2 teaspoon baking soda React with acids in the dough to produce carbon dioxide for extra lift and browning, particularly useful with lemon juice and cream of tartar. Help achieve a soft, slightly domed cookie shape.
- 1/2 teaspoon cream of tartar Stabilize and add extra tang to amplify rise when combined with baking soda, while also contributing a subtle acidic note that enhances brightness. Help maintain a light, delicate texture and prevent excessive spread.
- 1 to 1 1/2 cups frozen raspberries Introduce bright fruity pockets that contrast the lemon; frozen raspberries add moisture and tartness while distributing flavor throughout the dough. Freeze state reduces bleeding somewhat, so fold gently to preserve color and texture.
- Lemon Glaze Prepare a thin, glossy finishing layer to intensify lemon flavor and add sweetness and shine over cooled cookies. Tie together the citrus notes from the dough and provide an attractive presentation.
- 1/2 cup powdered sugar Dissolve into the glaze to provide powdered smoothness and neutral sweetness that balances lemon juice. Create a creamy base that sets to a delicate sheen on the cookie surface.
- 1 teaspoon lemon juice Concentrate bright acidity to the glaze, cutting sweetness and reinforcing lemon character for a lively finish. Promote proper consistency and help the glaze set with a clean citrus tang.
- 2 tablespoons heavy cream Thin and enrich the glaze to achieve a silky, pourable consistency while adding a rich mouthfeel and slight creaminess. Ensure the glaze coats evenly and sets with a pleasant texture and flavor.
Instructions
- Preheat the oven to 350°F. Line two baking sheets with parchment paper and set aside.: You should feel the hum of the oven warming and smell a faint toasty note as it reaches 350°F , an important steady heat so the cookies bake evenly. Preparing two lined sheets lets you rotate trays for even browning. A common misstep is placing unlined pans or skipping parchment which can lead to uneven bottoms and sticking, so take the extra minute to line sheets and space them properly.
- Beat together the butter and sugar for 1 to 2 minutes until combined.: As you cream butter and granulated sugar , listen for the change from dense to lighter, and watch the color shift to a paler cream, which indicates air incorporation. This texture helps create a tender interior and slight rise. If you under-cream, cookies can be dense; over-creaming may introduce too much air and cause excessive spreading. Aim for the brief 1 to 2 minute window for balance.
- Add the lemon zest, lemon juice, vanilla, and eggs, and continue beating until fluffy.: At this point the mixture turns aromatic with bright citrus notes from the lemon zest and lemon juice , and becomes slightly glossy as the eggs emulsify the batter. The mixture should feel lighter and a bit billowy, which helps trap lift during baking. One mistake is adding cold eggs straight from the fridge which can firm the butter and cause curdling, so let eggs come to room temperature if possible.
- Combine the flour, salt, baking powder, baking soda, and cream of tartar in a separate bowl and add to the butter mixture.: Mixing the dry flour with leaveners evenly distributes lift agents and salt, preventing pockets of rising or saltiness. When you add it, the batter will begin to thicken and feel more cohesive. Overmixing at this stage develops gluten and makes cookies tough, so fold until just combined for the best tender crumb.
- Beat until combined.: The batter will come together into a smooth, slightly dense dough that holds small peaks but is not stiff. You want a uniform color with streaks of butter fully integrated, which signals even baking. Avoid excessive beating that could create elastic dough, leading to chewy cookies rather than tender ones.
- Gently chop the frozen raspberries just a bit and add them to the cookie mixture.: The frozen raspberries will be firmer than fresh, which helps preserve some texture when they bake, and a light chopping makes distribution easier. Add them while still slightly frozen to minimize bleeding into the whole dough. A frequent problem is overchopping or adding thawed berries, which can release too much juice and overly color the dough.
- Fold the raspberries in gently. They will bleed into the dough as they are mixed in.: Folding preserves the berry shape and prevents overworking the dough, and you will notice little pink streaks appearing where juices touch the batter, which looks lovely when restrained. Fold slowly so berries don't burst extensively, and if you see large pools of liquid, stop and scoop out excess to avoid soggy cookies.
- Use a 1-tablespoon cookie scoop (small cookies) or an ice cream scoop (3 tablespoons for larger cookies shown here) to scoop balls of the dough and place them 2 inches apart on prepared cookie sheets.: Scooping creates uniform cookies that bake evenly; spacing is key so heat circulates and edges can brown. The dough will have a slightly tacky surface that smooths into round domes while baking. A typical error is packing scoops too tightly which can prevent proper spreading and cause uneven centers.
- Bake cookies for 11 minutes (small cookies) or 14 minutes (large cookies) until puffy and beginning to brown around the edges.: You'll hear a gentle crackle of warmth and see the edges take on a faint golden hue while centers remain soft and puffy. The aroma shifts to warm butter and citrus. Removing cookies too early leaves raw centers, and baking too long dries them out, so watch for that matte, set top with slight edge color as your cue.
- Remove from the oven, cool for 5 to 10 minutes, and then transfer to a cooling rack to cool the rest of the way.: As they rest the cookies will set and firm up subtly; touching too soon can cause them to crumble. The bottom should show light browning and the tops should look dry and matte. If you leave them on the hot pan too long they can continue to cook and overbrown, so transfer at the sign of set edges.
- Whisk together the glaze ingredients. Adjust the amount of cream to reach desired consistency (thin enough to drizzle over the cookies). Drizzle the glaze over the cooled cookies.: The glaze should be smooth and glossy, smelling of sweet lemon , and just thin enough to trail in ribbons when drizzled. Use a spoon or piping method to create pretty lines; the sugar will harden slightly as it cools, giving a delicate sheen. If the glaze is too thick it will clump, and if too thin it will pool, so adjust heavy cream by small increments.
- Allow glaze to set at room temperature, if desired, and serve.: The set glaze gives a slight crack and glossy finish, and the cookies will have that final pop of citrus aroma. Serving at room temperature ensures the texture is balanced; chilling can firm the glaze too much. A common oversight is glazing while cookies are still warm, which causes the glaze to sink and lose definition, so wait until they are cooled through.
Notes
- Room temperature butter matters: If your butter is too cold it will not cream properly with the granulated sugar, leading to dense cookies; if it is too warm the dough will spread excessively. Aim for a cool, slightly soft butter that yields when pressed but still holds its shape.
- Frozen raspberries reduce color bleed: Using frozen raspberries helps keep the dough looking pale and streaked rather than uniformly pink, giving a prettier contrast. Add them from frozen and chop them lightly for the best distribution without extra moisture.
- Measure flour accurately: Spoon all-purpose flour into your measuring cup and level it off to avoid packing, which can make cookies dry. If you live at altitude or in a very dry climate you may need to adjust slightly by a tablespoon to get the right dough texture.
- Watch for visual doneness: Look for slightly browned edges and a matte top to know when to remove cookies from the oven, rather than relying purely on time. Cookie size affects bake time, so check small cookies around 11 minutes and large ones around 14 minutes.
- Thin glaze for prettier drizzles: Start with less heavy cream when mixing the glaze and add a drop at a time until it streams smoothly off a spoon, then drizzle. If it is too thin let it sit a minute to thicken slightly or add a touch more powdered sugar.