Lemon Raspberry Cake
Lemon Raspberry Cake is a bright, tender layer cake with creamy raspberry buttercream and a jammy filling, offering a balance of tangy lemon and sweet raspberries. This easy to love dessert features a soft crumb and silky frosting, perfect for an easy weeknight celebration or weekend brunch. Make it to impress guests with fresh flavor and a beautiful presentation.
Equipment
- Stand mixer or large bowl and hand mixer
- Three 8 inch cake pans
- Parchment Paper
- Fine mesh sieve
- Spatula
- Cooling rack
Ingredients
- 2 cups sugar Provide sweetness and structure to the cake batter while helping with moisture retention and browning during baking. Creams well with butter to incorporate air for a tender crumb and balances the tartness of lemon and raspberries. Commonly measured by volume in home baking for straightforward mixing.
- zest of two lemons Offer bright citrus aroma and concentrated lemon oil that intensifies lemon flavor without adding extra liquid. Adds a fragrant top note to both cake layers and frosting, complementing the tartness of raspberries. Zest disperses flavor throughout the batter when mixed in with the butter and sugar.
- 1 1/2 cups butter, softened Contribute richness, tenderness, and moisture to the cake while providing a medium for creaming with sugar to trap air. Softened state allows proper aeration and emulsification with eggs and dry ingredients for a fine crumb. Also used in buttercream to create a stable, spreadable frosting base.
- 3 large eggs + 2 egg whites, at room temperature Add structure, leavening assistance, and moisture; egg whites contribute additional lift and stability to the batter. Room temperature eggs incorporate more evenly, promoting better volume and homogeneous texture in the finished cake. Yolks enrich flavor and color while whites help achieve a lighter crumb.
- 1 teaspoon vanilla Introduce warm, sweet aromatics that enhance the overall flavor profile and balance citrus notes. Small quantity intensifies other flavors and rounds out the cake and frosting without overpowering them. Added to batters and frostings during mixing for consistent distribution.
- 2 tablespoons fresh lemon juice Provide fresh, tart acidity that brightens the cake and reacts with baking soda for gentle leavening. Lemon juice amplifies the citrus character and balances sweetness in both batter and filling. Best when freshly squeezed to maintain vibrant flavor.
- 3 2/3 cups cake flour Form the primary bulk of the dry structure, supplying gluten and starch that create the cake's crumb. Cake flour yields a finer, softer texture with lower protein for tender, delicate layers. Sift or gently mix to avoid over-developing gluten and ensure uniform rise.
- 1 teaspoon salt Enhance flavor depth and balance sweetness while aiding in gluten development control for proper texture. Salt strengthens batter structure and highlights other flavors, ensuring the final cake isn't flat or overly sweet. Use measured amount to maintain intended flavor profile.
- 2 teaspoons baking powder Act as a chemical leavening agent that produces carbon dioxide when activated to help the cake rise and become light. Works in conjunction with baking soda and acidic components to provide consistent lift. Distribute evenly in the dry mix for uniform aeration.
- 3/4 teaspoon baking soda Serve as a fast-acting base leavener that reacts with acidic ingredients to create additional lift and tenderness. Complements baking powder to fine-tune rise and pH balance in the batter. Precise measurement is important to avoid off-flavors from excessive soda.
- 1 1/2 cups buttermilk Contribute acidity and moisture while tenderizing the crumb due to its lactic acid content. Buttermilk reacts with baking soda to produce gas bubbles for a lighter texture and adds a subtle tang. Incorporate at room temperature for optimal emulsification with butter and eggs.
- 12 ounces fresh raspberries Provide fresh fruit flavor, natural tartness, and visual interest when folded into batter or layered into the cake. Raspberries release juice that mellows sweetness and complements lemon; handle gently to avoid crushing. Fresh fruit also contributes texture and a burst of natural color.
- 1 1/2 cups butter, softened Add richness and stability to the frosting and help create a smooth, pipeable texture when creamed with powdered sugar. Softened butter emulsifies with other frosting ingredients and helps the icing hold shape for decorating. Doubled butter amount provides ample volume for a thick, luxurious frosting.
- 5 1/2 cups powdered sugar Sweeten and bulk the frosting while providing structure and body for spreading and piping. Powdered sugar dissolves into butter to form a smooth, stable buttercream that can be flavored and colored. Sift if necessary to avoid lumps and ensure silky texture.
- 1 -2 tablespoons cream or half and half Adjust frosting consistency by loosening and adding slight creaminess without thinning flavor significantly. Cream or half-and-half creates a smoother mouthfeel and helps achieve desired spreading or piping viscosity. Add gradually to reach the ideal texture for decorating.
- 1 cup raspberry jam Supply concentrated raspberry flavor and moisture to the filling or layers, enhancing fruit intensity and sweetness. Jam adds a glossy, spreadable component that binds layers and prevents the cake from tasting dry. Warm slightly for easier spreading and even coverage.
- fresh raspberries, for decorating Provide fresh, decorative garnish that reinforces the raspberry theme and adds bright color and a burst of freshness. Whole raspberries create an attractive finishing touch and offer textural contrast to soft cake and creamy frosting. Use just before serving to preserve appearance and firmness.
Instructions
- Preheat the oven to 350°F. Line three 8-inch cake pans with parchment and spray with cooking spray.: When you set the oven to 350°F , you will soon smell a faint warmth in the kitchen, and the thermometer will stabilize after a few minutes which is your cue to begin baking. Properly lining the pans with parchment and a light spray prevents sticking and helps the layers release cleanly, which is essential for neat assembly. I rub a little butter under the parchment to keep it from shifting, it sounds small but saves frustration. A common mistake is not preheating long enough, which leads to uneven rise; wait until the oven reads the full temperature before placing pans inside.
- In a large bowl or the bowl of a stand mixer, rub the lemon zest into the sugar until fragrant. Add the butter and beat until light and fluffy.: As you rub the zest of two lemons into the 2 cups sugar , aromatic citrus oils will perfume the sugar, giving an immediate bright scent that tells you the flavor is locked in. Adding the softened 1 1/2 cups butter and beating introduces air, which transforms the mixture into a pale, fluffy base; you will see the color lighten and the texture become airy, which is crucial for a tender crumb. If the butter is too cold, it will look speckled and not cream properly, so make sure it yields slightly to pressure. Avoid overbeating which can cause the batter to collapse later.
- Add the eggs and egg whites, vanilla, and lemon juice, and mix until well blended.: When incorporating the 3 large eggs + 2 egg whites , the batter will temporarily look curdled but will come together as it emulsifies. The vanilla and 2 tablespoons fresh lemon juice add depth and acidity, which you will notice as a more complex aroma. Mixing until well blended ensures even distribution of ingredients; stop once the mixture is uniform, because prolonged mixing can develop gluten later when dry ingredients are added. A frequent error is adding cold eggs which can cause the butter to seize; warm them to room temperature first.
- In a medium bowl, whisk together the cake flour, salt, baking powder, and baking soda. Add the dry ingredients to the wet ingredients in three additions, alternating with the buttermilk, and mix just until combined.: As you whisk the 3 2/3 cups cake flour , 1 teaspoon salt , 2 teaspoons baking powder , and 3/4 teaspoon baking soda , the mixture should look airy and even, which helps prevent lumps. Alternating the dry mix with the 1 1/2 cups buttermilk in three additions lets the batter incorporate gently, giving a uniform texture without overworking the flour. You will see streaks disappear as you fold, and the batter should be smooth but not overly dense. Overmixing here can yield a tight, chewy crumb, so stop when you no longer see dry streaks.
- Divide the batter evenly between the prepared pans and bake 23-26 minutes, until a toothpick inserted in the center comes out clean. Move to a cooling rack and cool completely before frosting.: As the pans bake at 350°F , you will smell the citrus and butter developing into cake aromatics and notice the edges pulling slightly away from the pan. The tops should turn a pale golden and spring back lightly when touched. A toothpick test is a classic indicator; if it comes out clean or with a few moist crumbs, the layers are done. Move them to a cooling rack to stop the cooking process, and resist the urge to frost while still warm, because trapped heat makes frosting slip and melt. Common pitfalls include opening the oven too often which can cause uneven rise.
- To make the frosting, puree the raspberries using a blender or food processor. Strain the raspberries through a sieve to remove the seeds.: Pureeing the 12 ounces fresh raspberries releases vivid color and bright aroma, but straining is essential to remove seeds for a silky frosting. Pressing the puree through a fine sieve yields a smooth, glossy liquid that integrates evenly into the buttercream. The scent will be intensely fruity and floral, signaling vibrant flavor. If you skip straining, the frosting may have a gritty texture and visible seeds, which some people do not prefer.
- Add the butter to a large bowl or the bowl of a stand mixer, and beat until light and fluffy. Add the raspberry puree and powdered sugar, and mix until combined. Add cream as needed to make a smooth frosting. Beat on high speed until light and fluffy.: When you whip the second portion of 1 1/2 cups butter , it should become pale and airy, which creates the structural base for the frosting. Gradually adding the raspberry puree and 5 1/2 cups powdered sugar allows the mixture to emulsify without seizing, and a tablespoon or two of cream or half and half brings it to a spreadable texture. The frosting should be bright pink, glossy, and smell unmistakably of raspberry. If the frosting is too thin, chill briefly and rewhip; if too stiff, add small amounts of cream. A common mistake is adding the puree too quickly, which can make the buttercream runny.
- To assemble the cake, level each of the cake layers. Place a cake layer on a serving platter or cake stand and spread a 1/4 inch thick layer of frosting over the top. Pipe a ring of frosting around the edges of the cake layer to hold in the jam. Spread 1/2 cup of raspberry jam evenly over the buttercream.: Leveling the layers ensures stable stacking and an even profile, which you can achieve with a serrated knife or cake leveler. When you spread the 1/4 inch layer of frosting, the texture should feel smooth and cool, and piping a shallow dam around the edge keeps the 1 cup raspberry jam contained. The jam adds concentrated fruit intensity and a sticky contrast to the buttery frosting, and you will see a neat, glossy layer when done. Avoid applying jam directly to an unleveled surface as it can pool and squeeze out.
- Repeat with the next cake layer, then top with the remaining cake layer. Spread a thin coat of frosting over and around the cake to seal in the crumbs.: The crumb coat traps stray crumbs so the final decoration stays pristine. After stacking the layers, apply a thin, even coat that will look patchy but will firm up in the fridge. The smell of raspberries and lemon will mingle enticingly as the frosting sets. Chill for at least 30 minutes to allow the crumb coat to stabilize; skipping this step often leads to crumb flecks showing on the final finish.
- Refrigerate for at least 30 minutes.: A brief refrigeration firms the crumb coat and chills the butter in the frosting, making the next layer easier to apply. You will notice the frosting set slightly and become less tacky to the touch. This rest period also helps the jam layer settle between the cake and buttercream. Do not leave the cake too long uncovered, as it can dry; wrap lightly if needed.
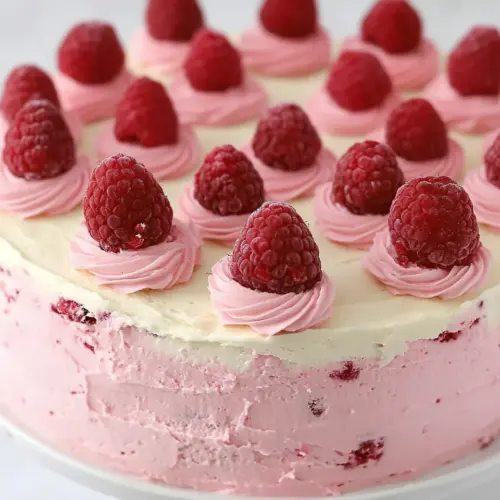
- After the frosting has set, spread a thicker layer of frosting around the sides and top of the cake, then decorate as desired (I just did little dollops with an open star tip).: The final coat should feel smooth and substantial, and as you spread it you will see the texture become glossy and refined. Piping small dollops around the top adds a pretty border and gives a professional finish. Use the fresh raspberries for decoration right before serving to maintain their freshness. A common error is over decorating too far in advance, which allows fruit to leak moisture onto the frosting.
- Refrigerate any leftover cake.: Storing slices in the fridge keeps the frosting stable and the filling fresh. The cake will keep for several days when covered, and chilling helps the structure hold when serving. Before serving, you can bring slices to near room temperature for the best flavor and texture. Leaving it unrefrigerated for long periods can soften the frosting excessively, especially in warm environments.
Notes
- Swapping flour Use all purpose flour only if you cannot find cake flour, but reduce the amount by 2 to 4 tablespoons to avoid a denser crumb. This keeps the texture light while accounting for a higher protein content.
- Adjusting frosting sweetness If the frosting tastes too sweet, add a teaspoon of lemon juice or a pinch of salt to balance the sugar without changing the texture dramatically.
- Making ahead Bake the layers and wrap them tightly, you can store unfrosted layers at room temperature for 2 to 3 days or freeze up to 2 months. Thaw in the fridge wrapped before assembling to avoid condensation.
- Stabilizing frosting If the frosting seems too soft, chill it for 10 to 20 minutes and rewhip; this firms the structure without adding more sugar.
- Handling extra jam Warm jam slightly to make spreading easier, but let it cool so it does not melt the frosting dam during assembly.
- Transporting the cake Chill the assembled cake thoroughly, then transfer it in a sturdy cake box with non slip beneath; this reduces sliding and keeps the decorations intact.