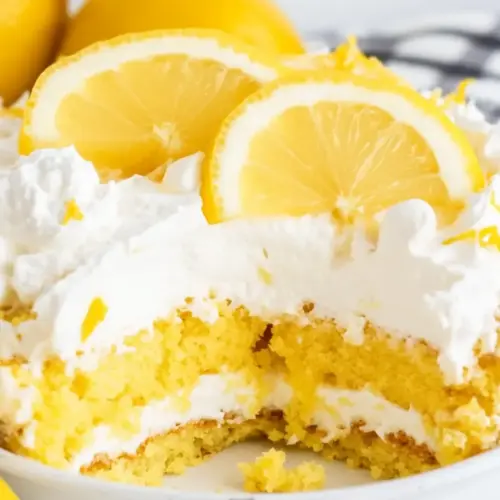
Lemon Pudding Poke Cake
Lemon Pudding Poke Cake is a creamy, bright layered dessert that pairs soft yellow cake with a silky lemon filling and light whipped topping. This easy make ahead treat is perfect for gatherings and warm weather, delivering contrasting textures and refreshing citrus notes. It is an excellent choice for an easy weeknight celebration or a potluck, and it always disappears fast.
Equipment
- 9x13 glass casserole dish
- Mixing Bowl
- Electric Mixer
- Spatula
Ingredients
- 15.25 ounces yellow cake mix Provides the base structure and bulk for the cake, supplying flour, sugar, leavening agents, and flavor components to create a tender yellow cake texture when mixed and baked according to package directions.
- 1 cup water Adds hydration to the cake batter, activating dry ingredients and allowing proper consistency for mixing while contributing to steam during baking for moistness.
- 1/2 cup oil can use your preferred cooking oil, vegetable oil, canola oil or even olive oil are all ok Contributes fat to the batter to tenderize crumb and improve mouthfeel; using different oils will subtly influence flavor and texture without altering the recipe method.
- 3 large eggs Incorporates richness and acts as a binding and leavening aid, where the beaten eggs trap air for lift while contributing moisture and structure to the cake.
- 4 ounces cream cheese softened Adds a tangy creamy layer when softened and blended, enriching the filling or frosting with smooth texture and slight acidity that balances sweetness.
- 7 ounces sweetened condensed milk about half a 14 ounce can Provides concentrated sweetness and creaminess, adding moisture and a caramelized dairy note that helps create a rich, velvety filling for the poke cake.
- 3.4 ounces lemon pudding mix Impacts flavor and thickening in the pudding layer, delivering lemon flavor and setting properties that create the characteristic creamy pockets after poking the cake.
- 1 1/4 cups milk I used 2% milk but you can use what you have Dilutes the pudding mix to the correct consistency and contributes dairy richness, helping the pudding layer set smoothly and complement the cake.
- 4 tablespoons lemon juice Offers bright citrus acidity and fresh lemon flavor to intensify the lemon profile; acidity also balances sweetness for a fresher finish.
- 16 ounces Cool Whip or other whipped topping, divided Garnishes and tops the cake with airy sweetness and volume; dividing it allows layering and finishing touches while providing a stable whipped topping.
- 10 pieces lemon Oreos or similar crunchy lemon sandwich cookie, divided Adds crunchy lemon-flavored contrast when crumbled or layered, contributing texture and intensified lemon cookie flavor; dividing preserves some for decoration.
- Lemons optional for garnish Provides optional fresh citrus slices for visual appeal and extra acidity; serves as a garnish that reinforces the lemon theme and brightens presentation.
Instructions
- Preheat the oven to 350 degrees. Spray a 9×13 glass casserole dish with cooking oil.: The kitchen will warm and you may notice a faint sweetness in the air as things come to temperature, which sets the stage for a well risen cake. Preheating ensures that the yellow cake mix reacts predictably with the heat so the center bakes evenly rather than setting slowly and becoming dense. A common error is placing batter in a cold oven, which can cause uneven rise and a gummy middle. Also, spraying a 9×13 glass casserole dish with cooking oil creates a release layer and helps the cake edge pull away cleanly after baking.
- Place cake mix, water, oil, and eggs in a large mixing bowl. Combine with a whisk or an electric mixer until you have a smooth batter.: As you combine the ingredients you will sense the batter becoming glossy and fluid, shifting from separate components into a cohesive mass that will bake into a tender crumb. Whisking by hand creates a slight resistance and gentle aeration, while an electric mixer will make the batter smooth more quickly. The reason this step matters is that properly combined ingredients ensure even texture and lift. Watch out for overmixing, which can develop gluten and make the cake tough, and under mixing, which leaves pockets of dry mix.
- Pour batter into the oiled pan. Bake the cake for 30–32 minutes or until cooked all the way through and a toothpick comes out clean when inserted in the center of the cake. Allow the cake to cool for at least 45 minutes, or until cool to the touch.: Pouring the batter should feel effortless as it settles into the prepared pan, an even surface ready for rising. The visual cue is an evenly distributed layer with no thick ridges. Bake the cake for 30 to 32 minutes or until cooked all the way through and a toothpick comes out clean when inserted in the center, which indicates the interior has set without overbaking. Avoid pulling the cake too soon, which leads to a sinking center, or baking too long, which dries it out.
- Place cream cheese and sweetened condensed milk into a large mixing bowl. Mix together cream cheese and sweetened condensed milk until smooth. This step is easiest done with an electric mixer, but can be done by hand if your cream cheese is really soft.: Cooling changes the texture from steaming softness to a more stable structure that will accept the filling. You will feel the cake cool to the touch over time, and the aroma will mellow from hot buttered notes to a comforting cake scent. This resting period prevents the filling from melting and running off. Cutting corners here is a common mistake; adding filling too early can make it absorb unevenly and create a soggy top.
- In a second medium bowl, add the lemon pudding, milk, and lemon juice. Mix well until combined.: When you beat softened cream cheese together with sweetened condensed milk , the mixture becomes luxuriously smooth and glossy, offering a rich counterpoint to the bright pudding. This mixture adds body and sweetness that helps the pudding cling to the cake. If the cream cheese is not softened enough, lumps will remain, so use an electric mixer or ensure very soft cheese. A frequent slip is trying to rush this step and ending with a grainy texture.
- Pour the lemon pudding mixture into the cream cheese mixture and mix well. Add about 6 ounces of the Cool Whip and fold it into the cream cheese mixture, a little less than half.: Whisking these creates a silky, fragrant filling base; the mixture will thicken slightly and smell distinctly citrusy. Proper dissolution of the pudding powder prevents graininess and ensures the thickening agents activate uniformly. The lemon juice sharpens the flavor and balances the sweetness. A mistake to avoid is adding cold milk too slowly which can clump the pudding; whisk briskly for a smoother result.
- With the handle of a large spatula or spoon, poke holes into the cake in even rows. A 4 x 6 grid works well, but it doesn't have to be perfect.: Blending these components yields a unified, creamy filling with a bright lemon aroma. Fold in about 6 ounces of the Cool Whip , which lightens the mixture and creates a pillowy texture that will sink into the cake pockets. The reason this matters is that the lighter filling distributes more evenly and yields a pleasant mouthfeel. Overmixing at this stage can deflate the whipped topping, so fold gently. Don’t forget to scrape the bowl to avoid leaving pockets of undissolved pudding or condensed milk.
- Spread the lemon filling over the cake evenly, lightly pressing it into the holes as needed. Top the filling evenly with the remaining Cool Whip.: The act of poking should produce neat, even holes that are visible on the cake surface, and you may hear a subtle suction as the tool passes through. A 4 by 6 grid works well to create consistent pockets, allowing the filling to be absorbed uniformly. This step ensures that moisture penetrates the crumb instead of just sitting on top. Avoid poking all the way through the cake, which would cause the filling to leak out the bottom.
- Crush five of the lemon Oreo cookies into large crumbs, then sprinkle on top of the cake. Refrigerate the cake for 2 hours or until the topping is fully set. Serve with half a cookie garnish and a twist of lemon if desired, and enjoy!: As you spread the filling you will notice it sinking into the holes and leaving small peaks where it meets the cake, signaling good absorption. Lightly pressing helps guide the filling into pockets without compacting the crumb, preserving a tender bite. After that, top the filling evenly with the remaining Cool Whip to create a silky surface. A common issue here is applying filling too forcefully, which compresses the cake and reduces the pleasant texture.
- Crush five of the lemon Oreo cookies into large crumbs: Crushing the cookies yields rustic, crunchy bits that contrast with the creamy topping; you will hear and feel the crunch as you break them, and the aroma of lemon cookies will lift the whole dessert. Sprinkle the crumbs on top to add texture and visual appeal. Then refrigerate the cake for 2 hours or until the topping is fully set, which firms the filling and melds the flavors. A typical mistake is skipping the chill time, resulting in a loose topping and less cohesive slices.
- Serve with half a cookie garnish and a twist of lemon if desired: When you plate the cake, the garnish gives a final fresh scent and a professional look. The contrast between the creamy interior and crunchy garnish is most pronounced right after chilling, and presentation matters because it primes the senses. If you plan to transport the cake, keep the garnish separate until serving to avoid sogginess. Overcrowding plates or slicing too quickly before full chill time are common errors that affect texture.
Notes
- Swap oils carefully Use neutral oils like vegetable or canola to keep the flavor balanced, while a mild olive oil can add a subtle depth; avoid strong flavored oils which will compete with the lemon.
- Measuring sweetened condensed milk If you struggle measuring sticky canned goods, spray the measuring cup with a light coating of cooking spray first to allow the milk to slide out cleanly.
- Thaw Cool Whip properly Thaw in the refrigerator overnight rather than at room temperature to prevent weeping and to maintain structure when folding into the filling.
- Softening cream cheese If you forget to soften cream cheese, cut it into small cubes and let it sit at room temperature ten to fifteen minutes or briefly microwave in short bursts, stirring often.
- Cookie texture tips Crush only half the cookies for sprinkling so you keep contrasting large pieces and fine crumbs for better mouthfeel.
- Traveling with the cake Chill thoroughly before transport and keep it level in a cooler or insulated bag to protect the topping and maintain appearance.