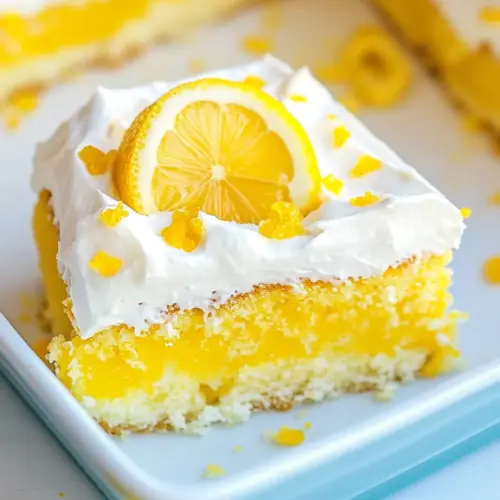
Lemon Poke Cake
Lemon Poke Cake is a bright, creamy, and easy dessert that pairs a tender sponge with lemon soaked pockets, silky pudding, and a cloud of whipped cream. This chilled cake delivers a refreshing citrus punch and moist texture perfect for warm gatherings and easy weeknight celebrations, making it a reliable showstopper you'll want to serve again and again.
Equipment
- 9 X 13 baking dish
- Mixing Bowls
- Whisk
- Wooden Spoon
- Offset Spatula
- Mixer
Ingredients
- 1 box White cake mix Lemon or Yellow cake mix also work Provides a convenient base for the cake batter and supplies flour, leavening, and sugar to create structure and sweetness; follow package directions while incorporating other wet and dry ingredients for best results.
- 3 large eggs room temperature Adds richness, moisture, and binding to the batter while contributing to a tender crumb; allow eggs to reach room temperature to ensure even emulsification and better volume.
- 1/3 cup oil Contributes fat to tenderize the cake and enhance mouthfeel while helping to incorporate air when beaten; choose a neutral oil to let lemon flavors shine.
- 3 lemons zested Imparts concentrated citrus aroma and bright flavor to the batter by releasing aromatic oils from the peel; zest only the colored skin to avoid bitterness from the pith.
- 1/4 cup fresh lemon juice Provides fresh acidic lemon flavor and liquid for the batter while balancing sweetness; freshly squeezed juice offers brighter taste than bottled alternatives.
- 1/3 cup milk Adds liquid to adjust batter consistency and contributes slight richness; use the measured amount to achieve the proper texture specified by the recipe.
- 2/3 cups sour cream Introduces tanginess, moisture, and density to create a tender, slightly creamy crumb; sour cream also reacts with leaveners to improve rise and texture.
- 1 box 3 ounces lemon Jell-O Delivers concentrated lemon flavor and pectin to seep into the cake when dissolved; use as directed to create the signature poke-cake syrup.
- 1 cup boiling water Dissolves the gelatin mix and allows it to be poured into the cake holes, infusing moisture and lemon flavor throughout; boiling water is required to fully activate the gelatin.
- 1 small box lemon instant pudding mix Provides instant thickening and additional lemon flavor to enrich the dessert’s filling while helping create a custard-like layer when combined with milk.
- 2 cups cold milk Cools and sets the instant pudding mixture while adding creaminess to the filling; cold milk helps the pudding thicken rapidly for spreadable consistency.
- 2 cups lemon curd Supplies a rich, intensely lemony layer that adds sweetness, glossy texture, and concentrated citrus tang when spread over the cake; spoon or warm slightly if too stiff to spread.
- 1 pint heavy whipping cream Offers richness and volume when whipped into fluffy topping, creating a light contrast to the dense cake and sweet fillings; chill cream and equipment for best whipping results.
- 1 tablespoon lemon zest Adds an extra burst of fresh citrus aroma and a hint of texture as a garnish or to intensify overall lemon flavor; use finely grated zest for best distribution.
- 1/2 cup powdered sugar Provides sweetness and helps stabilize whipped cream while smoothing texture; sift powdered sugar to avoid lumps and adjust to taste for desired sweetness.
Instructions
- Preheat the oven to 350 degrees F and grease a 9 x 13 baking dish.: As the oven warms, you will notice a faint settling hum and a gentle wave of warmth when the door opens, signaling readiness. Preheating ensures even rise and consistent crumb structure, because batter placed into a properly hot oven begins its chemical reactions right away. Greasing the pan prevents sticking and helps the edges brown slightly, producing a pleasant contrast. A common mistake is skipping the greasing or preheating, which can lead to uneven baking and a cake that clings to the pan. Use visual cues, the oven should feel steadily warm when you open it, and the greased surface should look faintly glossy rather than dry.
- Combine all Lemon Cake ingredients in a bowl and stir until smooth. Pour into the prepared pan and bake for 25-30 minutes or until an inserted toothpick comes out clean or with just a few crumbs.: You'll hear a soft whisking sound as batter becomes glossy and slightly thick; it should ribbon when the whisk lifts. Mixing brings air into the batter which contributes to a tender crumb when baked. Pouring into the pan, you can see the surface level and even out small peaks for uniform rise. During baking, the kitchen will smell subtly sweet and faintly eggy as proteins set. Test doneness visually, the top should be lightly golden and spring back when touched. Avoid overbaking because it dries the sponge and reduces its ability to absorb the lemon mixture. A common error here is underbaking which yields a gummy center, so always perform the toothpick test and observe the spring back.
- Mix lemon Jell-O with boiling water and cool to room temperature.: When you stir gelatin into boiling water, steam and a bright citrus aroma will rise, signaling full dissolution. Cooling it prevents the hot liquid from cooking or collapsing the cake crumb when poured later, and it allows the gelatin to begin setting to a syrupy consistency that soaks nicely. Stirring should produce a smooth, glossy mixture without grains. A typical mistake is pouring the gelatin while still very hot, which can create holes that expand and compress the cake or cause separation. Let it reach room temperature and check consistency, it should be pourable yet not scalding.
- When the cake is done, use the back of a wooden spoon to poke holes all over the cake.: Poking produces a satisfying pattern of tiny tunnels and you may hear a faint tearing sound as the crumb yields, showing it is tender. The holes act as reservoirs for the lemon soak, ensuring flavor is distributed into the interior, not just on top. Space the holes evenly for consistent texture and avoid pushing all the way through to the pan, which can create leakage. A common oversight is poking too sparsely, which leads to unevenly soaked cake, so aim for a dense, even pattern.
- Pour lemon Jell-o mixture on top of the cake into the holes.: As you pour, the gelatin glides into the cavities and settles with a glossy sheen, and you may hear a soft sough as the liquid finds its way. This step hydrates and flavors the crumb, making the cake luscious and moist. Pour slowly so the mixture fills the holes rather than running off the surface, and let it sit so capillary action draws the liquid downward. A misstep is pouring too quickly while the cake is still piping hot, which can cause excessive sinking or a soggy texture, so ensure the cake has cooled slightly before pouring.
- Next spread the lemon curd evenly on top.: The curd spreads with a thick, silky glide and gives a concentrated burst of tartness, which contrasts the sweet cake. Use an offset spatula to smooth it into an even layer so each slice has balanced intensity. Working evenly prevents pockets of heavy curd that might weigh down part of the cake. One mistake is applying curd too thickly in one spot, causing an uneven set and overly dense bites; aim for a uniform thin-to-medium layer.
- Mix the instant pudding mix with cold milk together until thick, and then IMMEDIATELY pour over the cake. Refrigerate the cake for a few hours or better overnight.: When you whisk pudding into cold milk , it thickens quickly into a creamy, custard like texture that seals the curd and jelly layers. The scent is mild and sweet, and pouring it over the cake should produce a smooth, even blanket. Time is crucial, because the pudding sets fast and must be poured before it becomes too viscous to absorb. Refrigeration allows the layers to meld, the flavors to settle, and the gelatin to finish setting. A common error is waiting too long and letting the pudding thicken, which prevents good absorption and yields uneven texture.
- Beat heavy whipping cream with the lemon zest and powdered sugar until stiff and spread over the cooled cake.: As you whisk, the cream transforms into billowy peaks, and the kitchen fills with a light, sweet aroma with a hint of citrus from the zest. Stiff peaks mean the topping will hold its shape when spread, creating a pleasant contrast to the denser pudding and curd. The added powdered sugar stabilizes the cream and sweetens subtly, while the zest perfumes it. Avoid overwhipping which leads to graininess and eventual separation into butter and buttermilk. Pay attention to visual clues, the cream should look glossy and hold a peak without collapsing.
- Top with lemon slices chill for one more hour and serve.: Adding slices provides a decorative, fresh finish and an extra burst of citrus oil from the rind. After a final chill the cake firms and slices hold cleanly, giving you neat, attractive portions. Serve cold, and you will notice the interplay between cool whipped cream, silky pudding, and citrus pockets. A final mistake to avoid is skipping the last chill, which can make the cake too soft to slice cleanly.
Notes
- Start with room temperature ingredients so the batter blends smoothly and traps air for a tender crumb.
- Cool the gelatin before pouring because hot liquid can compress the crumb and create sogginess instead of gentle soaking.
- Space your pokes evenly to ensure consistent moisture across every slice and avoid dry patches.
- Work quickly with instant pudding since it sets fast, pouring it immediately ensures it absorbs rather than solidifies on top.
- Chill thoroughly before serving to let layers set and flavors meld, which produces cleaner slices and improved texture.