Lemon Dump Cake
Lemon Dump Cake is an easy, bright, and creamy dessert with a crisp buttery topping and bubbling lemon curd pockets. This effortless recipe makes a crowd pleasing treat perfect for easy weeknight desserts or casual gatherings, offering a balance of tangy citrus and rich cream cheese. Make it when you want a show stopping dessert with minimal effort and pantry staples.
Equipment
- 9x13-inch Baking Dish
- Hand Mixer
- Mixing Bowl
- Oven
Ingredients
- 2 (12-ounce) jars lemon curd Provides intense, tangy-sweet lemon flavor and a creamy base that keeps the cake moist; spoon into the pan to create the signature dump-layered citrus filling. Adds bright acidity and sugar that balance richness and melds with cake mix during baking to form a glossy topping.
- 8 ounces cream cheese (softened) Contributes a smooth, rich texture and subtle tang that helps stabilize the filling when beaten with egg and sugar; soften to room temperature for easier blending. Provides structure and creaminess that contrasts the airy cake topping and enhances mouthfeel.
- 1 large egg (room temperature) Binds the cream cheese and sugar mixture, adding structure and a slight lift when beaten; ensure room temperature to incorporate evenly and avoid lumps. Also helps set the filling as it bakes, yielding a custard-like consistency within the dessert.
- 1/4 cup granulated sugar Sweetens and helps stabilize the cream cheese-egg mixture, cutting the tartness of lemon curd and promoting browning of the top during baking. Measure carefully to maintain proper sweetness balance so the dessert is bright yet not overly sugary.
- 1 (15.25-ounce) box vanilla, lemon, yellow or white cake mix ((we used white)) Forms the dry base that creates the cake-like crumb topping when sprinkled over the filling; choose vanilla, lemon, yellow, or white according to desired flavor. Absorbs butter and juices during baking to produce a crisp, golden crust with a tender interior.
- 1/2 cups salted butter (cold) Supplies fat that melts into the cake mix to create a buttery, crisp topping and tender crumb; use cold butter cut into small pieces or thin slices for even distribution. Salted butter adds a hint of savory contrast that enhances overall flavor and encourages a golden finish.
Instructions
- Preheat the oven to 350°F.: As the oven warms, you should feel a small ritual of readiness, a gentle hum and a faint warmth that will cradle the pan. The precise even heat of 350°F encourages the lemon curd to bubble gently while the topping browns, creating those signature rim bubbles and a toasted top. A common mistake is rushing this step, sliding the pan into an oven that is not fully hot which can lead to uneven baking and a topping that fails to crisp properly, so wait until your oven reaches temperature and use an oven thermometer if yours runs cool or hot.
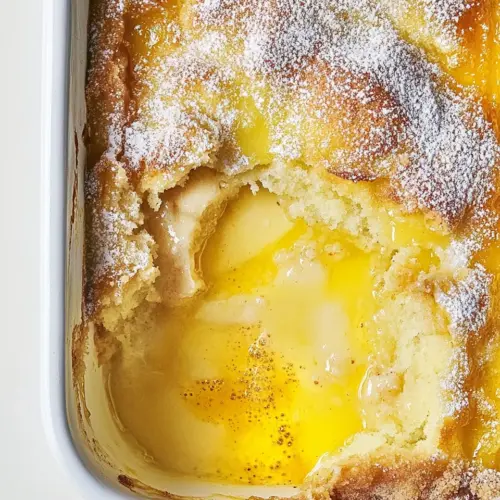
- Spread the lemon curd into the bottom of a 9×13-inch baking dish.: When you spoon the glossy lemon curd across the dish, you will notice its thick, satin like texture and brilliant yellow color. Smooth it gently with the back of a spoon so it forms an even bed, but do not overwork it; little pools are fine because they become pockets of intense lemon after baking. A pitfall here is skimping on coverage, which can create dry spots in the finished dessert, so aim for an even layer that reaches near the edges without being so thin it bakes away.
- In a medium bowl, use a hand mixer to combine cream cheese, egg, and granulated sugar until smooth and combined.: As you beat cream cheese with the egg and granulated sugar , watch the mixture transform from chunky to silky and pale. The sound will be a steady, light whir and the aroma will be faintly sweet and dairy forward. This smoothing step ensures the cream cheese layer blends uniformly when dropped over the curd. If the cream cheese is not fully softened, you may end up with lumps, so bring it to room temperature before starting to avoid an uneven texture.
- Drop spoonfuls of the cream cheese mixture over the lemon curd.: Placing spoonfuls, rather than spreading, will create pockets of creamy richness that bake into soft islands above the tangy curd. You will see dollops of pale, velvety filling dotting the surface, and during baking they will puff slightly and set. A common slip up is trying to spread the mixture thinly which can cause it to merge completely with the curd, losing the contrast of textures, so reserve spooning for that pleasing patchwork effect.
- Sprinkle the cake mix evenly over the first two layers.: As you shake the box of cake mix over the dish, a dusty snowfall will coat the cream cheese and curd. Aim for an even distribution so the topping browns uniformly. The dry mix acts like a crust base that, once the butter melts into it, will become crisp and golden. A frequent misstep is piling the mix too thick in some areas which can lead to uneven melting of butter and dry crumbs, so take a moment to level it with a light hand.
- Slice very thin pats of butter and spread over the entire top of the dry cake mix. Cover as much of the cake mix as possible.: The cold butter will sizzle slightly as it hits the warm top once the pan is in the oven, but before that the thin pats should be nearly translucent so they melt swiftly and saturate the dry cake mix . The smell of warmed butter as it melts is nutty and inviting, and visually the surface will begin to glisten as the butter pools. If you leave large chunks of butter, you might get uneven browning and dry pockets, so take time to slice the pats very thin and place them close together for more even coverage.
- Bake for 40 minutes or until the topping is browned and the lemon filling is bubbling around the edges.: During baking the kitchen fills with a warm, citrus perfume and the top will transform to a golden brown. Watch for the bubbling rim of lemon curd as a sign the internal temperature has risen and the filling is set but still luscious. If you bake much longer, the curd can become overly runny or the top may darken too far, so check near the end of the time and tent with foil if the top is browning too quickly compared to the bubbling.
- Allow dump cake to rest for 15 minutes before serving.: Resting lets the lemon curd cool just enough to thicken slightly, so spooning yields neat slices instead of a syrupy pour. You can sense the steam settling and the surface calming as the dessert moves from oven heat to a gentler warmth. A common impatience is cutting too early which results in a runny presentation, so give it the full rest to let textures stabilize and flavors meld.
Notes
- Use different cake mixes Swap the box for lemon, vanilla, white, or yellow to subtly shift the flavor profile without altering technique.
- Adjust the butter coverage If you prefer a softer topping, place fewer pats of butter, or for extra crispiness, add a few more thin pats to encourage deeper browning.
- Top with fresh fruit After cooling slightly, add fresh blueberries, raspberries, or sliced strawberries to complement the lemon curd and add freshness.
- Serve warm or chilled Warm brings a melty, gooey texture, while chilled yields firmer slices and a more cake like bite, both are delicious options.
- Extra coverage trick Check the top at about 30 minutes and add additional very thin pats of butter to any dry areas to ensure even saturation of the cake mix.