Lemon Custard Cups
Lemon Custard Cups are creamy, gently fragrant custards that balance bright citrus with a silky texture. This easy dessert uses minimal ingredients for maximum charm, perfect for an easy weeknight dessert or a small gathering. The delicate lemon infusion and smooth set make them an irresistible choice when you want something elegant yet uncomplicated to make.
Equipment
- Saucepan
- Oven
- Roasting Pan
- Cheesecloth
- Teakettle
- Ramekins or custard cups
- Whisk
- Strainer
- Heatproof bowl with spout
Ingredients
- 2 1/4 cups whole milk Heat gently and provide a creamy liquid base that dilutes the eggs and ensures a smooth custard texture when combined and cooked; whole milk contributes fat for richness and helps carry the lemon flavor throughout the cups.
- 1 tablespoon freshly grated lemon zest (you'll need about 2 large lemons), without any white pith Zest finely and offer bright citrus oils that lift the custard with aromatic lemon character; freshly grated zest without pith adds intense flavor and freshness without bitterness.
- 1/8 teaspoon pure lemon oil or pure lemon extract, or as much as needed to achieve a delicate lemon flavor – lemon oil will have a more concentrated flavor than an extract Add sparingly and deliver concentrated lemon aroma to intensify the citrus note without adding extra acidity; pure lemon oil or extract should be used carefully because a small amount goes a long way in balancing the delicate custard.
- 4 large eggs Whisk thoroughly and act as the primary setting agent by coagulating proteins that thicken the custard when gently cooked; large eggs also add structure, silkiness, and a subtle richness to each cup.
- 1/2 cup granulated sugar Dissolve fully and provide sweetness that balances the tart lemon elements while also aiding in creating a smooth mouthfeel; granulated sugar helps stabilize the custard and contributes to its overall flavor profile.
Instructions
- Add milk and lemon zest to a saucepan over medium heat and bring just to a boil. Remove saucepan from heat, and place a cover over the top. Set a timer for 30 minutes, to let milk take on some lemon flavor.: You will notice a soft citrus perfume rising as the milk warms, which is the lemon oil releasing into the liquid. The surface will shimmer and you may see tiny bubbles around the edge when it is nearly boiling. This gentle heat helps the lemon zest infuse the whole milk with aromatic compounds without cooking the zest itself into bitterness. Avoid a rolling boil because aggressive boiling can create scalded notes and alter the milk's sweetness.
- While you're waiting, do some prep work. Place oven rack right below the center position in the oven. Preheat oven to 325°F. Line the bottom of a tall-sided roasting pan with a double thickness of paper towels and place eight 4-ounce custard cups in the pan. Line a strainer with cheesecloth and set it over a heatproof bowl with a spout. Fill a teakettle with water and put it on to boil. When the water boils, turn the heat down to keep it warm.: Covering the saucepan traps steam and aromatic molecules, encouraging a deeper infusion of zest into the milk. You should feel warm steam when you lift the lid, and the scent will be more pronounced. If you skip the resting period, the infusion will be weaker and the lemon character will be less integrated.
- When the 30-minute timer goes off, pour the steaming milk mixture through the strainer lined with cheesecloth, into the heatproof bowl. Press on the lemon zest with a spatula, to release as much lemon flavor from the zest as possible. Discard cheesecloth with lemon zest. Stir lemon oil into lemon-infused milk. Taste test the milk and add more lemon oil if needed, as different oils and extracts will have varying amounts of lemon flavor. The goal is to have only a delicate lemon flavor.: As the milk cools slightly, it continues to extract fragrant oils from the zest. During this time the aroma will shift from sharp to mellow and floral. Use the interval to prepare your baking setup because rushing later steps is a common mistake that can throw off timing.
- In a 1-quart heatproof measuring cup or bowl with a spout, whisk eggs and sugar until well blended. Still whisking, very slowly drizzle in about 1/4 cup of the steaming milk, little by little, to temper (warm) the eggs – so they don’t curdle. Whisking continuously, very slowly pour in the remaining steaming milk.: Positioning matters because it ensures even, gentle heat during the water bath bake. You want the rack below center so the water can heat and transfer warmth evenly around the cups. If the rack is too low or high you may get uneven cooking, leaving some custards firmer than others.
- With a large spoon, skim off any foam from the top of the custard mixture. Then divide the custard mixture amongst the prepared cups. Place the roasting pan in the oven and then pour enough hot water from the teakettle into the roasting pan to come halfway up the sides of the cups.: A moderate oven creates a steady environment that cooks the custard slowly so it sets without curdling or developing a tough skin. You should notice a comforting gentle warmth when you open the oven. Avoid higher temperatures which will overcook the edges before the center sets.
- Bake the custards for 45-55 minutes, or until they jiggle only in the center when you tap the cups lightly. Bake time will depend on actual size and shape of cups. Take care to not overbake, as this can create a thickened skin over the top of the custards. Custard will firm up as it cools.: The paper towels cushion the cups and provide insulation, while the tall sides of the roasting pan allow you to pour hot water for a proper bain marie. The cups will sit snugly, and you can expect gentle heat circulation. Do not use thin flimsy towels that could shift when you pour water, as movement can jostle the custards.
- Transfer the custards to a rack and cool to room temperature, then cover and refrigerate for at least 2 hours before serving.: Straining the infused milk removes zest fragments and any foam, resulting in an ultra-smooth custard. The heatproof bowl with a spout makes transferring the liquid effortless. If you skip the strainer, little flecks of zest can end up in the custard and create uneven texture.
- Take custards out of the refrigerator about 15 minutes prior to serving. Serve with small dollops of sweetened whipped cream and fresh berries.: Having hot water ready prevents a long delay between pouring the custards into cups and setting them into their water bath, which keeps temperatures consistent. The sound of boiling and the steam indicates the water is ready. Using cold water will prolong bake time and can affect the custard's setting behavior.
- When the water boils, turn the heat down to keep it warm: Maintain a gentle simmer rather than a fierce boil so when you pour the hot water into the roasting pan, it is hot but not violently bubbling. The goal is stable hot water that transfers heat evenly. If it is too turbulent, splashing could get water into the cups.
- When the 30-minute timer goes off, pour the steaming milk mixture through the strainer lined with cheesecloth, into the heatproof bowl: The sound of the liquid streaming is reassuring, and the milk will look glossy and infused. Pressing on the zest with a spatula releases additional aromatic oils, deepening the lemon profile. Discard the used cheesecloth so no bitter particles remain in the liquid.
- Press on the lemon zest with a spatula, to release as much lemon flavor from the zest as possible: Apply gentle pressure to coax out the oils, and you will see the liquid smell brighten noticeably. This step intensifies the citrus without adding acidity. Be careful not to press so hard you push bits through the cloth, which would create texture issues in the finished custard.
- Discard cheesecloth with lemon zest: Removing the spent zest prevents any unwanted chewy fragments and ensures clarity of flavor. The infusion has done its job, and leaving the zest would risk bitterness. Proper disposal also keeps your workspace tidy.
- Stir lemon oil into lemon-infused milk: Adding a touch of lemon oil allows for precise control over the aromatic intensity. Stirring gently distributes it through the warm milk so the scent becomes even. Remember that oil is concentrated, so add sparingly and taste, you can always add more but you cannot take it away.
- Taste test the milk and add more lemon oil if needed, as different oils and extracts will have varying amounts of lemon flavor: A careful taste tells you whether the infusion needs a small boost. The milk should carry a delicate citrus whisper, not a punchy aroma. Overconcentrating will push the custard into an artificial territory, so adjust in tiny increments.
- In a 1-quart heatproof measuring cup or bowl with a spout, whisk eggs and sugar until well blended: The mixture will become pale and slightly thick, and the sugar should start dissolving into the egg whites and yolks. This homogenous base is critical for even setting and smooth texture. If you rush whisking, you may have grainy sugar pockets in the final custard.
- Still whisking, very slowly drizzle in about 1/4 cup of the steaming milk, little by little, to temper warm the eggs so they don’t curdle: As you add the warm milk, you will notice the egg mixture warming gradually without seizing. Tempering stabilizes the eggs so when the remainder of the milk is added, they incorporate smoothly. Pouring too quickly is the main cause of scrambled bits forming.
- Whisking continuously, very slowly pour in the remaining steaming milk: The gradual integration prevents abrupt temperature changes, keeping the mixture velvety. The sound becomes a steady ribbon of liquid and the mixture will look glossy. If you stop whisking or pour in a rush, the custard may develop lumps that are hard to fix later.
- With a large spoon, skim off any foam from the top of the custard mixture: Removing foam leads to a clearer, silkier surface on the baked custards. Skimming also eliminates light air pockets that could change texture. If you leave the foam, you might see small bubbles or an irregular top after baking.
- Then divide the custard mixture amongst the prepared cups: Pour slowly into each cup, watching the surface settle into a smooth sheen. The sight of uniform cups is satisfying and helps ensure even baking. Overfilling can cause spills into the water bath which creates uneven cooking.
- Place the roasting pan in the oven and then pour enough hot water from the teakettle into the roasting pan to come halfway up the sides of the cups: The water bath creates gentle, even heat conduction so the custards bake slowly and set uniformly. The water should glimmer and sit quietly; avoid splashing into the cups. If the water is too low the edges will set faster than the center.
- Bake the custards for 45 to 55 minutes, or until they jiggle only in the center when you tap the cups lightly: During baking you will notice the tops gaining a faint color and the aroma deepening. The correct doneness is a slight, confident wobble in the center, not a full liquid tremble. Overbaking is the surest way to get a grainy, rubbery texture, so err on the side of less time and remember they will continue to firm as they cool.
- Bake time will depend on actual size and shape of cups: Different vessels conduct heat differently, so watch for visual cues rather than relying strictly on minutes. Taller cups often need more time, while wider, shallow cups finish sooner. If you open the oven frequently you will lengthen the bake time, so trust the first check at the low end of the range.
- Take care to not overbake, as this can create a thickened skin over the top of the custards: A thick skin signals moisture loss and a tougher surface. If you notice a skin forming, tent the pan with foil and reduce oven heat slightly, to protect the surface while the center finishes setting. Once a skin forms it is difficult to reverse.
- Custard will firm up as it cools: Expect the texture to tighten during cooling, moving from a soft jiggle to a creamy set. This is normal and indicates proper starch and protein interaction from the eggs. Cutting into them while too warm will produce a looser texture and may look underdone.
- Transfer the custards to a rack and cool to room temperature, then cover and refrigerate for at least 2 hours before serving: Chilling helps the custards reach their final silky consistency and intensifies the lemon aroma. The cool touch will smooth the mouthfeel and make them easier to serve. Do not rush refrigeration before they reach room temperature, as abrupt cooling can cause condensation and wateriness on the surface.
- Take custards out of the refrigerator about 15 minutes prior to serving: Allowing a short rest brings them to an ideal eating temperature where the flavor opens and the texture is pleasantly soft. Cold straight from the fridge can mute aromas, while too warm hides the signature creaminess. A brief pause balances both.
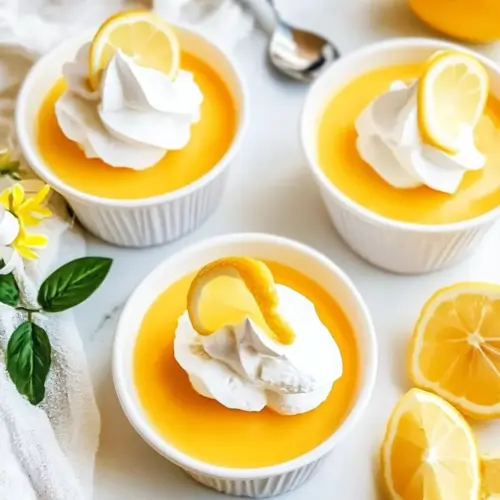
- Serve with small dollops of sweetened whipped cream and fresh berries: The creamy whipped garnish and bright berries offer contrast in texture and tartness that complements the custard. The visual pop of color also makes the cups inviting. Avoid heavy toppings that would overwhelm the delicate lemon profile.
Notes
- Swap citrus gently: Replace or combine lemon zest with a small amount of orange or lime zest for a different aromatic profile, but keep the steeping time the same to avoid bitterness.
- Adjust lemon intensity with care: Use lemon oil or extract in tiny increments after tasting the infused milk so you maintain a delicate citrus note rather than an overpowering one.
- Garnish choices for texture: Top with lightly sweetened whipped cream and fresh berries, or a few citrus segments for a bright contrast that complements the custard.
- Make it ahead for ease: Bake the day before and chill overnight, which improves texture and frees up time when serving guests.
- Presentation ideas for gatherings: Serve in small glass cups or ramekins and add a thin lemon zest curl on top for an elegant finish that highlights the citrus theme.