Lemon Cupcakes with Lemon Buttercream
Lemon Cupcakes with Lemon Buttercream are bright, creamy, and irresistibly tender. Zesty lemon juice and aromatic lemon zest combine with a soft, moist crumb for a delightful treat, while silky buttercream balances sweetness. Perfect for brunch, parties, or a sunny dessert, these cupcakes are easy to scale and make any gathering feel special, so give them a try for a reliable crowd pleaser.
Equipment
- Oven
- Muffin Pan
- Mixing Bowls
- Stand mixer or hand mixer
- Cooling rack
- Piping Bag and Tip
Ingredients
- 2 1/2 cups all-purpose flour Provide structure and bulk to the cupcakes, creating the crumb and absorbing liquids for proper texture. Sift or whisk before measuring to ensure even distribution and avoid lumps.
- 2 cups white granulated sugar Add sweetness and aid in creaming with fats to create tenderness and moisture in the batter. Dissolve well when mixing to ensure even sweetness and browning during baking.
- 3 teaspoons baking powder Leaven the batter by releasing carbon dioxide when activated, helping cupcakes rise and become light. Measure precisely to prevent metallic taste or over-risen, collapsed cakes.
- 1 teaspoon salt Enhance overall flavor balance and strengthen gluten networks slightly, improving texture and highlighting sweetness. Dissolve into dry ingredients for even distribution throughout the batter.
- 1 cup whole milk room temperature Contribute moisture and fat to the batter while providing tenderness and richness to the cupcakes. Bring to room temperature to promote even mixing and smoother batter consistency.
- 1/2 cup vegetable oil Replace some fat from butter, promoting moistness and a tender crumb while keeping cupcakes lighter. Combine well with wet ingredients to ensure uniform fat dispersion.
- 2 tablespoons lemon juice Introduce bright citrus acidity to balance sweetness and enhance lemon flavor; acidity also reacts with leaveners for subtle lift. Add freshly squeezed juice for best, vibrant flavor.
- 1 tablespoon lemon zest Produce concentrated lemon aroma and essential oils to intensify citrus flavor without extra liquid. Finely grate yellow zest and avoid the bitter white pith.
- 2 large eggs room temperature Bind ingredients, contribute richness and stability, and help create emulsification for a smooth batter. Use at room temperature to ensure even incorporation and proper aeration when beaten.
- 2/3 cup water Adjust batter consistency and hydrate dry ingredients for proper mixing and oven steam generation. Use at the specified amount to maintain intended texture and baking properties.
- Yellow Gel Food Color optional Provide optional color enhancement for a bright, sunny appearance without affecting flavor. Use sparingly to reach desired shade and stir thoroughly for uniform color.
- 2 cups (550 grams) unsalted butter room temperature Form the base of the buttercream, supplying richness, creaminess, and structure for whipping and holding shape. Keep at room temperature for smooth, spreadable frosting and easier whipping.
- 8 -9 cups powdered sugar Sweeten and stabilize the buttercream while building volume and structure when beaten into butter. Sift if lumpy and add gradually to reach desired sweetness and consistency.
- 1 teaspoon vanilla extract Add subtle aromatic depth and roundness to the buttercream, complementing lemon flavors. Measure carefully to avoid overpowering the citrus notes and stir in thoroughly.
- 3 tablespoons lemon juice Provide additional lemon acidity and brightness to intensify the buttercream's citrus profile and balance sweetness. Use freshly squeezed juice for the cleanest, most vibrant taste.
- Yellow Gel Food Color optional Offer optional color enhancement for the frosting to match the cupcake's theme without altering flavor. Apply a tiny amount and mix well to achieve consistent, even coloring.
Instructions
- Preheat oven to 350°F degrees.: When you open the oven and the air smells faintly warm, it signals steady heat build up which helps the cupcakes rise evenly. Preheating ensures the leavening agents react as intended rather than waiting for a cold oven, which can lead to dense centers. Listen for the oven click as it reaches temperature and avoid opening the door repeatedly during this initial heat up. A common mistake is not allowing full preheat, which can cause uneven domes and longer bake times.
- Add cupcake liners to a regular muffin pan. Set aside.: Parchment or paper cupcake liners provide neat edges and make it easy to remove cupcakes once baked. Setting the pan aside keeps your workspace organized so you can focus on mixing the batter. Press liners gently into each cup so they sit flush and stable, preventing batter from seeping between liner and pan. One pitfall is over filling liners during transfer, which will cause spill over and uneven tops.
- To a large bowl add dry ingredients: flour, sugar, baking powder and salt, whisk to combine.: flour, sugar, baking powder and salt, whisk to combine. : Whisking the dry ingredients aerates the mixture slightly and distributes the baking powder evenly, which is critical for uniform rise. As you whisk, you'll notice the mixture lighten in texture and small clumps break apart. This step prevents pockets of unmixed leavening that could create odd bubbles. Avoid vigorous rubbing that creates dust clouds, and make sure to scrape the whisk around the bowl so everything is fully integrated.
- To another large bowl (or the bowl of a stand mixer), add milk, oil, lemon juice, lemon zest, and eggs. Whisk on medium speed until fully combined, about 1 minute.: Mixing the wet ingredients until homogenous helps the eggs emulsify with the oil and liquids, producing a smooth base for the dry ingredients. You should see a glossy, slightly thickened mixture, with the zest suspended throughout. If you under mix, pockets of oil or streaks of egg can remain, causing uneven texture. Be careful not to over whip which can incorporate too much air and create large holes during baking.
- Add the dry ingredients to the wet ingredients and beat until well combined. Stop once to scrape the sides and bottom of the bowl with a spatula.: After adding dry to wet, you will notice the batter become thicker and slightly glossy. Scraping the bowl ensures no flour streaks or dry clumps remain, which would otherwise produce dry pockets in the cupcakes. The batter should be smooth and pourable. One common mistake is over mixing at this stage which develops gluten and yields tougher cupcakes, so stop as soon as the streaks disappear.
- With the mixer on low speed, slowly add the water and after that the food coloring if using. Mix just until combined. Scrape down the sides of the bowl as needed.: Adding water on low loosens the batter to a soft dropping consistency, which yields a tender crumb. If you add the water too quickly or at high speed, the batter can deflate and produce flat cupcakes. After the water, a touch of Yellow Gel Food Color will distribute more evenly in a thinner batter. Avoid lingering mixing which can make the texture gluey.
- Fill the cupcake liners with batter just a little over half.: Filling to just over half gives enough room for a pretty dome without spill over. I use an ice cream scoop or measuring cup to get uniform portions so bake times are consistent across the tray. You'll see the batter level out and a gentle mound form in the center. Over filling is the usual error here, leading to merged cupcakes or undercooked centers.
- Bake for 15-20 minutes, or until a toothpick comes out with a few moist crumbs NOT raw batter. Start checking on the cupcakes at the 15-minute mark. If you are baking mini cupcakes, they may be done in 9-12 minutes.: As the cupcakes bake, the kitchen fills with a warm lemon aroma and the tops turn a pale golden. Check by inserting a toothpick in the center, looking for a few moist crumbs clinging to it rather than wet batter. If you under bake, centers will sink and be gummy, while over baking dries them out. Rotate the pan halfway through if your oven has hot spots to ensure even coloring.
- Once done, remove the tray from oven and allow to cool for 3-5 minutes, then remove cupcakes to a cooling rack to finish cooling.: Letting them rest briefly in the pan allows the structure to set gently so they do not collapse when unmolded. After transferring to a cooling rack , the cupcakes will continue to release steam and firm up. Touch the top lightly to confirm coolness before frosting. A frequent mistake is frosting warm cupcakes which melts the buttercream and blurs piped details.
- Add butter to a large mixer bowl and mix until smooth.: The start of the buttercream process is whipping the unsalted butter until it becomes pale and silky. As you mix, you will hear a softer, lighter sound as air incorporates and the texture turns pillowy. Smooth butter yields a lump free frosting; if butter is too cold you will get small bits. If it’s too warm, the frosting will be greasy. Aim for room temperature consistency.
- Add 4 cups of powdered sugar and mix until smooth.: Adding powdered sugar in stages prevents a sugar cloud and helps the butter integrate cleanly. The mixture will thicken and sweeten substantially, and you should note a quiet, velvety texture forming. Scrape the sides so no gritty pockets remain. An easy trap is adding all the sugar at once, which leads to heavy dusting and uneven incorporation.
- Add the vanilla extract, gel food coloring and lemon juice, mix until smooth.: Introducing vanilla extract and lemon juice at this point brightens the flavor and balances the sweetness. The buttercream will loosen slightly and become more aromatic. If using Yellow Gel Food Color , add sparingly until you reach the desired hue. Be cautious with lemon juice, because too much can make the buttercream too thin and require more sugar to stabilize.
- Add the remaining 4 cups of powdered sugar and mix until smooth. If the buttercream is too soft, add more sugar, 1/2 cup at a time.: The final sugar addition creates pipeable stiffness. As you beat, the texture should become glossy and hold soft peaks. If the frosting remains too loose, add sugar gradually to avoid becoming overly dense. The common mistake is adding large portions of sugar at once which can make the buttercream grainy and overly sweet.
- Fix a piping bag with a large star tip or any other piping tip that you like.: Preparing your piping tools in advance makes the decorating stage seamless. A large star tip gives classic ridged swirls while other tips create different textures. Feel the frosting consistency by scooping some into the bag; it should flow smoothly but keep its shape. If it’s too stiff, let it sit a few minutes at room temperature, but be careful not to soften too much which makes detailed piping difficult.
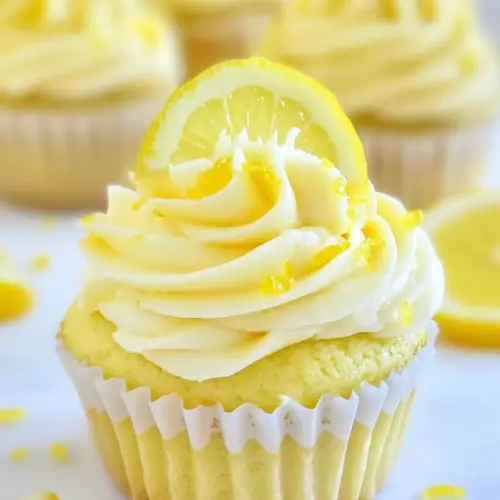
- Pipe the buttercream onto the cupcakes and garnish with lemon slices.: When piping, hold the bag vertically over the cupcake and apply steady pressure to create an even swirl. The first few seconds you will see a glossy rope transform into a decorative peak. Add a thin lemon slice or zest on top for visual contrast and a hit of fresh aroma. A common error is inconsistent pressure which results in uneven swirls, so practice a steady motion on a plate first if needed.
- Refrigerate cupcakes at least one hour before serving.: Chilling sets the buttercream so it keeps shape and the flavors meld slightly, giving a cleaner bite. After refrigeration, the texture becomes pleasantly firm yet creamy. Avoid leaving them out too long at room temperature if your environment is warm, as the buttercream can soften and lose definition.
- Store in the refrigerator for 3-4 days.: Proper refrigeration preserves freshness and prevents the buttercream from breaking down. Store cupcakes in an airtight container to avoid absorbing other odors and to maintain moisture. A common mistake is stacking cupcakes which squashes decoration, so allow space or use tiered storage if necessary.
Notes
- Increase lemon intensity: Add an extra teaspoon of lemon zest to the batter and an extra tablespoon of lemon juice to the buttercream to amplify citrus notes, tasting as you go so the frosting remains balanced and not too thin.
- Sobrighter color without flavor change: Use a tiny amount of Yellow Gel Food Color in the buttercream for a vivid presentation that does not affect taste, adding color drop by drop until you reach the shade you want.
- Stable frosting for warm weather: Beat the buttercream slightly firmer and chill briefly before piping if serving in a warm environment, this helps the frosting hold its shape longer when left out.
- Tiny citrus garnish: Instead of full slices, use thinly pared strands of lemon zest twisted over the piped frosting for an elegant, less heavy garnish that gives perfume on each bite.
- Make ahead assembly: Bake cupcakes up to two days ahead and keep unfrosted in an airtight container in the fridge; pipe the buttercream the day of serving for freshest texture and appearance.