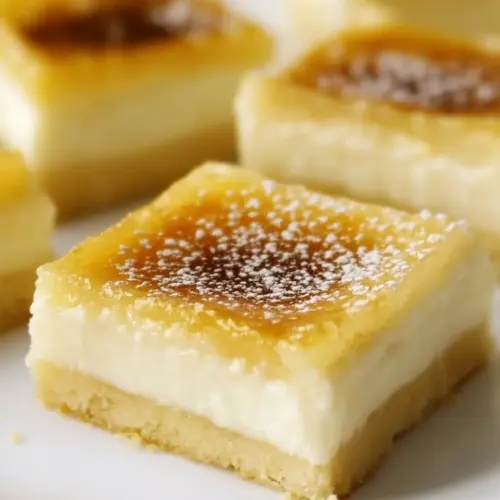
Lemon Creme Brulee Bars
Lemon Creme Brulee Bars are creamy, citrus forward, and elegantly simple to make, with a buttery base and a silky lemon custard topped with a crisp caramelized sugar shell. These easy dessert bars are perfect for spring gatherings or a special weeknight treat, offering bright lemon flavor and a satisfying crunch. Make them ahead and finish with a torch for a show stopping finale.
Equipment
- 8×8 glass dish
- Parchment Paper
- Mixing Bowls
- Spatula
- kitchen torch
- Broiler or oven
Ingredients
- 1/2 cup butter softened Soften and cream to create a tender shortbread crust that binds dry ingredients and adds rich butter flavor; contributes to a flaky texture and helps brown the base during baking.
- 1/2 cup granulated sugar Provide sweetness and tenderizing effect in the crust, dissolving into butter for a smooth texture; helps balance the tart lemon filling and supports caramelization when brulee-ing the top.
- 1 cup all purpose flour Supply structure and a tender crumb to the crust by forming gluten when mixed; offers a neutral backdrop that supports the buttery base without overpowering the lemon filling.
- 1/2 teaspoon vanilla extract Add a subtle floral-vanilla aroma that enhances overall flavor complexity; helps round out the sweetness and complements the lemon components without overwhelming them.
- 8 oz cream cheese softened Create a rich, creamy filling base when beaten smooth; adds tang and density to the custard layer, contributing to a silky mouthfeel and stable texture after baking.
- 14 oz sweetened condensed milk 1 can Contribute concentrated sweetness and a creamy consistency to the filling, adding body and smoothness; helps set the custard while keeping it velvety and preventing graininess.
- 1 egg beaten separately Incorporate structure and richness by binding the custard while adding leavening control; beaten separately to ensure even distribution and a stable, smooth filling consistency.
- 2 tablespoons lemon zest Provide bright citrus oils and intense aroma to lift and brighten the filling; finely grated zest infuses concentrated lemon flavor without adding extra acidity.
- 6 tablespoons lemon juice Add fresh acidity and liquid to the custard, balancing sweetness and helping the filling set; offers clean lemon flavor and aids in achieving the signature tartness of the bars.
- 5 tablespoons fine granulated sugar for brulee-ing, approximately Create a crisp caramelized topping when sprinkled and torched, adding contrasting texture and a sweet, slightly bitter caramel note; use sparingly to achieve an even brulee crust.
Instructions
- Preheat oven to 350° F. Line an 8×8 glass dish with parchment paper and lightly spray with nonstick cooking spray. Set aside.: The air in the oven should feel warm and steady, and you will smell the faint hint of warming metal as it approaches temperature. This step ensures even baking, and lining the pan with parchment helps you lift the finished bars cleanly without scraping or crumbling. Common mistake to avoid is skipping the parchment, which often leads to sticking and difficulty removing squares. If your oven heats unevenly, rotate the pan halfway through the bake to promote uniform color and set.
- In large bowl, combine butter, sugar, flour, and vanilla extract until dough forms. Press evenly into the bottom of prepared dish. Set aside.: The texture to aim for is a cohesive, slightly crumbly dough that presses flat without cracking. When you press it into the dish, the surface should look even and compact, and you should feel the butter releasing slightly, giving a faint fragrant note of richness. The why is simple, a well packed base prevents the filling from seeping through and creates an even foundation. A common error is overworking the dough, which can make the crust tough; press gently but firmly. If the dough looks too dry, a touch more softened butter helps bind it.
- In another bowl, whip cream cheese. Stir in sweetened condensed milk. Scrape sides and mix again.: As you whip the softened cream cheese , it should become smooth and airy, with no lumps remaining. When you fold in the sweetened condensed milk , the mixture will take on a glossy, creamy sheen and release a sweet, milky aroma. This step matters because a lump free base guarantees a silky custard texture after baking. One troubleshooting tip is to warm the cream cheese slightly if it resists smoothing, but do not melt it. Avoid under mixing, which leaves pockets of dense cheese.
- Add beaten egg, lemon zest, and lemon juice. Mix until mixture starts to thicken, 20-30 seconds. Scrape sides and mix again briefly.: Right after adding the egg and citrus, your bowl will sing with citrus fragrance, and the mixture should show a slight increase in viscosity, taking on more body. The acid from the lemon juice brightens flavors and helps the proteins in the egg set properly during baking, so this combination is key to achieving the custard mouthfeel. A frequent mistake is overbeating, which can introduce air and cause tiny holes in the finished surface; mix just until cohesive. If the mixture seems too thin, ensure ingredients were measured correctly and chilled enough before baking.
- Pour cream cheese mixture over top cookie bottom and smooth the top.: As you pour the filling it should flow like a thick ribbon, settling into an even layer that reflects light slightly. Smoothing with a spatula helps eliminate peaks that might brown unevenly. This technique matters because a level surface ensures consistent baking and a uniform set across the pan. A common slip is not scraping the bowl well enough, wasting filling; take a rubber spatula and clean the sides thoroughly. If you see lumps on the surface, use gentle strokes to coax them out before baking.
- Bake 20-25 minutes or until cheesecake is set completely. Cool to room temperature (may take up to an hour), then refrigerate for at least 2 hours.: During baking the kitchen will fill with a sweet, buttery aroma and you may notice the surface lose its glossy sheen indicating it is setting. The edges should be slightly puffed and the center only gently jiggly when nudged, which signals proper doneness. Cooling slowly to room temperature prevents cracking, and chilling firms the custard so you can slice neat squares. Avoid underbaking, which results in a runny center, and avoid overbaking, which makes the texture dry. If you suspect uneven set, give it extra minutes and then check again.
- Remove from refrigerator and cut into 16 squares. Separate the squares.: A cold bar slices much cleaner, so use a sharp knife and wipe it between cuts for pristine edges. You will hear a soft give as the knife passes through, and the squares should hold their shape firmly. This step matters because presentation relies on tidy portions, especially for serving. One mistake is cutting too soon, which leads to smudged slices; be patient and keep the bars chilled to ensure clean lines.
- Sprinkle the tops of each square with 1 teaspoon of sugar and spread around with finger to evenly distribute sugar.: The sugar should sit in a fine, even layer on top, catching the light and ready to transform under heat. Rubbing with your finger ensures full coverage, which promotes uniform caramelization. This matters because uneven sugar leads to patchy brûlée spots. A common error is using coarse sugar that takes longer to melt or does not form a smooth glassy top; choose fine granulated sugar for best results.
- Torch the tops until the sugar melts and turns an amber color. If you don't have a torch, place under the broiler.: When the sugar melts you will see it liquefy and then darken to warm amber, giving off a faint toasted scent. The tiny pop as the sugar sets into a brittle shell is part of the sensory payoff. Using a torch allows precise control and rapid caramelization, while the broiler requires close watching to avoid burning; under the broiler, move the rack close and watch constantly. A common pitfall is holding the torch too close, which can scorch the custard; keep the flame moving so the sugar melts evenly.
- Return squares to fridge until ready to serve.: Chilling the finished squares stabilizes the newly formed sugar crust and lets flavors meld for a few minutes to several hours. The contrast between cold custard and crisp sugar is best after a short chill, and the bars will hold for a day refrigerated in an airtight container. One mistake to avoid is stacking warm squares, which softens the crust; always fully cool and then store on a single layer when possible.
Notes
- Reduce sugar in the crust if you prefer a less sweet foundation, lowering the 1/2 cup to 1/3 cup will let the lemon shine more prominently without upsetting the structure.
- More intense lemon can be achieved by increasing the zest to 3 tablespoons, which adds fragrant oils without changing the acidity drastically.
- Broiler method is a great alternative if you do not own a torch, but watch closely as sugar can go from amber to burnt within seconds under intense heat.
- Make ahead by baking and chilling the bars up to 24 hours in advance, then brûlée the tops just before serving to preserve the crisp sugar shell.
- Fine sugar selection matters, use caster or fine granulated sugar for the brûlée step for a smooth, glassy finish that melts and rehardens evenly.
- Serve chilled for the cleanest slices, but allow the bars to rest 5 to 10 minutes after torching so the sugar sets before moving them into storage or onto plates.