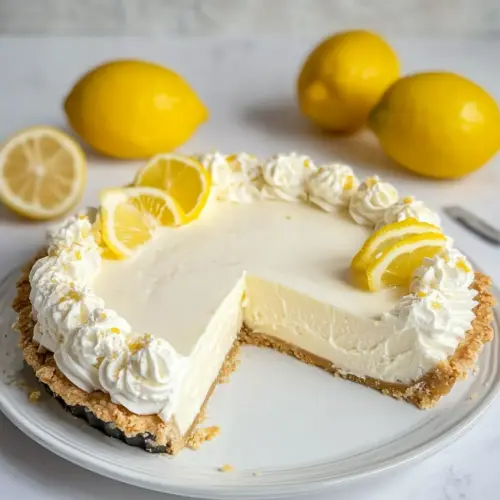
Lemon Cream Pie
Lemon Cream Pie is a creamy and citrus forward dessert with a buttery graham cracker crust and a light, airy filling. It combines fresh lemon juice and zest with sweetened condensed milk and whipped cream for an easy dessert that tastes elegant. Perfect for spring gatherings or an easy weeknight treat, this pie is bright, smooth, and worth making for any occasion.
Equipment
- Mixing Bowl
- Whisk
- Rubber spatula
- 9-inch pie plate
- Oven
Ingredients
- 1 1/2 cups graham cracker crumbs Provide a crisp, crunchy base for the pie crust, offering texture and a toasty flavor that balances the tart filling. Combine evenly with melted butter and press firmly into the pie pan to form a cohesive shell that holds the lemon cream. Choose finely crushed crumbs for a smooth, uniform crust that slices cleanly. Store any leftover crumbs in an airtight container for other crusts or toppings.
- 1/3 cup unsalted butter, melted Bind the graham cracker crumbs and add rich flavor and moisture to the crust while helping it hold its shape. Melt thoroughly and mix while warm to coat crumbs evenly, ensuring a compact, sliceable base. Use unsalted so the crust's salt level can be controlled separately. Measure accurately to avoid an overly greasy or crumbly texture.
- 2 1/2 tablespoons granulated sugar Sweeten the crust slightly and enhance caramelized notes to complement the lemon filling without overpowering it. Sprinkle into the crumb-butter mixture and blend until distributed for balanced sweetness. Adjust sparingly if using especially sweet crackers. Granulated sugar also helps stabilize the crust structure during chilling.
- 14 -ounce can sweetened condensed milk Contribute creamy sweetness and body to the lemon filling, creating a smooth, dense texture that sets without baking. Pour and whisk with lemon juice and zest to form the classic custard-like filling characteristic of a cream pie. Use the full can for proper consistency and chilling time. Chill thoroughly to allow the condensed milk to thicken and meld flavors.
- 1/2 cup fresh lemon juice Provide bright, acidic tang that curdles and thickens the condensed milk into a silky, tart lemon filling. Juice freshly for the most vibrant, natural citrus flavor and strain if needed to remove pulp or seeds. Balance the amount to achieve the desired tartness without making the filling too runny. Combine gradually while whisking to ensure even incorporation.
- Pinch of kosher salt Enhance overall flavor depth by rounding out the sweetness and bright acidity, preventing the filling from tasting flat or one-dimensional. Sprinkle a small pinch to avoid overt salting, as other components are already flavorful. Dissolve into the lemon mixture to disperse evenly. Use kosher salt for a clean, mild salt profile.
- 4 teaspoons lemon zest Lift and intensify the lemon character with concentrated citrus oils and aromatic brightness in the filling. Zest just the yellow peel, avoiding the bitter white pith, and measure finely so the flecks distribute evenly. Stir into the lemon-condensed milk mixture to release aromatic oils and enhance complexity. Fresh zest provides a fragrant accent that canned alternatives cannot match.
- 3/4 teaspoon vanilla extract Add a warm, sweet vanilla note that rounds out the tartness and complements the creamy sweetness of the condensed milk. Measure precisely and stir into the filling mixture to distribute flavor without overpowering the lemon. Use a high-quality extract for a balanced, natural taste. Vanilla also softens sharp edges and adds depth to the pie's aroma.
- 1 cup heavy whipping cream Whip to create a light, airy topping or fold into the filling to add richness and a silky mouthfeel with gentle peaks. Chill the cream first, then beat until soft or stiff peaks form depending on whether it will be folded into the filling or used as a topping. Avoid overbeating to prevent grainy texture or separation. Use cold utensils for best whipping results.
Instructions
- Combine graham cracker crumbs, melted butter, and sugar in a bowl. Mix until well blended. If it seems too dry, add 1 more tablespoon of butter. Mixture should resemble wet sand.: You will notice the warm aroma of the melted butter coating the graham cracker crumbs , which helps release the toasted notes. The texture should shift from dry to slightly clumping, like wet sand, which tells you the crumbs are ready to press. If you skip fully coating the crumbs, the crust can fall apart, so take a moment to mix thoroughly with a sturdy spoon or your fingers.
- Press the mixture into a 9-inch pie plate and bake at 325°F for 10 minutes or until lightly golden. Allow to cool.: As you stir, listen for the quiet scrape of crumbs coming together and watch for a uniform color and sheen from the butter . This step creates cohesion, so when you press the mixture into the pan it holds. A common mistake is under mixing which leaves dry pockets, so scrape the bowl sides and combine all the crumbs.
- Whisk together sweetened condensed milk, lemon juice, salt, lemon zest, and vanilla extract until smooth.: The extra butter will make the crumbs pack better and brown nicely. Aroma increases slightly as fats warm, and the mixture should hold when squeezed in your hand. Avoid adding too much butter or the crust will be greasy and crumbly when cooling.
- In a separate bowl, whip the heavy cream until stiff peaks form.: This visual cue means you have the right balance, with individual grains still visible but sticking together. A wet sand texture bakes into a crisp, cohesive crust. If it looks like a paste, you over added butter , and the crust may not set properly.
- Gently fold whipped cream into the lemon mixture in two or three additions. Pour into the cooled crust and refrigerate for at least 2 hours or until set.: The warmth of the oven intensifies the toasted graham cracker scent and firm the crust. You'll see the edges take on a light golden tone, and the surface will feel firmer when touched. Baking too long will dry it out, while underbaking risks a crumbly base, so watch carefully starting at the 8 minute mark.
- Garnish with additional whipped cream or lemon wedges if desired.: Cooling sets the crust, so it slices cleanly later. As it cools, the aroma mellows and the texture firms up. If you pour the filling into a hot crust, it can soften and become soggy, so patience here prevents a wet bottom.
- Whisk together sweetened condensed milk lemon juice salt lemon zest and vanilla extract until smooth: When you whisk these, the mixture becomes glossy and slightly thickened as the acid from the lemon juice reacts with the sweetened condensed milk . You should smell bright citrus and a hint of vanilla. If the mixture is grainy, you may not have whisked enough, so continue until it is silky.
- In a separate bowl whip the heavy cream until stiff peaks form: As you whip the heavy whipping cream , pay attention to changing texture, from loose foam to billowy peaks. The sound will change from light splashing to the heavier tempo of thickening cream. Stop at stiff peaks to ensure the cream folds in without collapsing; over whipping leads to butter formation.
- Gently fold whipped cream into the lemon mixture in two or three additions: Folding preserves the airy structure created by the whipped heavy whipping cream . Use a rubber spatula and make wide, sweeping motions from the bottom up. You should see ribbons of cream disappear slowly into the lemon base. If you stir aggressively, you will deflate the mixture and lose the light texture.
- Pour into the cooled crust and refrigerate for at least 2 hours or until set: The filling will relax and firm in the cold, taking on a smooth, sliceable consistency. The fridge dulls the aroma slightly but enhances texture, so resist the urge to cut early. A common error is not chilling long enough, which results in a runny slice, so plan ahead and allow adequate time.
- Garnish with additional whipped cream or lemon wedges if desired: Freshly whipped cream adds visual elegance and extra creaminess, while thin lemon wedges signal the flavor inside. Garnish right before serving to keep decorative peaks intact. Avoid garnishing too early because moisture from the fridge can soften decorations.
Notes
- Choose fresh lemons for zesting and juicing, because the oils in the peel elevate aroma and brightness more than bottled juice.
- Measure crumbs by weight if possible for consistent crust density, otherwise press until you get a compact base that holds together.
- Temper the chilling time by letting the filled pie rest at room temperature for a few minutes before transferring to the fridge, which prevents condensation on the surface.
- Stabilize whipped cream by chilling the bowl and whisk beforehand when you have a warm kitchen, so you reach stiff peaks without overworking the cream.
- Slice with a warm knife dipped in hot water and wiped dry between cuts for the cleanest edges and best presentation.