Lemon Cream and Raspberry Phyllo Napoleons
Lemon Cream and Raspberry Phyllo Napoleons are a creamy and crispy dessert featuring airy whipped cream folded with bright lemon curd, layered between delicate phyllo pastry and crowned with fresh raspberries. This easy elegant treat delivers textural contrast and a burst of citrus, perfect for brunch or an easy weeknight dessert that still feels special. Make it for guests to impress without stress.
Equipment
- Oven
- Baking Sheets
- Electric Mixer
- Mixing Bowls
- Sifter
Ingredients
- 6 whole fresh phyllo pastry sheets or frozen, thawed Crisp and delicate, provide the flaky layers that form the structure of the napoleons; handle gently to avoid tearing and thaw frozen sheets slowly under refrigeration to maintain texture. Brush layers with melted butter and sugar between sheets to achieve even browning and crispness when baked, ensuring a light, airy pastry base for the fillings.
- 6 teaspoons granulated white sugar (use slightly more, if desired) Sweet and fine-grained, add subtle sweetness and aid in caramelizing the phyllo edges when sprinkled between layers or on top before baking for a golden finish. Dissolve easily when mixed into creams or sprinkled atop desserts, helping to balance tart and creamy components without overpowering the dessert.
- 2 tablespoons unsalted butter, melted Rich and melted, contribute to browning, flakiness, and a tender mouthfeel when brushed over phyllo layers before baking to help them crisp uniformly. Use melted butter sparingly and evenly to prevent sogginess while enhancing flavor and the pastry’s delicate texture.
- 1/2 cup chilled whipping cream Cold and airy, whip to soft peaks to create a light, stable cream component that complements denser lemon curd and fruit layers; keep chilled until assembling to maintain volume. Fold whipped cream gently into sweetened or flavored bases to add silkiness and lighten the overall dessert mouthfeel.
- 1 1/2 teaspoons powdered sugar Fine and sweet, stabilize and lightly sweeten whipped cream or pastry creams when sifted in during whipping, helping to firm peaks and add a hint of sweetness without graininess. Incorporate sparingly to balance the tartness of lemon curd while preserving the cream’s texture.
- 1/2 teaspoon vanilla extract Fragrant and mellow, provide warm vanilla aroma that rounds out the tartness of lemon and the sweetness of cream when added to whipped cream or custard. Use a small amount to enhance overall flavor complexity without competing with fruit-forward components.
- 1/4 cup lemon curd (purchased) Tangy and smooth, contribute concentrated lemon flavor and sweetness as a primary filling layer that contrasts with the rich cream and crisp phyllo; purchased curd offers consistent texture and brightness. Spoon or pipe thin layers to prevent sogginess while ensuring each bite has a pronounced citrus note.
- Two 1/2 pint baskets (about 1 cup) fresh raspberries Juicy and vibrant, add fresh berry flavor, color, and a burst of acidity that complements lemon curd and cream while providing natural texture contrast; handle gently to avoid crushing. Use whole berries between layers or as a topping to introduce freshness and visual appeal to the assembled napoleons.
- powdered sugar Powdered and fine, dust as a finishing touch to add visual elegance and a delicate sweet surface without altering texture significantly; sift lightly over assembled pastries just before serving. Blend smoothly into frostings or creams if needed, offering mild sweetness and a refined appearance.
Instructions
- Preheat the oven to 375°F. Lightly spray 2 large baking sheets with nonstick spray.: As the oven warms you will notice the kitchen begin to hold a steady heat, which is reassuring. The purpose of preheating is to make sure the phyllo receives immediate, even heat and crisps rather than steams. A warm oven produces that delicate, golden color and crisp texture you want. If you skip reaching the full temperature, the pastry can become chewy instead of flaky. Common mistake to avoid, do not overcrowd the sheets or the air circulation will be restricted, leading to uneven browning.
- Stack phyllo sheets on work surface. Trim to 10 1/2 inch square (set scraps aside for another use).: When you cut the phyllo you will feel how thin and fragile it is, and the trimmed edges will flutter like tissue. Trimming creates uniform squares so they bake evenly and stack neatly. The visual consistency translates into even texture and a professional look. To prevent tearing, work on a clean, dry surface and keep unused sheets covered, because exposed phyllo dries out quickly. A common error is rushing the trimming, which can cause ragged edges and uneven layers.
- Place 1 phyllo sheet on work surface (cover remaining phyllo with plastic wrap and damp kitchen towel). Sprinkle with 1 generous teaspoon sugar. Top with a second phyllo sheet. Brush lightly with melted unsalted butter. Sprinkle with 1 generous teaspoon sugar. Top with a third phyllo sheet. Sprinkle with 1 generous teaspoon sugar.: At this stage the kitchen fills with a faint sweet and buttery note, and the sugar crystals offer a slight crunch after baking. Layering sugar and butter between sheets encourages caramelization and golden color, while the towel over the remaining sheets prevents drying. This technique is key for crisp, evenly colored layers, because dry phyllo will tear and not puff properly. Avoid applying too much butter or the layers will collapse into sogginess.
- Cut phyllo stack into 9 equal stacked squares. Arrange stacked phyllo squares on prepared baking sheets.: Cutting reveals the delicate stacked strata, and arranging them on the sheet should feel gentle so the layers remain aligned. Uniform squares ensure consistent baking, so watch for visual clues like uniform thickness. If squares are uneven, some pieces will brown faster and might burn. One common mistake is pressing too hard while cutting, which compresses the layers and reduces flakiness.
- Repeat layering and cutting with remaining 3 phyllo sheets, sugar and butter making total of 18 stacked phyllo squares.: Repeating the process keeps the workflow smooth and allows you to batch the work for consistency. As you prepare the second set you will notice your movements become more confident and efficient. The reason for repeating is to yield enough base layers for all servings, ensuring each napoleon has multiple crisp tiers. Avoid leaving the assembled stacks exposed for long periods, as moisture from the air can soften them.
- Bake until phyllo is golden, about 10 minutes. Transfer baking sheets to racks and cool completely.: During baking the oven will smell toasty and you will see the sheets transform to a warm amber color, with edges that look paper thin and crisp. Cooling on racks prevents residual steam from softening the layers, which preserves the flake. The why here is simple, hot pastry continues to steam if left on the baking pan, so transferring to a rack locks in the crispness. A typical error is leaving them on the hot sheet, which yields limp pastry.
- In a large bowl, use an electric mixer to beat the cream, 1 1/2 teaspoons powdered sugar and vanilla until medium peaks form.: As you whip the whipping cream listen for the change in mixer sound from soft to firmer, and watch for peaks that hold but still have some movement. This stage gives the filling body so it supports layers without collapsing. Chilled cream whips faster and is less likely to separate, which is why you want it cold. Overbeating will turn the cream grainy and buttery, so stop at medium peaks to avoid that common pitfall.
- Whisk the lemon curd in another medium bowl until smooth. Add to the cream mixture. Beat to the consistency of stiff peaks.: When you fold in smooth lemon curd you will see the pale cream take on a warm yellow hue and a glossy texture. The curd introduces concentrated citrus oils and sugar, so beating to stiff peaks ensures the filling is stable and sliceable. The reason this matters is structural; too soft and the napoleons will slump. A common mistake is adding cold curd straight from the fridge in big dollops, which can create streaks or deflate the mixture, so whisk it smooth first.
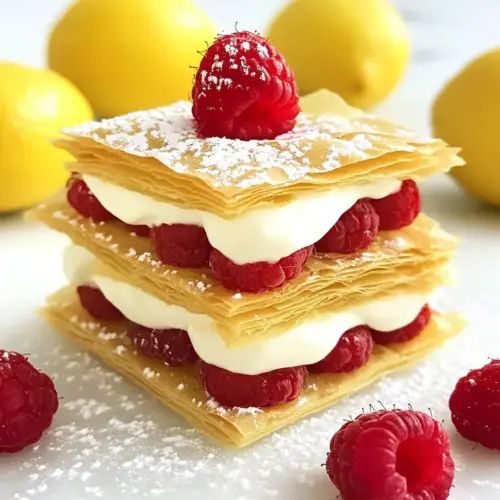
- Spread 1 generous tablespoon of the lemon cream on each of 6 stacked phyllo squares. Top each square with 6 raspberries. Layer each with 1 phyllo square, 1 more tablespoon of the lemon cream and 6 raspberries (save any remaining lemon cream for another use). Top each with 1 phyllo square. Sift powdered sugar over desserts.: As you assemble you will notice the contrast in textures and the fresh perfume from the raspberries . The generous tablespoon gives enough cream to bind layers without overwhelming the crisp pastry, and the repeated raspberry placement ensures flavor in every bite. Dusting with powdered sugar adds a tender sweetness and visual polish. One troubleshooting tip, assemble just before serving when possible, because the cream will begin softening the phyllo over time; avoid assembling too far ahead unless you plan to refrigerate carefully.
- Can be prepared 8 hours ahead. Cover loosely and refrigerate.: If you prepare them ahead the flavors have time to meld and the cream firms in the fridge, making neat slices. Covering loosely prevents condensation from forming while still protecting the pastries. The reason timing matters is texture, as the longer they sit the more moisture migrates into the phyllo , so plan to assemble within the window for the best balance of crisp and creamy. A common mistake is sealing them airtight, which can trap moisture and make pastry soft.
Notes
- Use a pastry bag for neat assembly: The note about the pastry bag in the recipe is perfect for creating consistent rosettes or piped layers of lemon cream, which makes the finished napoleons look professional and tidy.
- Swap berries thoughtfully: If raspberries are not available, strawberry slices can be used as suggested, but lay them flat and dry to prevent extra moisture from seeping into the phyllo.
- Prebake phyllo in bulk: Bake many sheets at once and store sealed in an airtight container to speed up future assemblies, ensuring they stay crisp by using silica packets or a paper towel layer to absorb moisture.
- Add grated chocolate sparingly: Grating a small amount of chocolate over the top adds visual contrast and a hint of richness, but use it sparingly so it does not overpower the lemon brightness.
- Try storebought phyllo cups for a shortcut: Using preformed phyllo cups reduces assembly time dramatically; spoon or pipe a teaspoon of lemon cream into each cup and top with a raspberry for bite size treats.
- Adjust sugar between layers: If you prefer less sweetness, reduce the granulated sugar sprinkled between sheets slightly, which will make the dessert feel lighter while keeping caramelized notes.