Lemon Cheesecake
Lemon Cheesecake is a creamy, tangy dessert with a crisp graham crust and bright lemon curd topping. The silky cream cheese filling and zesty lemon notes create an easy make ahead treat perfect for celebrations or casual gatherings. This easy to slice cheesecake delivers a professional finish with minimal fuss, making it worth trying for your next special meal.
Equipment
- KitchenAid 9-Speed Digital Hand Mixer
Ingredients
- 1 1/2 cups graham cracker crumbs Provide a crisp, crunchy base and absorb moisture; combine with melted fat to form a cohesive graham cracker crust that supports the cheesecake filling and adds subtle sweetness and texture contrast.
- 1/2 cup Bob’s Red Mill® Super-Fine Natural Almond Flour Add a tender, slightly nutty texture to the crust and contribute moisture; blend evenly with crumbs to lighten density and give a delicate crumb structure while enhancing flavor depth.
- 3 tablespoons sugar Supply subtle sweetness to the crust mixture and help balance flavors; dissolve into the crumbs to create slight caramelization when baked and improve overall mouthfeel of the base.
- 6 tablespoons buttermelted Bind the crust ingredients together by adding fat and moisture; melt and mix thoroughly with crumbs and almond flour to create a compact, sliceable bottom layer that browns when baked.
- 1 cup granulated sugar Sweeten the cheesecake filling and balance the tartness of lemon; incorporate into cream cheese to contribute smoothness, structure, and proper sweetness level throughout the custard.
- Zest of 2 lemons Concentrate bright citrus aroma and intense lemon flavor; finely grate over the filling mixture to impart essential oils that lift the profile and provide fresh, zesty notes in each bite.
- 32 ounces cream cheese room temperature (4 [8-ounce] packages) Create the rich, creamy body and primary tang of the cheesecake; soften to room temperature for smooth blending, ensure even texture, and provide structure when combined with eggs and sugar.
- 4 large eggs room temperature Set and enrich the cheesecake custard while adding silkiness; beat in at room temperature to incorporate air and stabilize the filling during baking for a creamy, firm interior.
- 2 teaspoons pure vanilla extract Enhance overall flavor depth with warm, aromatic notes; mix into the filling to complement lemon and cream cheese, rounding flavors and adding complexity without overpowering.
- 1/4 cup freshly squeezed lemon juice Introduce bright acidity to balance richness and provide clean lemon flavor; strain and add to the batter to adjust tanginess and help the custard set with a subtle citrus lift.
- 1/3 cup heavy cream Increase richness and contribute to a velvety mouthfeel in the filling; fold into the batter to add creaminess and smooth texture while supporting a luxurious finish.
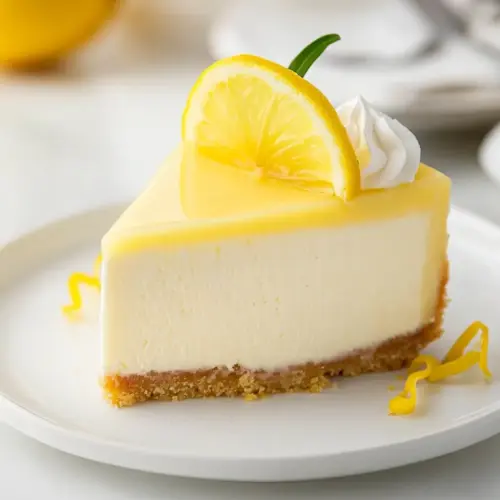
- 1 cup lemon curd Top or swirl into the cheesecake for concentrated lemon flavor and glossy finish; spread over the cooled cake or incorporate lightly to amplify citrus brightness and visual appeal.
- whipped cream optional Add lightness and a creamy finishing touch when serving; dollop as desired to balance richness, provide contrast in texture, and enhance presentation with a soft, airy element.
- lemon slices optional Offer an attractive, fresh garnish and a burst of citrus aroma; slice thinly to decorate the top or plate edges, boosting visual appeal and signaling lemon flavor to diners.
Instructions
- Preheat oven to 350°F. Separate a 9-inch springform pan into two pieces. Line the bottom of the pan with foil, fasten on the side piece, and spray the inside of the pan with nonstick cooking spray. Tightly wrap the outside bottom and sides of the springform pan with two layers of heavy duty foil. This step prevents leaks when using a water bath. I also take the extra step of placing the foil wrapped springform pan inside an oven bag while baking, but this is optional.: As you preheat, you should notice a faint warmth spreading through the oven, and the act of wrapping the pan feels protective; the foil barrier keeps water out while the foil under the springform seals seams that might otherwise leak. This careful wrapping reduces anxiety about a soggy oven and ensures the pan can sit in a water bath without drama. A common mistake is skimping on the foil, which can let water seep in and create a waterlogged crust, so be thorough. Keep the foil loose enough around the top edge to allow a little steam to escape, because completely sealing can trap too much moisture.
- Combine the crust ingredients in a medium bowl and stir until the ingredients are evenly distributed.: When you mix the crumbs, almond flour , sugar, and melted butter , you should hear a muted, sandy scrape as the crumbs bind and feel a uniform, damp sand texture under your spatula. This even distribution is what helps the crust bake consistently, giving you a golden surface rather than blotchy spots. If you notice dry patches, the crust will not hold its shape after baking, so add just enough melted butter to bring everything together. Avoid overmixing, which can make the crust heavy and overly compacted.
- Spoon the crumbs into the prepared pan and press into the bottom of the pan and up the sides to form a crust layer. Bake crust in preheated oven for 10 minutes. Remove pan to a cooling rack.: Pressing the crumbs should create a dense, even layer; use the bottom of a measuring cup for an even press and listen for the satisfying compacting sound. After baking, the crust will smell slightly toasty and hold its shape when cooled, which signals it will support the filling. A common error is pressing unevenly, causing thin spots that may soften when the filling is added, so check the thickness all around the pan before baking.
- Bring a kettle of water to boil for the water bath.: Boiling water will steam when poured into the larger pan, creating a humid, gentle baking environment. You will see rolling bubbles and hear the kettle sing as it reaches a boil, and that steam is key to preventing the cheesecake from drying out. Use caution pouring hot water, and keep oven mitts handy. If you skip the water bath the edges can overbake and crack, so although it is an extra step, it is worth it for a smooth surface.
- In a medium bowl, use your fingertips to combine the sugar and lemon zest until the sugar is fragrant.: Rubbing the zest into the sugar releases bright oils and a pronounced citrus aroma that you will notice immediately. The sugar will look slightly damp and clump as the zest’s oils infuse it, creating a perfumed base that flavors the entire cake. If you rush this step the zest will not distribute evenly, and you may get pocketed flavor rather than a consistent lemon note throughout.
- In the bowl of a stand mixer fitted with the paddle attachment, or in a large bowl with an electric mixer, beat cream cheese and lemon-sugar for about 2 minutes. Scrape down the sides of the bowl and mix for an additional 30 seconds. Add in eggs, one at a time, scraping down the sides of the bowl after adding the second and fourth egg. After adding the final egg and scraping the sides of the bowl, mix again for 30 seconds. The mixture should be smooth and creamy. Add in the vanilla, lemon juice, and heavy cream and mix for an additional 30 seconds.: When you beat the cream cheese with the infused sugar, the texture will transition from dense lumps to a glossy, satiny batter; you should see a slow ripple when the paddle lifts. Adding eggs gradually helps maintain that texture, preventing curdling and reducing air incorporation that causes cracks. The batter should smell like gentle lemon with a rich dairy warmth. If the mixture looks grainy, you likely had cold cream cheese or underbeat at the start, so stop and smooth it out before proceeding.
- Pour the cheesecake filling over the crust.: As the filling pours, it should glide in a thick, ribbon like stream that settles evenly across the crust. Look for a smooth surface and no obvious lumps; if you see streaks of unmixed cream cheese, scrape and fold them in to avoid textural pockets. The visual cue of a uniformly pale batter means the oven will bake it consistently. Avoid rocking the pan aggressively, which can create air pockets and unsettle the crust.
- Place pan into a larger pan (I use a roasting pan) and pour boiling water into the larger pan until halfway up the sides of the cheesecake pan. Gently lay a piece of foil over the pan – do not tighten the foil as we’ll want to allow the air to still circulate.: Pouring the boiling water will create steam that gently surrounds the cheesecake, and you should see a thin mist rise around the pans. The water level halfway up the sides is enough to moderate oven heat without splashing into the batter. Leave a gentle foil tent over the top, as sealing tightly can trap condensation and drip onto the surface. A common slip is overfilling the outer pan, which risks splashes into the filling when removing it; pour carefully.
- Bake 55-65 minutes, the edges will appear to be set, but the center will still have some jiggle to it. At this point, turn off the oven, and leave the oven door cracked. Allow the cheesecake to rest in the cooling oven for one hour.: During baking the edges will slowly take on a faint golden tint while the center retains a gentle wobble like gelatin. That jiggle is your cue that the interior will finish setting without drying out. Turning off the oven and leaving the door cracked lets the temperature drop slowly, preventing abrupt contraction that causes cracks. Opening the door too wide too soon can cause a sudden temperature change and lead to a split top, so resist the urge to check often.
- After one hour has passed, carefully remove the cheesecake from the water bath and place on a cooling rack to cool completely. Once the cake is completely cooled, place it into the refrigerator for at least 8 hours.: Removing it will reveal a pale, even surface; as it cools the center will firm and you may hear a faint settling sound as the residual heat dissipates. Chilling overnight allows the structure to stabilize and flavors to meld, giving a clean slice and concentrated lemon notes. A frequent mistake is cutting too soon; a cheesecake that has not chilled adequately will be too soft and weep on the plate.
- Just before serving, top the cheesecake with lemon curd, whipped cream and lemon slices.: Spoon glossy lemon curd carefully across the top, watching it spread in a luxurious, shining layer. The tart curd will contrast the rich filling while a dollop of whipped cream cushions each slice with airy sweetness, and thin lemon slices add a bright, decorative finish. If your curd is cold and stiff, warm it gently to make spreading easy, and avoid overloading the top which can overwhelm the delicate balance.
Notes
- Pan sealing: Make sure the foil covers the bottom and sides of the springform pan thoroughly to block water during the water bath, and inspect the seams for gaps before placing it in the oven.
- Room temperature ingredients: Have your cream cheese and eggs at room temperature to ensure a smooth batter that blends evenly without lumps or curdling.
- Even pressing: Use the bottom of a measuring cup to press the crumb mixture evenly into the pan and up the sides so the crust supports neat slices after chilling.
- Gentle mixing: Stir the batter until just smooth and glossy, and avoid whipping in extra air after the eggs have been added to minimize cracks during baking.
- Patience for chilling: Plan ahead and refrigerate the cheesecake for at least eight hours, because chilling is essential for texture and clean cutting, and it lets the flavors settle beautifully.