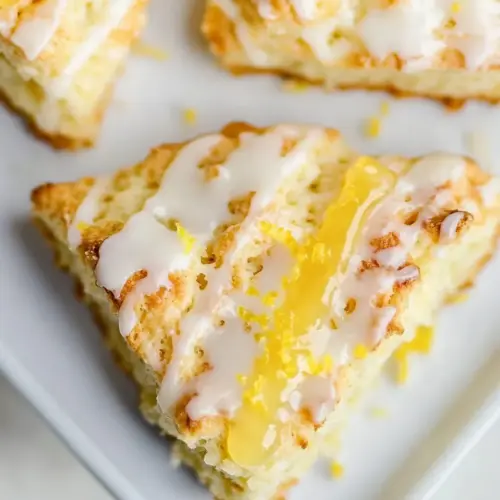
Lemon Buttermilk Scones
Lemon Buttermilk Scones are tender, flaky, and bursting with bright citrus flavor. The tang of buttermilk and the aromatic punch of lemon zest create a light, irresistible texture, finished with a glossy lemon glaze. These scones are perfect for a quick weekend brunch or an easy, elegant treat any time you crave a citrusy baked good.
Equipment
- Oven
- Large Bowl
- Pastry blender
- Baking Sheet
- Cooling rack
- Whisk
- Small Bowl
Ingredients
- 2 cups all-purpose flour Provide structure and bulk to the scones, forming the base of the dough and developing gluten for tender crumb when handled minimally; measure by spooning and leveling for accuracy and sift if needed to remove lumps.
- 1/3 cups sugar (granulated) Add mild sweetness and assist in browning the scone exterior; adjust slightly to taste and ensure even distribution by mixing with dry ingredients.
- 1 tablespoon baking powder Leaven the dough by releasing gas when baked, creating lightness and lift in the scones; whisk with dry ingredients to avoid clumps and ensure even rise.
- 1/2 teaspoons salt Enhance overall flavor balance by providing a subtle savory contrast that heightens sweetness and lemon notes; dissolve evenly with the dry mix for consistent seasoning.
- 3 tablespoons lemon zest (from about 2 lemons) Contribute bright citrus aroma and concentrated lemon flavor throughout the dough; finely grate only the yellow outer peel to avoid bitterness and measure tightly packed tablespoons.
- 1 egg yolk Enrich the dough with fat and emulsifying properties that improve texture and contribute to tenderness; incorporate into the wet ingredients to help bind and add richness.
- 1 cup buttermilk Provide acidity and moisture to tenderize the scone crumb while reacting with leavening agents for a soft texture; keep cold to help maintain flaky layers when combined with butter.
- 1 teaspoon vanilla extract Offer a hint of warm sweetness and deepen overall flavor complexity in the dough or glaze; stir into wet ingredients to distribute the flavor uniformly.
- 3 tablespoons butter (unsalted) Add richness and create flaky layers by cutting cold butter into the flour mixture so small pieces remain to melt during baking; keep chilled and incorporate until pea-sized bits remain.
- 1 1/2 cups confectioners sugar (same as icing sugar or powdered sugar) Form a smooth, sweet glaze that adds sweetness and sets to a shiny finish on top of cooled scones; sift to remove lumps and whisk until glossy before drizzling.
- 1 tablespoon corn syrup (light) Provide gloss and help the glaze remain pliable and slightly shiny, preventing crystallization for a smoother finish; stir into the glaze until fully incorporated.
- 1 tablespoon milk (plus more as needed) Adjust glaze consistency and help thin to a pourable texture while contributing a touch of dairy richness; add gradually and more as needed to reach desired thickness.
- 2 tablespoons lemon juice (freshly squeezed) Deliver fresh citrus tang and bright acidity that cuts through sweetness and complements the lemon zest; use freshly squeezed for best flavor and adjust intensity to taste.
- 1/8 teaspoons salt Bring a small amount of salt to the glaze to enhance sweetness and round flavors; dissolve thoroughly in the glaze to avoid grainy texture.
Instructions
- Preheat the oven to 400 ℉.: The moment you set the oven to 400 ℉ you begin building the environment that will give you that quick oven spring and golden exterior. You should hear the faint hum of the oven as it climbs in temperature, and a stabilized, properly preheated oven yields even browning and consistent rise. If the oven is not fully preheated the scones may spread instead of puffing up, so wait for the indicator or use an oven thermometer to confirm accuracy. Also, place a rack in the center so heat circulates evenly and the bottoms do not overbrown.
- In a large bowl combine the flour, sugar, baking powder, salt and lemon zest. Whisk to combine everything.: When you mix the dry ingredients, inhale the sharp citrus perfume of the lemon zest mingling with the faint sweetness of the sugar . Whisking aerates the mixture slightly, making the dry mix light and uniform, which helps the leavener distribute evenly. This step matters because uneven baking powder or big pockets of salt can cause irregular rise or odd salty bites. A common mistake is skipping the zest distribution, which causes the lemon flavor to be uneven, so rub the zest between your fingers while adding it to release more oils and scent.
- In a small bowl whisk the egg yolk, buttermilk and vanilla extract together.: As you whisk the egg yolk with the buttermilk and vanilla extract , the mixture should look glossy and uniform, with no streaks of yolk. The buttermilk adds tang and acidity that affects tenderness and reacts slightly with the baking powder. You will notice a silken texture and a soft sheen. Avoid overwhisking into froth, which could add unwanted air and disrupt dough consistency when combined.
- Add the butter to the flour bowl, and using a pastry blender, cut in the butter to make small pea sized pieces.: The sound of the pastry blender scraping through the flour is oddly satisfying as you create little coarse crumbs studded with butter . Those pea sized pieces are crucial because they melt in the oven and create steam, which forms flaky pockets and layers. If the butter warms too much the dough will feel greasy, and the scones will lose flakiness, so return the bowl to the fridge for a few minutes if it feels soft. Avoid using melted butter here, that will ruin the intended texture.
- Add the buttermilk mixture to the flour mixture and stir until the dough pulls together. Lightly flour a work surface and dust your hands with flour.: The moment the wet mix hits the dry you will see the dough coalesce from loose crumbs into a shaggy mass. Stir just until the dough pulls together, because overmixing develops gluten and makes scones tough. The surface should look slightly tacky but not wet; if it is overly sticky dust with a touch more flour . A frequent error is stirring until completely smooth, which yields a denser result, so stop when you can see small bits of butter embedded and the dough holds.
- Transfer the dough to the work surface and knead it gently about 5 times. Shape the dough into a ball, then flatten it into a disk that’s about 3/4 of an inch thick and about 8 inches in diameter.: You will feel the dough tighten slightly as you knead, and this gentle touch aligns the crumb without making it chewy. The disk should spring back a little when pressed, and its even thickness ensures uniform baking. If you press too many times the scones become dense, and if the disk is uneven some wedges will bake faster than others, so use light, controlled folds. Keep the dough cool, and if it begins to warm under your hands, chill briefly.
- Cut the disk into 8 wedges of equal size. Place the wedges onto a baking sheet.: As you cut the disk you should see the interior texture that promises flakiness. Arrange the wedges with a little space between them so hot air can circulate and edges crisp. Cutting precisely ensures consistent bake time across the batch, otherwise some pieces may brown sooner. Use a sharp knife or bench scraper and wipe it clean between cuts for crisp edges rather than dragging dough.
- Bake them for about 20 minutes or until golden. Transfer the scones to a cooling rack.: The oven will sing with a gentle rising sound and you will watch the tops gain a golden, slightly glossy finish. The edges should be firm and the centers spring back lightly to the touch. Baking until golden locks in flakiness and prevents soggy interiors. A common misstep is taking them out too early which yields doughy centers, so test by tapping a top to check resilience. Move them to a cooling rack promptly so steam does not pool underneath and soften the bottoms.
- To make the lemon glaze, add the confectioners’ sugar to a bowl. Add the corn syrup, milk, lemon juice, pinch of salt and start whisking until smooth. Add more milk until the glaze is runny but still thick.: The glaze should initially feel thick and pasty, then slowly loosen as you whisk. The aroma of fresh lemon juice brightens the sugar, and the tiny pinch of salt deepens the sweetness. If the glaze is too thick add more milk a teaspoon at a time until it becomes pourable but still coats the back of a spoon. Avoid adding too much liquid at once which can make it runny and unable to cling to the scones.
- While the scones are cooling drizzle them generously with the glaze then garnish with more lemon zest.: The sound here is the soft splat as the glaze hits the warm tops and slowly settles into glossy ribbons. The glaze will set slightly as it cools, but if the scones are too hot the glaze can become overly thin, so wait a few minutes after baking before glazing. Finish with extra lemon zest for color and added citrus oil. Don’t overdrizzle or the bottoms may become sticky, instead aim for an even coating that enhances each bite.
Notes
- Swap citrus intensity — Increase or decrease the amount of lemon zest and lemon juice to dial the tartness. I often add an extra teaspoon of zest if I want a more aromatic bite, but avoid too much juice in the dough which can alter texture.
- Adjust sweetness — Reduce the sugar in the dough by a tablespoon or two if you prefer a less sweet scone, and balance the glaze accordingly so it does not overpower the citrus.
- Butter temperature — For flakier results, freeze the butter briefly before grating or cutting it in, which preserves cold pockets that produce steam and layers during baking.
- Glaze consistency — Control the thickness by adding milk a teaspoon at a time until the glaze coats the back of a spoon; thicker glaze gives a glossy finish that sets, thinner glaze soaks into the crumb slightly.
- Make ahead — Shape and cut the wedges, then freeze them on a sheet tray before transferring to a bag. Bake from frozen adding a few extra minutes to the time for fresh scones any morning.
- Presentation upgrade — Add a final sprinkle of extra lemon zest or a tiny pinch of coarse sugar on the glaze for sparkle and texture before it sets.