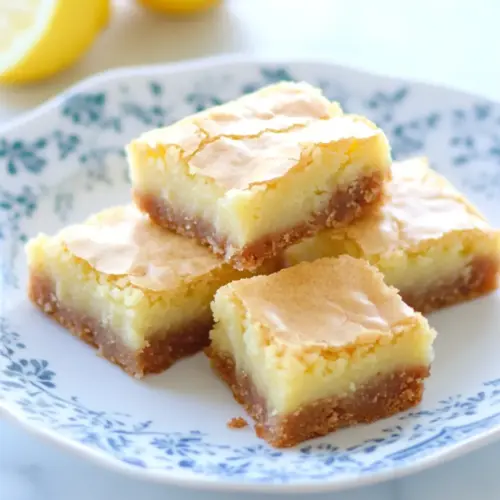
Lemon Brownies
Lemon Brownies are bright and tender bars with a soft, cake like crumb and a glossy lemon glaze. The fresh lemon zest and juice lend aromatic citrus notes, while simple pantry staples keep this an easy, approachable bake perfect for spring gatherings or an easy weeknight dessert, making them irresistible and worth trying today.
Equipment
- 8 x 8 inch baking dish
- Electric mixer with paddle attachment
- Mixing Bowls
- Spatula
- Sifter
Ingredients
- 3/4 cup all-purpose flour Provides structure and lightness to the batter by contributing gluten and helping bind ingredients; measure accurately for proper texture. Adds bulk without overpowering the lemon flavors and supports the rise from eggs for tender brownies.
- 3/4 cup granulated sugar Adds sweetness and helps create a tender, moist crumb while balancing the tartness of lemon; dissolves into the batter for even sweetness. Also aids in browning and contributes to overall flavor depth in the finished brownies.
- 1/4 teaspoons ea salt Enhances overall flavor by balancing sweetness and highlighting lemon brightness; helps control fermentation and strengthens structure slightly. Use precise measurement to avoid making the brownies taste overly salty or flat.
- 1/2 cup 1 stick unsalted butter, softened Contributes richness and moisture while adding a tender mouthfeel through fat content; softened butter creamily incorporates with sugar to trap air. Also carries flavor and helps create a glossy finish on the baked surface.
- 2 large eggs Provides lift, moisture, and structure by coagulating proteins when baked; eggs also enrich flavor and contribute to a fudgy, cohesive texture. Beat until combined to ensure even distribution throughout the batter.
- 2 tablespoons lemon zest Delivers concentrated citrus aroma and bright lemon flavor to infuse the batter; zest contains essential oils that intensify lemon character. Finely grate to release oils without adding bitter pith for balanced tartness.
- 2 tablespoons lemon juice Adds fresh lemon acidity to balance sweetness and enhance brightness; juice reacts with other ingredients to sharpen flavor. Strain if needed to remove pulp or seeds and incorporate evenly into the mixture.
- 1 rounded cup powdered sugar Creates a smooth, sweet glaze or dusting that provides contrast to lemon tang and adds sweetness without altering texture much. Sift before use to remove lumps and achieve a silky, even coating or filling.
- 3 tablespoons lemon juice Introduces additional lemon tang and acidity for the glaze or batter where needed; augments brightness and helps achieve desired tartness. Combine carefully to avoid thinning glaze too much while maintaining flavor balance.
- 3 teaspoons lemon zest Boosts intense citrus aroma and reinforces lemon profile in glazes or finishing touches; zest adds fragrant oils without extra acidity. Finely grate to distribute evenly and avoid bitter white pith for optimal brightness.
Instructions
- Preheat oven to 350 degrees. Spray an 8 X 8 inch baking dish with cooking spray and set aside.: As the oven warms you will notice a faint, dry heat that readies the environment for even baking, which is crucial so the center sets while the edges gently brown. A properly preheated oven prevents underbaked middles and overdeveloped edges, so wait until it reaches the full temperature before sliding the pan in. A common mistake is to begin mixing too early and assume the oven will catch up, leading to uneven rise. Place a rack in the center to promote balanced airflow and preheat for at least 10 minutes if your oven runs cool.
- Zest and juice 2-3 large lemons depending on what size they are; set aside.: Freshly zested lemon releases bright oils that perfume the bowl, a signal that you are building the citrus backbone of the bars. Squeeze the lemons into a small bowl and strain any seeds, and set both zest and juice aside so you can incorporate them at the right moments. If you zest after juicing you may have less zest to work with, and the pith can become bitter if you dig too deep. Try to use firm lemons, as overly soft fruit can yield watery juice that dilutes flavor.
- In the bowl of an electric mixture fitted with the paddle attachment, beat the flour, sugar, salt, and softened butter until combined.: When the dry flour meets the butter and granulated sugar in the mixer you will see a cohesive, slightly crumbly mixture that signals even distribution. This stage creates the base texture, and blending until just combined avoids developing gluten that would toughen the bars. Overbeating at this point is a mistake, it can make the batter dense. Aim for a uniform look with no streaks of dry flour .
- In a separate bowl, whisk together the eggs, lemon zest, and lemon juice until combined. Pour into the flour mixture and beat at medium speed until smooth and creamy, about 2 minutes.: Whisking the eggs with lemon zest and lemon juice releases bright citrus aroma and incorporates air, which helps the finished texture feel lighter. The mixture should look homogenous and slightly frothy. If the eggs remain separated or stringy the batter may not emulsify properly, leading to pockets in the bake. Use room temperature eggs for better blending.
- Pour into baking dish and bake for 20-25 minutes, or until just starting to turn golden around the edges and a toothpick inserted into the center of the brownies comes out clean. Allow to cool completely before glazing. Do not overbake or the bars will be dry.: At this point the aroma of butter and lemon will be strong and inviting, and the batter should glide off the paddle in smooth ribbons. This emulsification stage is where structure forms, so beating long enough to create a cohesive, creamy batter matters. Avoid beating excessively, which risks overworking the flour , or underbeating, which leaves lumps. If you notice streaks of dry flour scrape the bowl and finish on low speed.
- When brownies have cooled completely, make the glaze. Sift the powdered sugar, add lemon zest and juice, and whisk together all three ingredients. You can add more powdered sugar or lemon juice here depending on the consistency you like. Spread 1/2 the glaze over the brownies with a rubber spatula. Let glaze set. I sped up this process by throwing them in the fridge. Spread the remaining glaze over the bars, and let it set. Once again you can speed this up by placing them in the fridge. Cut into bars, and serve. Makes about 24 small brownies.: As the bars bake you will see the edges begin to color and a light citrus perfume will fill the kitchen, indicating the sugars are caramelizing just enough. A toothpick should come out clean when inserted into the center, and the surface should be set but not deeply browned. Overbaking will produce dry bars, so check at the earlier end of the time range if your oven runs hot. If the center still seems gooey at the recommended time give it a few more minutes and check frequently.
- Allow to cool completely before glazing: Cooling is where the crumb firms up and the bars reach their proper texture, and you will notice the fragrant aroma shift from hot butter to mellowed citrus. If you try to glaze while warm the topping will slide off or dissolve into the bars, so patience matters. Use a rack to cool evenly and resist the urge to cut while warm, as that will create ragged edges.
- Sift the powdered sugar, add lemon zest and juice, and whisk together: Sifting powdered sugar prevents lumps and ensures the glaze becomes silky when mixed with lemon juice and lemon zest , producing a glossy finish. Whisk until smooth, then adjust consistency by adding more powdered sugar to thicken or more lemon juice to thin. A common error is adding all the lemon juice at once, which can make the glaze too runny, so add gradually until you reach the desired texture.
- Spread half the glaze over the brownies and let set: The first thin layer seals the surface and begins to create that delicate crackle as it firms, and you will see a semi opaque sheen form. Chilling briefly speeds this process and helps the second layer sit neatly on top. Avoid piling on a thick initial layer, which can remain tacky and prolong setting time. If the glaze seems too thin chill for a few minutes then add the next layer.
- Spread the remaining glaze over the bars and let it set: The second application adds visual polish and intensifies lemon flavor, resulting in a bright, shiny top that snaps cleanly when cut. Placing the pan in the fridge for a short period helps the glaze firm uniformly. Cutting too soon will smear the glaze and ruin clean squares, so wait until it is fully set.
- Cut into bars and serve: Once the glaze is firm you will notice fragrant lemon aroma and a balanced sweetness that invites a second helping. Use a sharp knife and wipe it between cuts for neat edges. A common slip is using a blunt knife which crushes the bars and creates crumbly slices, so sharpen or chill the pan slightly before slicing.
Notes
- Room temperature eggs mix more smoothly and create a lighter batter, so take them out of the fridge about 15 to 20 minutes before you start.
- Softened butter should yield to a gentle press but not be greasy, this helps it incorporate evenly without creating a heavy batter.
- Gradual glaze adjustment helps you reach the right consistency, add lemon juice a little at a time to avoid making the glaze too runny.
- Use a sharp knife and wipe it between cuts for clean bars, a dull blade will tear the glaze and compress the crumb.
- Zest before juicing to avoid losing zest to the juicing process, and avoid zesting into the bitter pith.