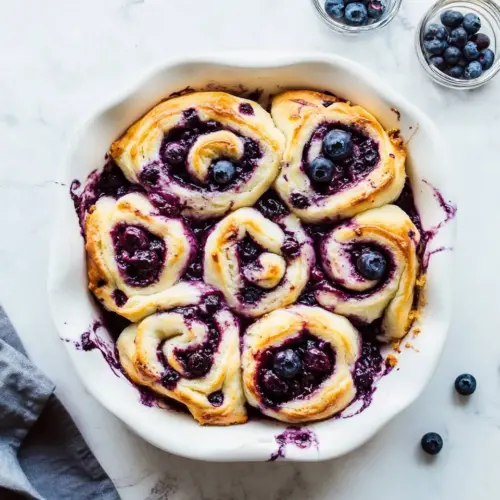
Lemon Blueberry Sweet Rolls
Lemon Blueberry Sweet Rolls are soft, tender, and bright with citrus. These bakery style rolls combine a buttery enriched dough with jammy blueberries and zesty lemon glaze for a creamy yet refreshing bite. Perfect for weekend brunch or a special breakfast, they are an easy way to impress with familiar pantry ingredients. Make them for a reason to linger over the table.
Equipment
- Medium Pot
- Stand mixer
- 9 x 13-inch baking pan glass or ceramic
Ingredients
- 1 cup whole milk Warm whole milk to lukewarm temperature to activate yeast and create a tender, enriched dough; it also adds moisture and fat for a soft crumb. Gently warming prevents killing the yeast while helping dissolve sugars and meld flavors. Use slightly below body temperature for optimal yeast activity.
- 2 -1/2 teaspoons active dry yeast Proof active dry yeast in the milk to leaven the dough and provide lift and airy texture. Sprinkle yeast over warm liquid with a pinch of sugar to wake it; bubbling confirms viability. Adjust timing if mixture fails to foam to ensure proper fermentation.
- 1/3 cup + 1/2 teaspoon granulated sugar divided Dissolve part of the granulated sugar in the milk to feed yeast and contribute to browning and subtle sweetness; reserve the remaining sugar for filling. Sugar balances flavor and helps with crust caramelization during baking. Divide as specified to control fermentation and filling texture.
- 4 tablespoons unsalted butter melted and cooled to room temperature Melt unsalted butter and cool before adding to dough to incorporate rich fat without cooking the egg or killing yeast; contributes tenderness and flavor. Cooling avoids compromising yeast activity and ensures even distribution. Use unsalted to control overall saltiness in the recipe.
- 1/2 tablespoon vanilla extract Add vanilla extract for aromatic depth and a warm, sweet fragrance that complements lemon and blueberries. Vanilla rounds out flavors and enhances perceived sweetness without adding sugar. Use pure extract for best flavor integration.
- 1 large egg yolk Whisk one large egg yolk into the dough to enrich structure, improve color, and add fat for a silkier crumb and glossy finish. Egg yolk increases tenderness and helps create a richer, more tender roll. Ensure yolk is well combined for even texture.
- 2 -3/4 cups all-purpose flour plus additional flour if needed Combine all-purpose flour as the primary structure-building ingredient to form gluten and provide body to the rolls; add more if necessary to reach proper dough consistency. Flour determines chew and rise and should be measured carefully. Adjust with small additions to avoid a tough dough.
- 3/4 teaspoons salt Add salt to the dough to enhance flavor, strengthen gluten structure slightly, and balance sweetness from other ingredients. Salt improves taste perception and controls yeast fermentation speed. Use the specified amount to avoid over-salting.
- 4 tablespoons unsalted butter softened Soften unsalted butter for the filling to create a spreadable layer that produces tender, rich swirl interiors and moist bites. Soft butter blends with sugar and lemon zest to form a cohesive filling. Ensure it is soft but not melted for best spreading consistency.
- 3/4 cup granulated sugar Use granulated sugar in the filling to sweeten and help caramelize during baking, creating a slightly crunchy, flavorful ribbon. Sugar balances tart lemon and juicy blueberries while promoting browning. Combine evenly with butter and zest for consistent sweetness.
- 1 large lemon Zest and juice one large lemon to provide bright citrus flavor and acidity that cuts richness and highlights blueberries; incorporate zest into the filling and juice into glaze or dough per recipe directions. Lemon adds freshness and aromatic oils that elevate overall profile. Use organic if zesting the peel.
- 1 cup fresh blueberries Fold fresh blueberries into the filling or topping to introduce bursts of fruity sweetness and a tender, juicy texture that pairs with lemon. Fresh berries release moisture and flavor during baking, creating pockets of jam-like fruit. Gently distribute to avoid crushing berries prematurely.
- 1/3 cup heavy cream lightly warmed Warm heavy cream slightly to help dissolve powdered sugar for a smooth icing or to enrich the dough or glaze; warmed cream also helps integrate flavors and yields a velvety texture. Light warming ensures it mixes easily without cooling the dough excessively. Use the specified amount for desired consistency.
- 1 large lemon Zest and/or juice another large lemon to ensure enough bright citrus for the glaze and filling, reinforcing lemon flavor and acidity balance throughout. Additional lemon ensures consistent tang in both filling and icing components. Handle carefully to avoid white pith when zesting.
- 1 tablespoon unsalted butter melted Melt a tablespoon of unsalted butter for brushing the rolls after baking to add sheen, richness, and a soft, flavorful crust. Brushing warm butter enhances mouthfeel and helps any glaze adhere. Use immediately while rolls are hot for best absorption.
- 1 -3/4 cups powdered sugar Whisk powdered sugar to create a silky glaze that adds sweetness, opacity, and a smooth finish to the cooled rolls; it also helps bind lemon juice or cream into a pourable icing. Sift if needed to avoid lumps and adjust consistency with liquid. Drizzle to taste for visual appeal and sweetness.
- 1/8 teaspoons salt Pinch a small amount of salt into the glaze to heighten overall sweetness perception and balance the citrus; salt in the finishing glaze sharpens flavors without making the icing salty. Use the tiny specified quantity to avoid altering sweetness excessively. Stir thoroughly to dissolve.
Instructions
- Heat the milk in a medium pot over low heat until it reaches 100°F. Remove from heat and add the yeast and 1/2 teaspoon sugar. Give it a quick stir. Let sit until foamy, about 5–10 minutes. (If the mixture doesn’t foam, you may need new yeast, or too-hot milk could have killed the yeast. Start over or the rolls won’t rise).: Soft, soothing warmth should rise from the pot, not steam, and the milk should feel just warm to the touch like a bathtub for a baby. This gentle temperature activates the yeast without killing it, which is critical for an even rise. You should smell a faint dairy note but no cooked milk scent. A common mistake is overheating the milk, which will kill the yeast and leave you with dense rolls, so use a thermometer or test carefully by hand.
- While the yeast is proofing, melt the butter and let it return to room temperature. Once cooled, whisk in vanilla extract and egg yolk until smooth. Pour this mixture into the base of a stand mixer along with the remaining 1/3 cup sugar. Pour the activated yeast and milk mixture into the bowl of the stand mixer. Mix everything until combined. Add flour and salt on top.: Once you stir in the yeast and sugar, the surface will look slightly rippled. Set it aside and watch for a foamy cap after five to ten minutes, which smells slightly yeasty and sweet. If the foam is slow to appear, your yeast may be old or the milk too warm, and you should start over for a reliable rise.
- Mix on low speed with the dough hook until thick and slightly sticky (~2 minutes), scraping the sides with a spatula as needed. Knead on medium speed until the dough gathers around the hook, (~5–6 minutes). If the dough is not gathering around the hook, you can slowly add additional flour (1/4 cup up to 3/4 cup extra). You want the dough to be slightly sticky and tacky. Resist the urge to add too much additional flour, as this will take away from the softness of the dough, but the dough should gather around the dough hook and not stick to your fingers.: The butter should feel cool, not warm, when mixed with the egg yolk and vanilla . This cooling prevents cooking the yolk and ensures a cohesive mixture. The mixture should be glossy and smooth when whisked. If the butter is too hot, it will scramble the yolk, which ruins the texture.
- Remove the dough and shape it into a ball (it will be a little sticky!). Grease the mixing bowl with cooking spray or butter and return the dough to the bowl, turning to coat with the spray or butter. Cover with plastic wrap or a towel and let rise until doubled. This takes roughly 45 mins to 1 hour 15 minutes. Placing the dough in a warm (but not too warm) environment will make it rise a bit faster.: You want a silky, homogenous blend with a faint vanilla aroma and a slightly richer color from the yolk. This enriched base contributes to tenderness and flavor. Avoid overwhisking to the point of foaming, as that will incorporate too much air.
- Lightly flour a clean surface and roll out the dough. Try to get a rectangle shape that is approximately 15 x 12 inches (with the 15-inch side facing you). Avoid overworking the dough.: The bowl will glint with the wet mixture and sugar crystals. Adding the sugar now helps dissolve it evenly as the dough forms, improving texture. If the sugar clumps, break it up so it can incorporate smoothly during mixing.
- With a table knife, spread the butter evenly over the dough (leaving a 1-inch border on the dough). In a small bowl, combine sugar and lemon zest of 1 lemon (about 1 tablespoon). Rub together with your fingers until fragrant and zest is broken down. Add 1/2 tablespoon lemon juice and mix. Sprinkle this lemon sugar over the butter. Sprinkle and gently press the blueberries evenly over the lemon sugar mixture.: When the foamy yeast joins the bowl, you will notice tiny bubbles dispersing through the liquid. This blending starts the transformation from liquid to dough. If the foam collapses immediately, the yeast may be weak, so watch for gradual activity as the mixer runs.
- Using a very sharp knife (I use a bread knife), cut the roll of dough into 12 equal slices and place (cut side up) in a well-greased 9×13-inch ceramic or glass pan (avoid metal pans if possible; metal pans will sometimes make the sweet rolls taste metallic and react with the acid).: As the mixer runs on low, the combination will look shaggy and slightly wet. This is the moment the dough begins to form, and the sound will shift from splashing to a thicker, lower hum. Resist the urge to crank the speed too early, which can overwork gluten before the ingredients are properly hydrated.
- Preheat oven to 375°F. Cover the rolls in the pan and allow them to rise until nearly doubled, about 20–30 minutes.: Sprinkle the all purpose flour and salt evenly so they hydrate uniformly. You will see the dough change from glossy to more matte as flour is incorporated. Salt strengthens gluten and balances sweetness, so uniform distribution avoids pockets of salty or flabby dough.
- Warm the heavy cream for 15–20 seconds in the microwave (not hot, just not cold/straight from the fridge).: The dough should look cohesive but cling slightly to the hook, with a soft, tacky surface. That slight stickiness means the rolls will be tender. A common error is adding too much extra flour here; add only small amounts if absolutely necessary, because overflouring yields dense, dry rolls.
- Using a pastry brush, brush the heavy cream over the risen rolls and allow it to soak in and around the rolls.: The sound will become steadier and the dough should climb the hook and form a smooth ball. You will feel the dough become elastic when pulled, and it should bounce back slowly when poked. If it remains loose, add flour in small increments; if it becomes too stiff, let it rest for five minutes to rehydrate.
- Bake sweet rolls at 375°F for 30–35 minutes, until rolls are lightly golden brown at the edges and the centers are cooked through.: The dough will feel slightly tacky but hold a rounded shape. When you grease the mixing bowl and turn the dough to coat it, you seal moisture in, encouraging a gentle rise. A dough that spreads rather than holds shape was likely over proofed or too wet, so adjust your rising time or flour next batch.
- While the rolls are cooling, prepare the glaze. Whisk together the lemon zest of a lemon (about 1 tablespoon), 3 tablespoons lemon juice, melted butter, powdered sugar, and salt.: Coating the bowl prevents sticking and makes it easy to judge how much the dough has risen. The dough should double in size; check by pressing a finger gently into the surface, which should slowly spring back. If it bounces right back, it needs more time.
- Allow sweet rolls to cool at room temperature for 5–10 minutes, then spread the glaze evenly over the rolls. Enjoy warm!: The dough should look airy and slightly domed. You will see small gas pockets under the surface and a yeasty aroma. Avoid placing it in a too hot spot, which can speed the rise and create uneven texture, or a too cool spot, which will stall fermentation.
- Lightly flour a clean surface and roll out the dough: The dough should unroll smoothly into a rectangle roughly 15 x 12 inches. Light flour keeps sticking in check while preserving elasticity. If the dough resists, let it rest five to ten minutes to relax the gluten, which makes rolling easier.
- Try to get a rectangle shape that is approximately 15 x 12 inches: A consistent rectangle ensures even layers and uniform roll sizes. If one edge is thicker, the rolls on that side will take longer to bake, so trim or press the dough to even thickness before adding the filling.
- Avoid overworking the dough: The surface should remain tender and smooth. Overworking tightens gluten and makes the final rolls chewier and less tender. If the dough shows signs of tearing, allow it to rest so the gluten can relax.
- With a table knife, spread the butter evenly over the dough: The surface will glisten with softened butter , leaving a one inch border around the edges. Even spreading forms an internal ribbon of richness that melts during baking. If you apply cold butter, it will tear the dough, so softened but not oily is best.
- In a small bowl, combine sugar and lemon zest of 1 lemon: Rubbing the zest into the sugar releases aromatic oils and creates a fragrant, coarse paste. The scent should jump forward instantly when you rub them together. If the zest is too coarse, press it further to release oils for maximum lemon flavor.
- Rub together with your fingers until fragrant and zest is broken down: The texture becomes grainy and very aromatic, with bright citrus notes. This step is crucial because it infuses the filling with fresh lemon oil, which bakes into the rolls and lifts the overall flavor.
- Add 1/2 tablespoon lemon juice and mix: The extra liquid helps the lemon sugar adhere to the butter layer, creating a cohesive sweet and tangy filling. If the mixture becomes overly wet, add a pinch more sugar to keep it spreadable.
- Sprinkle this lemon sugar over the butter: The sugared surface will sparkle and the scent will intensify. Spread it evenly so each roll gets a good hit of lemon. Places with thicker sugar will caramelize more and become slightly chewier.
- Sprinkle and gently press the blueberries evenly over the lemon sugar mixture: The blueberries should be distributed so each roll has several, creating juicy pockets when baked. Pressing them lightly embeds them into the filling so they do not roll out during slicing. Avoid overfilling which can cause leaks.
- Using a very sharp knife cut the roll of dough into 12 equal slices: A sharp blade yields clean edges, and each slice should display neat spiral layers. Equal sizes ensure even baking. A dull knife will squish the roll and smear the filling.
- Place cut side up in a well greased 9×13-inch ceramic or glass pan: The rolls should sit snug but not overly tight, allowing room for expansion. Ceramic or glass offers gentle, even heat; metal can sometimes react with lemon and alter flavor. If rolls are too crowded they will bake unevenly, so space them evenly.
- Avoid metal pans if possible: Metal pans can speed browning and may react subtly with the lemon, so using ceramic or glass helps maintain a balanced flavor and even color. If you must use metal, watch the baking time closely for faster browning.
- Preheat oven to 375°F: The oven should be fully up to temperature before the rolls go in, producing consistent oven spring. A reliable oven thermometer helps, because an oven that is too cool will lengthen baking and an oven that is too hot will brown the edges before centers cook.
- Cover the rolls in the pan and allow them to rise until nearly doubled: During this short second rise, the rolls will puff and look pillowy. They should be noticeably fuller but not collapsing. If they overproof here they will flatten and may become gummy in the center.
- About 20 to 30 minutes: Expect this final rise to be relatively quick. You will see the surface become smoother and airy. If your kitchen is cool, place them in a slightly warm spot to encourage activity, but do not exceed a warm temperature which can overproof quickly.
- Warm the heavy cream for 15 to 20 seconds in the microwave: The cream should be slightly warmed, not hot, and feel just off refrigerator chill. Brushing it onto the risen rolls allows moisture to seep in, creating an extra tender interior during baking. Avoid heating too long which will scald the cream.
- Using a pastry brush brush the heavy cream over the risen rolls: The rolls will glisten as the cream soaks into crevices. This step adds richness and helps improve crumb tenderness. If too much pools in the pan, blot lightly to avoid soggy bottoms.
- Bake sweet rolls at 375°F for 30 to 35 minutes: The oven fills with a bright, buttery lemon aroma and the tops should develop a light golden tone while centers set. You may hear soft crackles as the fruit releases steam. If edges darken too quickly, tent lightly with foil to prevent overbrowning.
- Until rolls are lightly golden brown at the edges and the centers are cooked through: Check centers by gently pressing one roll the middle should hold its shape and not feel doughy. A pale but firm center indicates they are done. Undercooked centers will feel soft and yield when pressed, signaling more time is needed.
- While the rolls are cooling prepare the glaze: The glaze should be silky when whisked, with a bright lemon aroma and a glossy texture from the melted butter. Whisk it until completely smooth so it spreads easily and sets to a pleasant sheen.
- Whisk together the lemon zest of a lemon 3 tablespoons lemon juice melted butter powdered sugar and salt: The mixture becomes a luminous, fragrant glaze, combining tartness and sweetness in a spoonable syrup. The scent of fresh lemon should be sharp and invigorating, and the glaze should be pourable but not runny. If it is too thick add a little more lemon juice.
- Allow sweet rolls to cool at room temperature for 5 to 10 minutes: Cooling for a short period prevents the glaze from melting completely into puddles, while still allowing the rolls to be served warm. You will still have a glossy finish without losing all warmth. If you wait too long the glaze will set fully and the rolls will not be as luscious warm.
- Spread the glaze evenly over the rolls: The glaze should cascade over the spirals and settle into nooks, creating a pretty, shiny finish. Use the back of a spoon or a small spatula to guide it for an even coat. If you prefer more tang, add an extra teaspoon of lemon juice before glazing.
- Enjoy warm: Serve immediately while the rolls are still warm and aromatic. The texture will be at its peak those first servings, with glossy glaze, soft crumb, and juicy blueberry bursts. Leftovers are still lovely warmed briefly.
Notes
- Swirl intensity Adjust how much lemon sugar you use for the filling to create a subtler or more pronounced citrus note, which changes how bright the rolls taste without altering the base dough.
- Blueberry placement Scatter the blueberries more sparsely or more densely so each roll has varied bursts of fruit, which affects moisture distribution and where the jammy pockets form during baking.
- Glaze thickness Thin the glaze with extra lemon juice for a runnier finish that soaks into the rolls, or keep it thicker for a glossy top that sets, depending on how sticky you want the exterior.
- Make ahead Prepare the rolls up to the cut stage, then refrigerate overnight covered, letting them rise slowly before baking the next morning for fresher mornings with less prep time.
- Freezing option Freeze unbaked, unglazed rolls in a sealed container for up to two months, then thaw in the fridge overnight and bake as directed, which preserves freshness for future breakfasts.