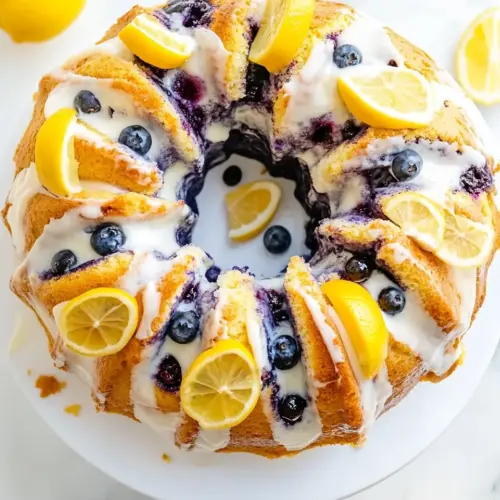
Lemon Blueberry Bundt Cake
Lemon Blueberry Bundt Cake is a bright, moist bundt with creamy crumb and bursts of juicy blueberry, finished with a glossy lemon glaze. The combination of butter, Greek yogurt, and buttermilk creates tender texture, while lemon zest lifts the flavor. Perfect for brunch or gatherings, this cake is easy to make and reliably impressive, a great reason to bake it for friends and family.
Equipment
- Standing mixer
- Paddle attachment
- 10 to 12 cup bundt pan
- Mixing Bowls
- Cooling rack
- Measuring Cups and Spoons
- Spatula
Ingredients
- 8 tablespoons unsalted butter (1 stick) at room temperature Soften and cream to provide richness and moisture while helping aerate the batter for a tender crumb; use at room temperature to ensure even incorporation and smooth texture when beaten with sugar.
- 1/4 cup nonfat plain Greek yogurt at room temperature Add creaminess and tang that contributes moisture and slight acidity to react with leaveners; keep at room temperature to prevent curdling and encourage a uniform batter.
- 1 3/4 cups granulated sugar Sweeten the cake and help with structure by dissolving into the batter; creaming with butter helps incorporate air for lift and provides the primary source of sweetness.
- 3/4 teaspoon kosher salt Season and enhance overall flavor balance while controlling fermentation of leaveners; kosher salt also strengthens gluten slightly and sharpens the cake’s sweetness.
- 4 large eggs at room temperature Bind ingredients and add richness, structure, and leavening when whipped; bring eggs to room temperature so they emulsify more easily for a stable, airy batter.
- 3 cups all-purpose flour Provide bulk, structure, and chewiness through gluten development while contributing to the cake’s crumb; measure accurately and sift if needed to avoid lumps.
- 2 teaspoons baking powder Leaven the cake by producing carbon dioxide when combined with moisture and acidity, helping create rise and lightness; distribute evenly with dry ingredients for consistent texture.
- 1/2 teaspoon baking soda Contribute additional leavening power and react with acidic components for tender crumb and lift; use measured precisely to avoid metallic or soapy taste.
- 1 cup well-shaken, low-fat buttermilk at room temperature Introduce acidity and moisture to tenderize the crumb and activate baking soda; well-shaken buttermilk ensures consistent texture and even distribution.
- Zest of 2 medium lemons Impart bright citrus aroma and concentrated lemon flavor without extra liquid, enhancing overall freshness; zest finely to avoid bitter pith and sprinkle evenly into batter.
- 1 1/2 cups fresh blueberries optional (see notes if using frozen) Provide bursts of juicy fruit flavor, moisture, and visual appeal; gently fold in to avoid breaking berries and toss with a little flour if using to prevent sinking.
- 1/2 cup powdered sugar Create a simple glaze that adds sweetness and a smooth finish while dissolving quickly over the cake; sift powdered sugar to ensure a lump-free, glossy drizzle.
- 1 tablespoon freshly squeezed lemon juice Add fresh citrus tang to the glaze and brighten the overall flavor profile; freshly squeezed juice balances the powdered sugar and harmonizes with the lemon zest in the cake.
- 1/2 tablespoon low-fat buttermilk Thin the glaze to desired consistency and add a touch of dairy richness for shine and smooth pour; use a small amount to avoid making the glaze too runny.
Instructions
- Preheat the oven to 350 degrees F (check your oven racks to make sure they are positioned so that you have enough room for the cake). Set out a 10- to 12-cup nonstick Bundt cake pan but do not grease it (yet!).: As the oven warms you should smell a faint warmth from the heating elements, and the kitchen will feel slightly toasty. Preheating ensures the cake starts rising right away, producing even texture rather than slow dense lift. A common mistake is skipping thorough preheating, which can lengthen baking time and yield uneven crumb. Also make sure racks are arranged so the bundt pan sits centered, allowing air to circulate for even browning.
- In the bowl of a standing mixer fitted with the paddle attachment or a large mixing bowl, cream the butter and Greek yogurt on medium speed until beginning to turn smooth, about 20 seconds. Add the sugar and beat 1 minute. Scrape down the bowl, then add the salt. Beat 1 additional minute until fluffy and lightened in color.: You will notice the texture change as the butter and Greek yogurt come together, becoming slightly glossy and softer in appearance. This creaming traps small pockets of air that help the cake rise, and starting smooth prevents lumps in the batter. If you overcream, the mixture can become too loose and deflate, so stop once it looks evenly combined. Avoid speeding through this step as undercreamed mixtures leave uneven texture.
- Add the eggs, one at a time, beating well after each addition, stopping to scrape down the bowl once or twice to make sure the ingredients are combining evenly.: After adding the sugar the mixture should lighten in color and gain a fluffy quality, with tiny bubbles visible when you scrape the paddle. This aeration contributes to a tender, lift-y crumb. If you skip this beat the cake can be denser. Scrape down the bowl to incorporate any unmixed bits, or pockets of fat may remain and cause uneven texture.
- In a separate bowl, whisk together the flour, baking powder, and baking soda. Add 1/3 of the flour mixture to the butter mixture, mixing on low speed just until the flour disappears. Add 1/2 of the buttermilk, beating on low to incorporate, then the second 1/3 of the flour mixture, the remaining buttermilk, then the last 1/3 of the flour mixture, beating just until the flour disappears and the ingredients are blended. The batter will look a little shaggy by should not have any large lumps. On low speed or by hand, mix in the lemon zest (I like to zest my lemons right over the mixing bowl to catch every last precious bit of the zest).: Scraping ensures all ingredients are fully integrated, and adding the salt at this stage helps distribute it evenly throughout the batter so each bite tastes balanced. You may notice a subtle change in flavor as the salt brightens the sweet notes. Failing to scrape can leave streaks of unmixed sugar or butter along the sides, leading to lumps in the final cake.
- Thoroughly grease the bundt pan with nonstick spray (I don’t recommend adding flour as it puts a funny coating on the cake. If you’d like to be extra double sure it doesn’t stick, dust the cake lightly with almond flour or a different nut flour). Spoon 1/4 of batter into the prepared pan, then sprinkle with 1/2 cup of the blueberries. Add the next 1/4 of the batter and sprinkle with the next 1/3 of the blueberries. Continue alternating the cake and berries, ending with the batter. With a spoon or spatula, gently level the cake batter and smooth the top.: The mixture should appear airy and paler, with a smoother finish. This extra time deepens the aeration and ensures the sugar dissolves into the fat, a key factor for a fine crumb. Watch for signs of overbeating which can create a loose, overly whipped mixture that may collapse during baking.
- Bake the cake for 45 to 55 minutes, or until a toothpick inserted into the center comes out clean. If you are using a dark pan, check at the 40-minute mark as the cake will bake more quickly.: With each egg added the batter will become more fluid and glossy, and its volume may increase slightly. Eggs act as emulsifiers, so adding them slowly prevents curdling and ensures a stable batter. A common misstep is adding eggs too quickly, which can cause separation and a lumpy mixture; if that happens, a quick scrape and a lower speed will typically bring it back together.
- Remove the cake from the oven. Immediately run a thin knife carefully between cake and pan all around the edge to loosen it. Place the pan upside down on a cooling rack. If the cake immediately drops out of the pan onto the rack, remove the pan. If the cake doesn’t drop onto the rack, let it rest for 5 minutes upside down in the pan, then carefully lift the pan off the cake. If the cake STILL feels like it's sticking, give it another 5 minutes upside down, then very gently shake the pan back and forth to loosen and remove it. Let cool completely on the rack.: Whisking the dry ingredients evenly distributes the baking powder and baking soda , preventing pockets of leavener that could create bubbles or tunnels in the cake. The dry mixture should look uniform and light. If you skip whisking, you risk uneven rising and inconsistent texture.
- While the cake cools, prepare the glaze: In a small bowl, whisk together the powdered sugar, lemon juice, and buttermilk until smooth. If you desire a thicker glaze, add a bit more powdered sugar until your desired consistency is reached. Drizzle over the cooled cake. Slice and enjoy!: After adding this portion the batter will look thicker and slightly drier, with no visible streaks of flour. This gentle addition prevents overmixing the gluten and keeps the cake tender. Stirring too vigorously here will develop gluten and make the cake tough, so keep the speed low and stop as soon as the flour is incorporated.
- Add 1/2 of the buttermilk, beating on low to incorporate, then the second 1/3 of the flour mixture, the remaining buttermilk, then the last 1/3 of the flour mixture, beating just until the flour disappears and the ingredients are blended: Alternating buttermilk and the flour mixture creates an emulsion that keeps the batter smooth and prevents overworking the flour . You will notice the batter becoming silkier after each addition, with a slightly shaggy but cohesive look at the end. Rushing this sequence or adding wet all at once can lead to overmixing and a tougher crumb.
- The batter will look a little shaggy by should not have any large lumps: A properly mixed batter has a slightly textured appearance but no dry clumps of flour. At this point, mix on low speed or fold by hand just until combined. Overmixing at the end will tighten gluten, giving a dense result. If you see lumps that are stubborn, gently fold with a spatula rather than increasing mixer speed.
- On low speed or by hand, mix in the lemon zest (I like to zest my lemons right over the mixing bowl to catch every last precious bit of the zest): The lemon zest will release aromatic oils that perfume the batter, making it smell bright and citrusy. Zesting over the bowl captures those oils so they stay in the cake. Be careful not to grate too deeply into the pith, which is bitter. If you add zest too early or overwork it, the oils can dissipate before baking.
- Thoroughly grease the bundt pan with nonstick spray (I don’t recommend adding flour as it puts a funny coating on the cake: Greasing the pan well helps the cake release cleanly; you may also dust lightly with almond flour for extra insurance. The surface should feel evenly coated but not slick with oil. Under greasing causes sticking and broken edges when unmolding; if that happens, allow the cake to cool a little longer before attempting removal.
- Spoon 1/4 of batter into the prepared pan, then sprinkle with 1/2 cup of the blueberries: As you layer the batter and blueberry , you will see pockets forming that will create pretty slices. The berries give moist bursts and visual contrast. If you pile too many berries in one spot they can sink and create dense areas, so distribute them evenly for balance.
- Add the next 1/4 of the batter and sprinkle with the next 1/3 of the blueberries: Continue to alternate so the berries are dispersed through the cake rather than all at the bottom. You will notice slight variance in color where the berries sit, which is normal. Overfilling the pan risks overflow, so leave a little headroom.
- Continue alternating the cake and berries, ending with the batter: The final top should be smooth and level so that the cake rises evenly. Use a spoon or spatula to gently smooth the surface. Vigorous tapping to remove air bubbles is not necessary and can shift the berries, causing uneven pockets.
- With a spoon or spatula, gently level the cake batter and smooth the top: Run the spatula in a gentle motion so the surface looks even and tidy. A smooth top bakes into a uniform dome that unmolds attractively. Rough handling can push berries toward the surface and create uneven browning.
- Bake the cake for 45 to 55 minutes, or until a toothpick inserted into the center comes out clean: You should hear a faint settling sound as the cake finishes, and the top will be a delicate golden color. The toothpick test ensures the interior is set without overbaking. If you use a dark pan check at 40 minutes because it can bake faster. Overbaking dries the crumb, while underbaking leaves a gummy center.
- Remove the cake from the oven: The cake will release a warm, buttery aroma with citrus undertones. Let it rest briefly in the pan to stabilize. A common error is rushing the unmold; unmolding too hot can cause the cake to tear, while waiting too long may make release harder. Follow the cooling instructions for the best outcome.
- Immediately run a thin knife carefully between cake and pan all around the edge to loosen it: You will feel the slight give as the cake detaches from the pan. This prevents sticking at the edges and helps the cake drop out cleanly. If you skip this step the cake can cling and break when inverted, so take the time to be thorough and gentle.
- Place the pan upside down on a cooling rack: Gravity helps the cake release and cool evenly. If it drops out immediately, remove the pan; if not, let it rest for 5 minutes then lift the pan off. If the cake still sticks, allow an additional 5 minutes and gently shake the pan to encourage release. Forcing the pan off can deform the cake, so patience pays here.
- Let cool completely on the rack: Cooling until room temperature stabilizes the crumb and prevents the glaze from melting away. You will notice the aroma mellow and the texture set. Slicing too soon can cause crumbling and a gooey center, so give it time.
- While the cake cools, prepare the glaze: Whisk the powdered sugar , lemon juice, and buttermilk until silky. The glaze should look glossy and pourable. If it is too thin it will run off, if too thick it will clump; adjust with small amounts of powdered sugar or buttermilk accordingly. Taste to ensure a bright balance of sweet and tart.
- If you desire a thicker glaze, add a bit more powdered sugar until your desired consistency is reached: Add in teaspoons and whisk thoroughly for a smooth finish. The right thickness will cling as it drips down the sides and pools gently in the crevices of the bundt shape. Going too thick loses the glaze's sheen, while too thin leaves little visible icing.
- Drizzle over the cooled cake: Use a spoon or small pitcher to pour the glaze so it forms pretty ribbons over the bundt. The glaze should sparkle and highlight the curvature of the cake. Avoid glazing a warm cake as the glaze will melt and disappear into the crumb.
- Slice and enjoy: When you cut into the cake you will see the speckled interior and the jewel like blueberry pockets. Serve at room temperature for the best texture. A common serving mistake is refrigerating then serving cold, which dulls the flavors; room temperature preserves the bright lemon notes.
Notes
- Room temperature matters — Bring butter, Greek yogurt, eggs, and buttermilk to room temperature so they incorporate smoothly; cold ingredients can lead to lumps and an uneven crumb.
- Measure flour correctly — Spoon and level the flour or weigh it to avoid packing, which can produce a dry, heavy cake instead of a tender one.
- Protect against berry bleeding — If using frozen blueberry, keep them frozen until adding to the batter; they will bleed less if they go in cold and unmelted.
- Alternate additions — Adding flour and liquid in alternating thirds helps maintain a smooth emulsion and prevents overmixing, which is key for a fine crumb.
- Test for doneness reliably — Use a toothpick in the center and look for a few moist crumbs but no wet batter; underbaked cake will sink as it cools.
- Cool before glazing — Wait until the cake is fully cooled so the glaze remains glossy and sits on the surface rather than soaking in and disappearing.