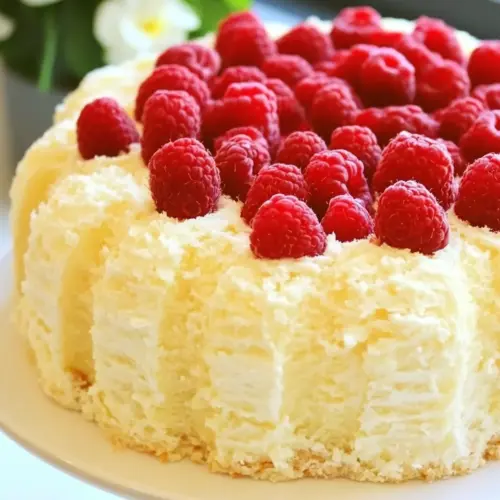
Lemon Angel Food Cake with Raspberries
Lemon Angel Food Cake with Raspberries is a light and airy dessert that pairs cloudlike cake with creamy lemon filling and bright raspberries. This easy make ahead treat is creamy, refreshing, and perfect for spring brunches or casual gatherings, offering an elegant finish without hours of work. Make it to impress guests while keeping the process delightfully simple.
Equipment
- Long serrated knife
- Large Bowl
- Whisk
- Spatula
- Offset Spatula
- Serving Platter
Ingredients
- 1 angel food cake store bought or homemade Stored whole or homemade, provides the light, airy base and structure for the dessert; slices easily absorb fillings and toppings while keeping the cake delicate. Compliments the lemon and raspberry flavors and serves as the centerpiece for assembly and presentation.
- 1 small box sugar free lemon pudding Dissolved into milk to create a tangy, sugar-free lemon layer that adds bright citrus flavor and slight thickening; helps bind the cream filling and maintain a stable texture. Enhances overall lemon profile without adding extra sugar, balancing sweetness from the cool whip and raspberries.
- 1 1/2 cups low fat milk Measured and used to hydrate the pudding mix, yielding a creamy consistency; contributes necessary liquid to activate the thickening agents and ensures the lemon pudding sets properly. Low fat milk keeps calories lower while still providing dairy richness and mouthfeel.
- 1 tub fat free cool whip defrosted Softened after thawing and folded into the prepared lemon pudding to create a light, fluffy filling; adds volume, smoothness, and sweetened creaminess while keeping the dessert low in fat. Provides stability and a whipped texture that contrasts with the airy cake and juicy berries.
- 1/2 pint raspberries Rinsed and gently packed as fresh fruit to place between layers or as a topping; offers bright, tart-sweet bursts of flavor and fresh color that contrast the creamy lemon filling. Adds natural juiciness and a slight texture variation that complements the light cake.
Instructions
- Place angel food cake onto serving platter. Slice evenly into 3 layers. Set aside.: The top note you will notice is the soft, pillowy texture under your knife, with a faint sweet scent that promises a delicate bite. Take care to use a long serrated knife and a gentle sawing motion to avoid tearing, keeping the slices as even as possible so the cake stacks straight. Pressing too hard will compress the crumb and ruin the cloud like lightness, so steady hands matter here. If the cake resists, chill it briefly for cleaner cuts. Watch for crumbs falling into the platter, and gently brush them away so the presentation stays tidy.
- In a large bowl, whisk pudding mix and cold milk together for 2 minutes until smooth and thickened. Fold in cool whip. Spread about 1 cup of this mixture over top the 1 st layer of angel food cake. Top with 2 nd layer of cake, another cup of lemon cool whip mixture and the top layer of cake.: You will hear a soft whisking rhythm and see the powder dissolve, then the mix will change from runny to glossy and slightly thick, smelling of lemon. The cold milk helps the pudding thicken properly and folding in the fat free cool whip preserves airiness, so use a spatula and lift gently to keep volume. Over stirring can deflate the mixture and lead to a heavy filling, so stop once streaks disappear and the texture feels light but stable. If lumps remain, let it sit for a minute and whisk again gently to avoid breaking down the whipped texture.
- Use remaining lemon cool whip mixture to frost the outside of the cake and top with raspberries. Dust with powdered sugar, if desired. Refrigerate until ready to serve.: As you spread the filling, you will feel a slightly resistant, billowy texture that smooths into place; the lemon aroma will become more pronounced. Use an offset spatula or the back of a spoon and apply gentle pressure to coax the mixture to the edges, creating a uniform layer that will support the next cake tier. If you pile too much in one spot the cake may slide later, so aim for even distribution. A common slip is using a cold cake slice straight from the fridge which can make the filling firm up unevenly, so keep everything at the same chill level for better adhesion.
- Top with 2 nd layer of cake, another cup of lemon cool whip mixture and the top layer of cake.: When stacking, the faint springy give of each layer should nestle into the filling and create a cohesive height, while the lemon scent intensifies. Align the edges carefully to maintain a round silhouette, and press each layer down lightly so the filling settles but does not squeeze out. If layers are crooked, slide them gently into place rather than forcing, which could tear the cake. Avoid pressing too firmly or the structure may compress and lose its light texture.
- Use remaining lemon cool whip mixture to frost the outside of the cake and top with raspberries.: The frosting stage allows you to shape the dessert visually; as you spread the filling over the sides, notice how the cake takes on a smooth, pale lemon coat and the subtle creamy aroma becomes comforting. Place raspberries with intention, clustering some at the top and scattering a few along the base for balance. Keep movements soft and patient to preserve the cake's surface. A typical error is overworking the frosting which leads to streaks and loss of that soft, cloud like finish, so do small, confident strokes and step back to assess.
- Dust with powdered sugar, if desired. Refrigerate until ready to serve.: The final dusting adds a whisper of sweetness and a tiny visual snow that compliments the berries. Refrigeration firms the filling so slices hold their shape and the lemon flavor chills into a refreshing note. Expect a subtle condensation on the surface as it chills, which is normal, but avoid leaving it out too long at room temperature or the filling can soften and run. When storing, cover loosely with a tented foil to protect the raspberries and keep the cake from absorbing other fridge odors.
Notes
- Choose a fresh cake - If you opt for store bought, pick one that springs back when gently pressed, it will hold layers better and create a prettier presentation.
- Chill ingredients - Cold milk and a chilled tub of cool whip help the pudding set quickly and the filling keep its shape during assembly.
- Prep berries last - Rinse and pat the raspberries dry shortly before decorating to prevent excess moisture from making the frosting weep.
- Even layering - Use a ruler or the edge of a spatula to guide even spreads of filling so each slice has balanced proportions of cake and cream.
- Light dusting - A small sieve for powdered sugar gives a delicate finish without overwhelming the lemon and raspberry flavors.