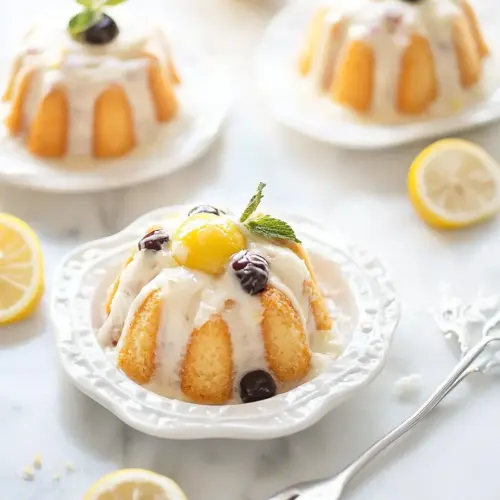
Lemon and Cherry Mini Bundt Cakes
Lemon and Cherry Mini Bundt Cakes are bright, tender, and irresistibly cute. The combination of zesty lemon and plump cherries yields a moist, fragrant crumb with a glossy syrup finish. These mini cakes are perfect for casual gatherings or a sweet afternoon pick me up, offering delightful texture and flavor in every bite. Try them for a simple, impressive dessert that is easy to share.
Equipment
- 12 cavity mini bundt pan
- Stand mixer
- Small Bowl
- Parchment Paper
- Cooling rack
- Saucepan
Ingredients
- 1 1/2 cups all-purpose flour Sifted to create a light, tender crumb and provide structure by forming gluten when mixed with liquids; measures ensure proper balance with leavening agents and fats for consistent mini bundt texture.
- 3/4 teaspoon of baking powder Leavened to gently lift the batter and produce airy cakes; accurately measured to avoid metallic or soapy flavors while ensuring appropriate rise for small molds.
- 1/4 teaspoon of salt Balanced to control overall seasoning and strengthen gluten network subtly; small amount prevents a flat, overly sweet profile and enhances other flavors without salinity.
- 1/4 cup dried cherries Soaked or lightly chopped to distribute bursts of fruity, sweet-tart flavor throughout the cake; provides chewy contrast and visual interest when evenly folded into batter.
- Zest of 2 lemons Grated finely to release fragrant citrus oils that brighten the batter and glaze; contributes aromatic complexity and slight bitterness that complements the cherries and sugar.
- 1 cup sugar Creamed to add sweetness, tenderize the crumb, and help dissolve when creaming with butter; measured precisely to balance acidity and moisture for desired cake structure.
- 12 tablespoons of unsalted butter, at room temperature Creamed at room temperature to aerate the batter and incorporate fat for richness and moisture; softened texture allows even creaming with sugar for proper leavening and mouthfeel.
- 3 eggs, lightly beaten Beaten briefly to combine and emulsify with fats and sugars, adding moisture and structure through coagulation when baked; measured eggs also help bind and leaven the mini bundts.
- Juice & zest of 1/2 lemon Squeezed and zested to add bright acidity and concentrated lemon aroma that balances sweetness; juice provides tenderizing liquid while zest intensifies citrus notes.
- 1/2 cup of water Poured in to adjust batter consistency and provide steam for expansion during baking; contributes hydration without overpowering flavor and helps achieve the correct batter viscosity.
- 1 cup of sugar Dissolved or combined to sweeten syrups or glazes and to balance tart lemon; additional sugar can create a syrupy finish or augment overall sweetness depending on technique.
- 1/4 teaspoon almond extract Added sparingly to impart a warm, nutty almond aroma that deepens complexity; tiny quantity enhances fruit notes and pairs well with cherries without dominating the profile.
- 1 sprig of fresh rosemary Bruised or finely chopped to release aromatic oils that offer piney, savory, and resinous notes; used sparingly to introduce subtle herbal contrast to the sweet citrus-cherry combination.
- 2 tablespoons of unsalted butter Melted into glazes or brushed on cakes to add shine, richness, and a slight savory background; small finishing butter smooths texture and helps carry flavors across the palate.
Instructions
- Preheat oven to 325°F. Grease and flour a non-stick 12-cake mini bundt pan and tap out any excess flour.: The oven warming produces a predictable environment so the cakes rise evenly, and prepping the pan ensures the pretty ridges release cleanly. As you grease, notice how the surface becomes glossy, and when you dust with flour the ridges reveal a faint white coat. A well prepared pan will produce clean unmolding without tearing the crumb. A common mistake is skimping on grease in the pan's cavities, which leads to cakes sticking; if you see any bare spots, re grease and flour again. The sound is subtle here, but you might hear a faint scrape when tapping out excess flour, and visually the wells should look evenly coated.
- Place dried cherries in a small bowl and cover with boiling water. Let steep for 5 minutes or until cherries soften and plump up. Drain, squeezing out excess water. Chop the cherries into small pieces and set aside.: Rehydrating concentrates aroma and turns the dried fruit tender, which prevents it from robbing moisture from the cake. You will notice the cherries swell and their color deepen to a glossy, almost jewel tone; that shine tells you they absorbed enough liquid. Squeezing out extra water avoids adding too much moisture to the batter. When you chop them, the knife will slide more smoothly through the softened fruit, and the pieces should be small enough to disperse through the batter without all sinking to the bottom. A frequent error is using cold water which prolongs steeping and leaves cherries chewy; always use boiling water for quick, even rehydration.
- Sift the flour, baking powder and salt onto a piece of parchment paper and set aside.: Sifting creates an aerated, lump free dry mix so the batter blends smoothly. After sifting, the flour will look light and feathery, and the baking powder and salt will be evenly distributed, avoiding pockets of salty or bitter taste in the finished cake. This also helps you fold without overworking, since a finer texture mixes more gently. Avoid skipping the sift if your flour is clumpy, because that can translate to dense spots in the crumb.
- Combine the lemon zest and sugar in a small bowl. Rub the lemon zest into the sugar with your fingers until the sugar becomes moist and yellow. Set aside.: Rubbing zest into sugar releases citrus oils, turning the sugar perfumed and slightly damp which perfumes the entire cake. As you rub, inhale the lift of lemon oil; the sugar will take on a pale yellow tint and feel slightly clumped. This step is crucial for distributing bright aromatics evenly, and if omitted the lemon will feel less integrated. A typical misstep is zesting too coarsely, which adds bitter bits of pith, so use only the colored rind.
- In the bowl of an electric stand mixer, beat the butter on medium speed until creamy and smooth, for about 1 or 2 minutes. Add the lemon sugar mixture and beat until light and fluffy or for about 5 minutes, scraping down the sides of the mixing bowl as needed. Add the eggs one at a time and mix for about 1 minute after each addition. Reduce the mixer speed to low. Add the sifted flour mixture to the bowl in three batches, blending each until just mixed in and scraping the sides as needed. With the last batch of flour, also add the chopped cherries and incorporate, taking care not to over mix.: As you cream butter and the lemon sugar, you will see a transformation to pale, aerated cream that holds small peaks; that trapped air is what gives the cakes lift. When you add the eggs one at a time, the batter will momentarily look loose then smooth out, signaling good emulsion. Folding in the dry ingredients in batches avoids overdeveloping gluten from the flour , so stop mixing as soon as streaks disappear. When adding the chopped cherry , aim for even distribution; the batter should look speckled rather than loaded in one place. Overmixing at this stage is the most common mistake, which creates toughness, so mix gently and use a rubber spatula to finish if needed.
- Using a large cookie scoop or spoon, add the batter into the wells of the prepared pan.: Portioning with a scoop ensures uniform cakes that bake at the same rate, and the batter should mound slightly but not overflow the well. You will notice the batter has a glossy, thick texture and it should settle into the ridges as you tap the pan lightly. Consistent portions yield even baking and neat presentation. A typical error is overfilling which leads to overflow and uneven domes, so leave a small gap at the top of each well.
- Bake for 18-20 minutes, or until a toothpick inserted into the middle of a cake comes out clean.: During baking the kitchen will fill with lemon and buttery notes and you may hear a faint crackle as edges set. Visual cues matter here the tops should be lightly golden and spring back when touched. The toothpick test checks the center so you avoid underbaking which makes the crumb gummy. Opening the oven too often can collapse the little cakes, so trust the time and peek near the end. If you notice a wet batter spot in the center on your test, return to the oven and check again after a few minutes.
- As the cakes are baking, prepare the syrup glaze. Add the lemon juice and zest, water, sugar, almond extract, sprig of rosemary and butter. Heat over low heat just until the sugar dissolves then raise the heat to medium and cook for 5 more minutes. Remove from the heat and let the glaze cool completely.: Heating the syrup slowly dissolves the sugar and allows the rosemary and lemon flavors to infuse gently, creating a fragrant liquid that will sink into the crumb. You will see the sugar dissolve into a clear syrup and the aroma will deepen as it simmers. Cooling it slightly prevents the butter from separating when you combine it. If the syrup boils too hard you risk reducing it into a thicker syrup that will not soak in as well, so keep a gentle simmer. Strain the rosemary before glazing if you want a clean, herb free finish.
- When the cakes are ready to come out of the oven, transfer the pan to a cooling rack to rest upright in the pan for about 10 minutes, then gently tap the pan to loosen the cakes. Carefully pop the cakes out of the pan. While they cakes are still warm, brush them with the syrup.: Resting the cakes stabilizes their crumb and releases steam so they unmold cleanly; you will feel the pan lose its warmth as they cool. Tapping helps coax them free without tearing, and when they release the underside should be evenly textured and lightly golden. Brushing with warm syrup at this moment allows it to penetrate while the crumb is still receptive, adding moisture and flavor. A common pitfall is waiting until they are cold to glaze, which keeps the syrup on the surface rather than soaking in.
- After they are completely cool, drizzle cakes with the glaze, dividing the glaze evenly among the cakes. Dust lightly with powdered sugar if desired.: Once cool the glaze will set slightly and give a glossy sheen, and a light dusting of powdered sugar can add a soft, snow like finish. Visually the cakes will look polished and the glaze will sit in the ridges, highlighting the shape. Serving at room temperature gives the best texture contrast between crumb and syrup. If you store them warm in a covered container the glaze can become tacky, so let them cool fully before packaging.
Notes
- Room temperature butter matters Cold butter will not cream properly and hot butter makes the batter loose, so aim for a soft but cool texture for best aeration.
- Even scoop sizes ensure uniform baking Use a large cookie scoop to portion the batter so each mini bundt finishes at the same time, avoiding some cakes that are dry while others are underbaked.
- Strain the glaze if needed After simmering with the rosemary, strain the syrup to avoid herb bits on the cakes unless you prefer them for rustic flair.
- Store properly to maintain moisture Once glazed and fully cooled, keep the cakes in an airtight container at room temperature for up to two days to preserve texture and flavor.
- Make ahead and freeze You can freeze the baked, unglazed mini bundts on a tray, then transfer to a freezer bag; thaw and brush with syrup before serving for nearly fresh results.