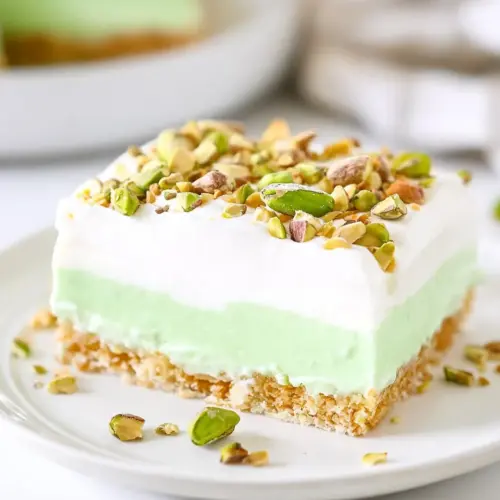
Layered Pistachio Dessert
Layered Pistachio Dessert is a creamy, crowd pleasing no bake treat with a buttery shortbread crust, tangy cream cheese middle, and silky pistachio pudding top. Easy to assemble and perfect for gatherings, it offers a mix of textures from crunchy nuts to pillowy topping. Make it for an easy weeknight celebration or a potluck dessert that always disappears fast.
Equipment
- Food Processor
- Electric Mixer
- 9x13-inch Baking Dish
- Mixing Bowls
- Rubber spatula
Ingredients
- 20 shortbread cookies, (11-ounce package) Crushed into fine crumbs to form a sturdy, buttery base for the dessert, shortbread cookies provide a sweet, crisp foundation when combined with melted butter. They add a rich, shortbread flavor that complements the creamy layers above and helps hold the dessert together. Press firmly into the pan to create an even, compact crust that supports the pudding and whipped layers.
- 1/4 cups helled pistachios Shelled pistachios provide a bright, nutty flavor and subtle crunch when chopped and incorporated into layers or used as a garnish. They contribute a distinctive green color that enhances visual appeal and a toasted aroma when lightly warmed. Scatter or fold them into fillings to add texture contrast to the smooth components.
- 4 tablespoons salted butter, melted Melted salted butter acts as a binder for the cookie crumbs, helping form a cohesive crust with added savory balance to the sweetness. It enhances mouthfeel and richness in the base while aiding in compaction when pressed into the pan. Use an even amount to ensure the crust holds together without becoming greasy.
- 1 (8-ounce) package cream cheese, softened Softened cream cheese lends a tangy, creamy body to the middle layer, providing structure and a velvety texture when whipped smooth. It balances sweetness from sugars and puddings and helps stabilize the whipped topping for a richer mouthfeel. Ensure it is fully softened to avoid lumps and achieve a homogeneous mixture.
- 1/2 cup powdered sugar Powdered sugar sweetens and slightly thickens creamy layers while dissolving smoothly for a consistent texture. It adds a fine sweetness without graininess, helping to stabilize whipped mixtures and cream cheese blends. Sift or add gradually to prevent clumping and achieve desired sweetness.
- 1 cup Cool Whip, thawed Cool Whip, thawed, lightens and aerates the cream cheese mixture, producing a fluffy, mousse-like consistency in the dessert layers. It adds volume and a stable whipped texture that helps maintain layers without weeping. Fold gently to preserve airiness while evenly combining with denser components.
- 2 (3.9-ounce) packages dry pistachio instant pudding Dry pistachio instant pudding mixes provide quick, concentrated pistachio flavor and help set the middle layer when combined with milk. They thicken rapidly to form a smooth, firm pudding that supports the whipped topping and maintains distinct layers. Whisk vigorously to ensure lumps are removed before layering.
- 2 1/2 cups cold milk Cold milk hydrates the dry pudding mix and initiates thickening, producing a smooth, settable pistachio pudding layer. It controls the final consistency of the pudding, so using the specified temperature and volume yields optimal texture. Pour gradually while whisking to prevent clumps and ensure even thickening.
- 2 -3 cups Cool Whip, thawed, or whipped cream Cool Whip or whipped cream adds a light, pillowy top layer that contrasts with the denser pudding and crust, creating a creamy finish. It provides visual appeal and a smooth mouthfeel while cushioning garnishes and helping maintain layered definition. Spread gently to keep layers distinct and attractive.
- 1/4 cups helled pistachios, crushed Shelled pistachios, crushed, supply a crunchy, decorative topping with concentrated nutty flavor and appealing green flecks. They enhance texture contrast and provide a finishing flourish that signals the pistachio flavor throughout the dessert. Sprinkle evenly over the top layer for best presentation and bite distribution.
Instructions
- In a food processor or blender, pulse 20 cookies and 1/4 pistachios into fine crumbs. Add 4 tablespoons melted butter and mix until combined and mixture sticks together when pressed between your fingers. Add an additional tablespoon butter if needed to help the crumbs come together. Press mixture into the bottom of a 9×13-inch baking dish and place in the freezer or the refrigerator 5 minutes.: You should hear a steady, granular sound as the cookies break down into small, even crumbs, and the mixture will look uniformly sandy. This fine texture helps the crumbs bind with the melted butter, producing a crust that presses together cleanly. If you have uneven chunks, pulse a few more times until the texture is consistent, because large pieces can create an unstable base. A common mistake is over processing until it becomes paste, so stop once it resembles coarse sand.
- In a medium bowl, whip 8 ounces cream cheese with an electric mixer until fluffy. Add in 1/2 cup powdered sugar and mix until combined. Fold in 1 cup Cool Whip. Gently spread the mixture evenly over the crust. Place in the freezer or fridge 10 minutes.: When you pour the warm, glossy butter over the crumbs, they will darken slightly and take on a cohesive sheen. Mix until every crumb is moistened, and test by pinching a small amount; it should hold shape when pressed. This binding step matters because a loose crust will crumble when sliced. If it feels too dry, add an additional tablespoon of butter sparingly; adding too much will make the crust greasy.
- In a separate medium bowl, whisk the pudding and 2 1/2 cups milk together until thick. Once thickened, spread evenly over the top of the cream cheese layer. Place back in the fridge for another 10 minutes to allow the pudding to set.: As you press, you should feel the mixture compress and hear a faint scraping as it levels. Use the bottom of a measuring cup for even pressure to create a compact, uniform surface. Chilling briefly firms the butter and sets the crust so the next layers sit on a stable platform. Rushing this step could lead to a soft base that sags when you spread the filling.
- Once pudding has set, spread the remaining Cool Whip on top and sprinkle with chopped pistachios. Chill 2 to 3 hours. Slice just before serving and enjoy while cold.: The mixer will sound smoother as the cream cheese aerates, and visually it will lighten in color and texture, turning from dense to pillowy. Properly whipped cream cheese creates the foundation for a light filling that contrasts the crust. If it stays lumpy, it may not blend smoothly with the powdered sugar and topping, so scrape the bowl and continue whipping until smooth.
- Add in 1/2 cup powdered sugar and mix until combined: Powdered sugar dissolves quickly into the whipped cream cheese, adding sweetness and a silkier mouthfeel. You will notice a subtle glossy sheen as it integrates. Mixing thoroughly prevents graininess and ensures even sweetness. Under mixing is a common error that leaves pockets of sugar, so scrape the sides and beat until fully incorporated.
- Fold in 1 cup Cool Whip: When you fold the thawed topping into the sweetened cream cheese, use a gentle motion to keep the airiness intact; the mixture should become cloud like and soft. This lightening step gives the filling lift and prevents it from becoming dense. Over mixing will deflate the mixture, so fold just until uniform streaks disappear to maintain volume.
- Gently spread the mixture evenly over the crust: As you spread the creamy mixture, you will feel slight resistance from the chilled crust beneath, and the surface should smooth into a uniform layer without displacing the base. A rubber spatula helps you glide the filling into corners cleanly. Pushing too hard can disturb the crust, so work gently from center to edges for even coverage.
- Place in the freezer or fridge 10 minutes: A short chill firms the cream cheese layer so the next pudding layer sits cleanly on top; you will notice the edges become slightly set to the touch. This quick rest prevents layers from blending into each other, which preserves the distinct textures. Skipping this can cause the pudding to mix into the filling and muddy the presentation.
- In a separate medium bowl, whisk the pudding and 2 1/2 cups milk together until thick: As you whisk, the mixture will transform from thin to glossy and custard like, thickening within minutes. Whisking briskly eliminates lumps and creates a smooth, uniform pudding. Achieving the right thickness is important because a runny pudding will not hold its layer; under whisking is the common culprit for a loose set, so continue until it holds gentle peaks.
- Once thickened, spread evenly over the top of the cream cheese layer: Pour the pudding carefully and use a spatula to nudge it into an even sheet; you will see a clean demarcation between the light filling and the pistachio green. The visual contrast is part of the appeal, so take your time to smooth the surface. If the pudding seems too loose, give it another minute of standing to thicken, because a thin pudding can seep into the cream cheese.
- Place back in the fridge for another 10 minutes to allow the pudding to set: During this brief chill, the pudding firms and develops a slight skin, which makes spreading the final topping simpler. You will notice the surface become satin like and less glossy. Not chilling long enough is a frequent mistake that leads to mixing when adding the last layer, so wait the full time for best results.
- Once pudding has set, spread the remaining Cool Whip on top and sprinkle with chopped pistachios: The final Cool Whip layer should be spread gently to avoid pulling up the pudding beneath; it creates a soft cap that contrasts the nutty sprinkle. When you add the chopped pistachios, they will pop with color and add audible crunch as you bite. Add the nuts just before serving to maintain their crispness, since prolonged refrigeration can soften them.
- Chill 2 to 3 hours: Extended chilling allows the layers to fully marry and the pudding to reach optimal firmness, producing clean slices. You will notice the dessert set more firmly at the edges first and then inward. A common error is slicing too soon, which yields messy portions, so be patient and let it chill the full time for neat pieces.
- Slice just before serving and enjoy while cold: Cold slices hold together best and present a crisp cross section of layers, with contrasting textures and flavors in every bite. Serving chilled also sharpens the pistachio flavor and preserves the lightness of the topping. If left out too long, the dessert softens and becomes harder to plate, so keep it refrigerated until serving.
Notes
- Swap the cookie base Try graham crackers or vanilla wafers if you want a slightly different sweetness or texture, but keep the same quantity so the crust presses properly.
- Use homemade whipped cream For a fresher top layer, whip heavy cream with a touch of sugar until soft peaks form, then fold gently into the final layer instead of store bought topping.
- Add citrus zest to the filling A teaspoon of lemon or orange zest folded into the cream cheese layer brightens the flavor profile and pairs beautifully with pistachio.
- Toast the pistachios Lightly toasting the nuts enhances their aroma and deepens their flavor, but cool them before chopping to avoid melting the Cool Whip when garnishing.
- Make it ahead strategically You can prepare the crust and cream cheese layer the day before and keep the pudding and topping separate until assembly to maintain optimal texture.
- Adjust sweetness If you prefer a less sweet dessert, reduce the powdered sugar slightly in the cream cheese layer or use a lighter topping for the final layer.