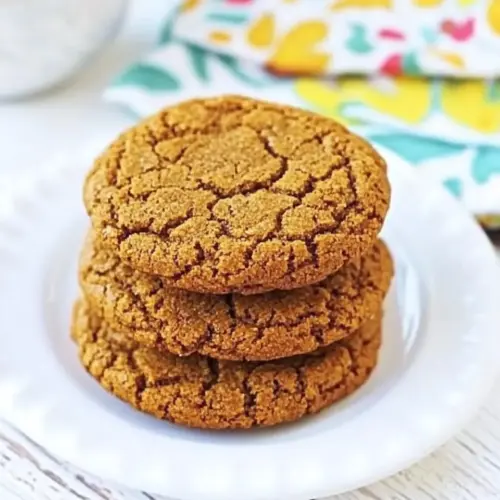
Laura Ingalls Wilder Molasses Cookies
Laura Ingalls Wilder Molasses Cookies are chewy, warmly spiced treats with toasted coconut and deep molasses flavor. These easy cookies combine hearty rolled oats and a citrus lift for a comforting, old fashioned bite, perfect for fall gatherings or cozy afternoons, making them a must bake when you want a simple, crowd pleasing sweet.
Equipment
- Cookie Sheets
- Mixing Bowls
- Wire Rack
- Spoon or Cookie Scoop
Ingredients
- 1 cup unsweetened grated or flaked coconut (fresh or dried) Adds sweet, chewy texture and a tropical flavor that complements molasses; can be used fresh or dried and contributes to overall cookie chewiness and mouthfeel.
- 1/3 cup unsalted butter, room temperature Provides creamy richness and helps incorporate air when creamed with sugar; contributes to tender crumb and deeper flavor when at room temperature.
- 1/3 cup granulated sugar Sweetens the dough and helps with creaming to incorporate air; balances the dark molasses flavor and contributes to cookie structure.
- 1 large egg, room temperature Binds ingredients together and adds moisture while contributing to leavening and structure; room temperature egg emulsifies fats for a smoother dough.
- 1/2 cup molasses Imparts deep, complex sweetness and warm caramel-like flavor that defines these cookies; also adds moisture and chewiness to the dough.
- 1 1/2 cups rolled oats Adds hearty texture and a subtle nutty flavor while contributing chew and structure; helps absorb some moisture and gives rustic body to the cookie.
- 1 cup flour Provides structure and bulk by supplying gluten and starch; balances moisture and helps cookies set and hold shape during baking.
- 1/2 teaspoon allspice Adds warm, aromatic notes with a mild peppery sweetness; enhances the molasses and spice profile for traditional flavor.
- 1/2 teaspoon salt Enhances overall flavor by balancing sweetness and bringing out spice notes; also supports proper dough hydration and taste balance.
- 1/4 teaspoon nutmeg Contributes warm, sweetly woody aroma and a gentle nutty spice note; used sparingly to avoid overpowering the cookie.
- 1/4 teaspoon ground cloves Delivers a sharp, pungent, warming spice that intensifies the overall spiced profile; small amount prevents cloying sweetness and adds depth.
- 1 teaspoon baking powder Offers gentle lift and lightness to the cookie by releasing gases when heated; complements baking soda for balanced rise and texture.
- 1/4 teaspoon baking soda Provides additional leavening and helps neutralize acidity for balanced rise and tender crumb; used in a small amount for controlled spread.
- 1 teaspoon orange extract or grated orange zest (or sub 1 tsp vanilla) Adds bright citrus aroma or floral vanilla note, enhancing overall flavor complexity; orange zest or extract brightens richness from molasses.
Instructions
- Preheat oven to 325 degrees F and grease two cookie sheets with unsalted butter. If you're using fresh grated coconut, grate it into a bowl and reserve. If using dried coconut, pour the coconut into a small bowl and cover with cold water. Let the coconut soak to rehydrate while you're working with the other ingredients.: You will notice the kitchen warming as the oven reaches 325 degrees F , a gentle heat that encourages even baking. Greasing the cookie sheets with unsalted butter adds a subtle browning to the cookie bottoms, and you should see a faint sheen on the surface of the pans. A common mistake is skipping the greasing and relying only on parchment, which can lead to uneven bottoms, so either grease lightly or use parchment for consistent results. Listen for the faint hum of the oven settling and watch the oven thermometer if you have one to ensure accuracy.
- In a medium mixing bowl, cream the butter and sugar together. You can cream them by hand (the way Laura would have) or with an electric mixer.: Fresh unsweetened grated or flaked coconut gives off a sweet, almost milky scent when freshly grated; it feels tender between your fingers and slightly damp. Reserving it keeps it from drying out before mixing. Overgrating or shredding too finely can make the coconut disappear into the batter, so aim for visible flakes. A pitfall here is adding wet, unpressed coconut into dry ingredients, which can throw off the batter's moisture balance.
- Beat in the egg.: As the dried unsweetened grated or flaked coconut soaks, you will see it swell and become plumper, and it will soften to the bite. This rehydration helps mimic fresh coconut texture and prevents a leathery chew. Drain and squeeze it well later to avoid adding excess water to the dough, which could make the batter too loose. Skipping the squeeze step is a frequent error and leads to cookies that spread too thin.
- Beat in the molasses.: When you cream unsalted butter and granulated sugar , the mixture will turn paler and slightly fluffy, holding faint peaks if creamed long enough. This process incorporates air that helps the cookies have a tender interior, so take the time to reach a light, airy texture. If you undercream, the cookies may be denser; if you overcream, they may spread excessively. The sound changes too, from a soft scrape to a smoother, quieter rhythm as the mixture becomes uniform.
- Drain the water from the coconut and squeeze dry (if you used fresh coconut, skip this step).: Adding the large egg will make the mixture glossy and looser, and you should see the batter bind together more uniformly. The egg brings structure and moisture, so ensure it is at room temperature to blend smoothly. A common issue is adding a cold egg which can cause the butter to seize into lumps, so warm the egg slightly if needed.
- In a large mixing bowl, stir together the dry ingredients. Add the wet ingredients to the dry, including the shredded coconut, along with the orange extract/zest and the coconut. Stir together until a batter forms. Note: If you're not a fan of orange flavoring, sub 1 tsp of vanilla for the orange.: As you beat in the molasses , the color will deepen to a rich brown and the aroma becomes molassy and slightly burnt sugar like, layering complexity into the batter. The batter will loosen and gain moisture, so stir until fully incorporated and smooth. Over mixing at this stage can create a tough texture later, so combine until uniform but stop once blended.
- Drop the batter by heaping tablespoonfuls onto the greased cookie sheet. The cookies spread quite a bit, so make sure you leave enough space between them. I was able to fit 12 cookies per sheet.: After rehydrating dried unsweetened grated or flaked coconut , pressing it in a towel or between your hands will release excess water, and you should see the coconut look plumper but not dripping. This ensures the dough does not become overly wet; soggy coconut will make cookies spread and lose structure. A common slip is leaving the coconut wet, which results in flat, overly soft cookies.
- Place the cookie sheets in the oven, one on the top rack and one below. Let them bake for 8 minutes. Switch the sheets, lower to upper and upper to lower, and let them bake for 7-10 minutes longer. Cookies are done when an impression made by lightly touching the center of the cookie does not remain. Begin checking at 7 minutes, and test them frequently until they are done--don't overbake, or the cookies will dry out. Remove the cookies from the sheets and cool them on a wire rack. Serve. Store them in a sealed container like a plastic zipper bag or sealed Tupperware; this will help them stay fresh.: When you combine flour , rolled oats , allspice , nutmeg , ground cloves , baking powder , baking soda , and salt , you will see a uniform, sandy mixture where the spices are evenly distributed. Sifting or whisking helps ensure even distribution, preventing spice pockets that can create uneven flavor bursts. If you do not mix the dry ingredients well, some cookies can end up overly spiced while others taste bland.
- Add the wet ingredients to the dry, including the shredded coconut, along with the orange extract/zest and the coconut: As you fold the wet into the dry, the batter will take on a cohesive, slightly tacky texture studded with flecks of spice and coconut. The citrus from orange extract or zest brightens the heavy molasses base, and the rolled oats give body. Mix until just combined to avoid overdeveloping the flour which can make the cookies tough. A frequent mistake is overmixing, which yields a dense, chewy result rather than the tender yet textured cookie intended.
- Drop the batter by heaping tablespoonfuls onto the greased cookie sheet: When you drop dough by tablespoonfuls, you will hear a soft plop and see rounded mounds forming with textured surfaces from the oats and coconut. Leave space between mounds because the cookies spread as they bake. If you crowd them, they will merge; spacing is important for individual browning and even heat circulation. Use a cookie scoop for consistent sizing to ensure even baking across the tray.
- Place the cookie sheets in the oven, one on the top rack and one below: As the trays begin to bake, the kitchen will fill with a warm spiced scent. After the initial eight minutes, swapping the trays helps even out differences in rack temperature; you should see edges start to brown while centers remain slightly soft. Begin checking at seven minutes into the second phase; a gentle touch to the center should leave no permanent indentation when done. Watch closely to avoid overbaking, which dries the cookies and reduces the tender interior. Remove and transfer to a wire rack to cool so air circulates and the bottoms do not steam, which keeps them crisp rather than soggy.
- Let them bake for 8 minutes then switch the sheets, lower to upper and upper to lower, and let them bake for 7 to 10 minutes longer: During this final bake, observe the color change to a deeper golden brown at the edges and a set but slightly yielding center. The aroma will deepen to a caramel like warmth, and you may see tiny bubbles at the surface from the leaveners doing their work. The texture should feel springy to a light touch but not wet. Overbaking will create a dry, crumbly cookie, so begin testing at the earlier end of the time window and use the touch test described to avoid dryness.
- Cookies are done when an impression made by lightly touching the center of the cookie does not remain: The tactile test is crucial, as visual cues can mislead. A finished cookie will have a set center that springs back slightly, and the edges will be more deeply colored. If the center indents and stays, return to the oven in short increments. Removing them too early leads to collapsed centers; leaving them in too long makes them hard. Cool on a wire rack to finish the texture transformation evenly.
- Remove the cookies from the sheets and cool them on a wire rack: Cooling for a few minutes allows the cookies to firm up and lets the flavors meld; you will notice a gentle toasty scent as they cool. The bottoms should be lightly browned and the tops set but slightly soft. Storing them immediately while still hot can trap steam and soften the edges, so allow them a brief rest before transferring to storage.
- Serve. Store them in a sealed container like a plastic zipper bag or sealed Tupperware: Once cooled, the cookies hold their texture best in an airtight container, and you will keep them fresh for several days. The container prevents drying and preserves the spicy aroma. A common error is leaving them uncovered, which causes rapid staling and loss of the tender interior that makes these cookies special.
Notes
- Measure carefully, especially the molasses and flour, because small deviations change the spread and texture of the cookies significantly.
- Press and drain rehydrated coconut thoroughly so your dough does not become too wet, which would cause the cookies to spread excessively.
- Use a cookie scoop for uniform sizes so all cookies bake in the same timeframe and finish together without some becoming overdone.
- Watch the swap when you rotate the oven racks; this evens browning and prevents one tray from finishing much earlier than the other.
- Cool on a wire rack to avoid steam softening the bottoms, which keeps the edges pleasantly crisp and the centers tender.