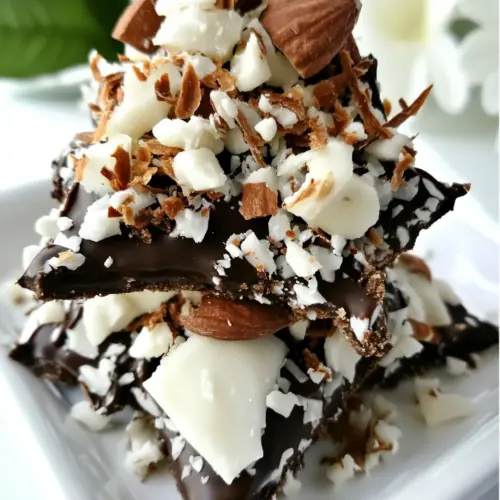
Kiss My Cookie Bark Coconut Edition
Kiss My Cookie Bark Coconut Edition is a creamy, crispy chocolate treat layered with chewy macaroons, toasted almonds, and sweetened coconut. This easy to share dessert brings texture and flavor together for casual gatherings or gifting. Perfect for quick prep and make ahead entertaining, itâ�s a festive and reliable choice for a crowd pleasing sweet.
Equipment
- Oven
- Baking Sheet
- Silpat or waxed paper
- Microwave-safe Bowl
- Wire Rack
Ingredients
- 1 1/3 cups sweetened coconut Adds sweet, chewy texture and tropical coconut flavor that forms the base of the cookie bark, providing both chewiness and visual interest when toasted slightly.
- 2 tablespoons + 2 teaspoons sugar Sweetens and helps caramelize the coconut during baking or toasting, balancing richness and enhancing overall sweetness without overpowering other flavors.
- 1 1/2 tablespoons flour Binds the coconut mixture and provides slight structure so the topping holds together on the bark while giving a subtle tender crumb.
- Pinch salt Enhances and balances flavors by cutting through sweetness and elevating other ingredients, ensuring the coconut and chocolate tastes remain bright and not cloying.
- 1/4 teaspoon almond extract Imparts a delicate nutty-fruity aroma that complements chocolate and coconut, adding depth without dominating the overall flavor profile.
- 1 egg white Adds lift and helps bind the coconut and flour mixture, creating a glossy finish and ensuring the topping adheres well to the chocolate layer.
- 12 macaroon cookies (1” size) either store-bought or from scratch (see below for recipe) Provides crunchy, chewy cookie pieces that introduce texture contrast and deliver a familiar macaron-like bite throughout the bark.
- 30 Hershey’s Coconut Creme Kisses (or, if you can’t find those, try the almond ones) Contributes concentrated coconut-cream centers that offer pockets of sweet, creamy filling, amplifying the coconut theme and adding indulgent bursts of flavor.
- 3 cups Milk Chocolate Chips Creates the rich, chocolatey foundation that holds the bark together, melting smoothly to encase mix-ins and provide a satisfying snap once set.
- 1/4 - 1/2 cup sliced almonds, toasted (place in a 350° oven on a baking sheet for just a few minutes) Supplies crunchy, toasty nuttiness and visual appeal when sprinkled on top, adding both flavor contrast and a pleasant crunch to each bite.
Instructions
- Preheat oven to 350°. Grease and flour a cookie sheet, or use a Silpat.: The aroma of warm air and toasting sugars is the first cue that the bake is starting to develop depth. As the oven climbs to 350° , the air in your kitchen will begin to feel cozy and the metals in your pans will warm, helping cookies brown more evenly. Be sure your oven racks are centered so heat circulates properly. A common mistake is not preheating fully, which can leave cookies pale and underbaked, so wait until the thermometer reads steady 350° .
- Stir together coconut, sugar, flour, and salt in a medium bowl. Add almond extract and egg white and stir until well blended. Drop 1” balls onto your prepared cookie sheet.: When you mix these dry elements, the texture should look evenly speckled, with the coconut coated in sugar granules and the pinch of salt distributed. The sound is subtle, but youâ ll notice a dry rustling as the ingredients blend. This step is important because it ensures even sweetness and consistent browning when baked. Avoid over-mixing which can compress the coconut and lead to dense cookies.
- Bake about 15 minutes until edges of cookies are golden brown. Remove from cookie sheet to wire rack to cool.: As the liquid hits the dry mixture, youâ ll see it come together into a sticky mass. The glossy sheen from the egg white indicates hydration and bind, while the perfume of almond extract will become noticeable. Stir just until combined, because overworking can make the mixture tough. If it seems too dry, a light touch of additional beaten egg white can help, but add sparingly.
- Chop up your macaroons and Kisses. Line a cookie sheet with waxed paper.: Using a teaspoon or small scoop, drop rounded balls so they spread evenly and maintain shape. You should hear a soft thud as each mound meets the sheet, and the balls will hold a dome shape before baking. Space them adequately so edges have room to brown. A frequent error is overcrowding which leads to merged cookies that lose their defined edges.
- Melt chocolate chips in a medium, microwave safe bowl about 2 minutes, stirring every 30 seconds.: During baking youâ ll notice the coconut toasting and the edges taking on a light golden color. The kitchen will fill with a warm, toasty note and the cookies will firm up but remain chewier inside. Check at around 12 minutes and use visual cues rather than exact timing, since ovens vary. Avoid leaving them too long, which can make the cookies brittle rather than chewy.
- Spread 2/3 of the melted chocolate on the prepared cookie sheet. Sprinkle chopped cookies, Kisses, and almonds on top. Drizzle with remaining chocolate. Chill until hardened. Break into pieces before serving.: Once out of the oven, transfer the cookies to a wire rack so air circulates around them and they cool evenly. Youâ ll notice a drop in steam as moisture dissipates, and the cookies will firm to the right chewiness. Leaving them on the hot sheet can continue to cook the bottoms and cause overbrowning, so move them promptly.
- Chop up your macaroons and Kisses: Chop the baked macaroons and candy Kisses into bite sized pieces that will nestle into the poured chocolate. The texture contrast is key here, so aim for varied sizes, from tiny crumbs to small chunks. The sound of chopping is pleasantly rhythmic, and the pieces should be small enough to adhere to the chocolate but large enough to be noticed in each bite. Avoid chopping too fine or you lose those chewy pockets.
- Line a cookie sheet with waxed paper: Preparing the sheet with waxed paper provides an easy release once the chocolate sets. The smooth surface helps you lift the chilled bark without breaking it. Ensure the paper lies flat without folds, because creases can create unwanted shape in the finished bark. A common oversight is skipping this step which makes removal messy.
- Melt chocolate chips in a medium, microwave safe bowl about 2 minutes, stirring every 30 seconds: As the chocolate warms, it will go from firm to glossy, and stirring encourages even melting and prevents scorching. The aroma will deepen into a rich cocoa scent and the texture should be silky when smooth. Be cautious with heat bursts, as high temperatures can seize chocolate. If it looks grainy, a small splash of neutral oil can restore silkiness, but it is better to use gentle heat and frequent stirring.
- Spread 2/3 of the melted chocolate on the prepared cookie sheet: Use an offset spatula or the back of a spoon to create an even layer roughly a quarter inch thick. You should see a glossy surface that catches light and reflects a smooth finish. This base holds the toppings, so aim for even coverage. If the chocolate cools and thickens too much while working, warm it briefly in the microwave to restore fluidity but do so in short bursts to avoid overheating.
- Sprinkle chopped cookies, Kisses, and almonds on top: Scatter the chopped macaroons , Kisses , and toasted almonds across the warm chocolate so they slightly sink and set in place. The visual should be a balanced, randomized mosaic where each bite will catch bits of everything. Press gently if needed so pieces adhere. A common mistake is overloading one area, which makes the bark uneven; aim for distribution so each shard is satisfying.
- Drizzle with remaining chocolate: Warm the remaining chocolate just enough to drizzle, then use a spoon to create thin ribbons across the topped sheet. The drizzle adds visual contrast and extra binding. Youâ ll hear a whisper as the chocolate lands and see it create delicate lines. If the drizzle is too thick, it will obscure the toppings, so keep it fluid and light.
- Chill until hardened: Place the sheet in the refrigerator or a cool spot until the chocolate firms, which sets the barkâ s shape. The chilling hushes the glossy sheen into a firm snap; youâ ll feel the surface become solid when you tap it. Avoid freezing, which can cause condensation when thawed and dull the finish.
- Break into pieces before serving: Once set, remove the waxed paper and break the bark into irregular shards by hand. The fracture should be crisp, and each piece will show the embedded bits of macaroon and almonds . Serving in varied sizes is visually appealing, but watch for very large shards that are hard to bite into; break those down further for easy eating.
Notes
- Swap candy gently: If you canâ�t find the specified Kisses, choose a similar small candy that melts well, maintaining contrast in texture and sweet pockets.
- Adjust almond quantity: Use the lower or higher end of the almond measure to control crunch intensity, especially if you prefer more nut forward bites.
- Vary chocolate coverage: Spread slightly less base chocolate for a thinner bark or more for thicker, chunkier shards that hold toppings firmly.
- Toast coconut lightly: If you prefer deeper coconut flavor, toast a portion of the shredded coconut before mixing to intensify the aroma.
- Chop sizes for texture: Make some macaroon chunks small and some larger to create playful texture differences in each shard of bark.
- Make ahead and chill: Prepare the bark up to three days ahead and store in an airtight container to keep it ready for events without losing crispness.