Keto Halloween Cookies
Keto Halloween Cookies are a crunchy, low carb treat that marry nutty almond flavor with a hint of cocoa and buttery richness. These easy cookies bake up crisp and hold cute shapes for spooky decorating, perfect for an easy weeknight bake or party platter. Make them for a festive, guilt conscious celebration that still feels indulgent.
Equipment
- Oven
- Food Processor
- Parchment Paper
- Cookie cutters
- Baking Sheet
Ingredients
- 1/3 cup coconut flour 40 g Provides absorbent, low-carb structure to the dough and gives a light, slightly crumbly texture; use measured amount because coconut flour is very absorbent and can dry out cookies if overused.
- 3/4 cup almond flour 75 g ground almonds work as well Adds a tender, nutty base and healthy fats to create a moist, cohesive cookie; ground almonds contribute flavor and help balance the dryness of coconut flour.
- 1/3 cup powdered sweetener 60 g, use 1/2 cup (80 g) for a sweeter cookie Sweetens the cookies without sugar and helps with browning and texture; powdered form dissolves smoothly into the butter for an even sweetness throughout.
- 1/2 cup butter 114 g, softened, unsalted Contributes richness, moisture, and helps bind ingredients while creating a tender crumb; softened, unsalted butter allows easier creaming with sweetener for uniform dough.
- 2 tablespoon cocoa powder unsweetened Imparts chocolate flavor and deep color while remaining sugar-free; unsweetened cocoa adds intensity without adding carbs or sweetness.
- 1/4 teaspoon baking powder Provides a gentle lift to the cookies for slight puffing and improved texture; small amount helps lighten the dense low-carb flours without creating overly cakey results.
- 1/4 teaspoon xanthan gum optional Improves dough elasticity and helps hold the cookie together, especially useful with gluten-free flours; optional but helpful to stabilize texture and reduce crumbliness.
- 1/3 cups sugar free chocolate chips or 50 g unsweetened chocolate plus 2 tablespoons powdered sweetener Offers chocolatey pockets or can be replaced with unsweetened chocolate plus sweetener for deep flavor; sugar-free chips or chocolate maintain low-carb profile while adding texture.
Instructions
- Preheat the oven to 180 Celsius / 350 Fahrenheit electric or 160 C / 320 F fan.: When the oven warms up you should notice a gentle, clean heat spreading through the chamber and the control panel settling on the target temperature, which ensures even baking from the start. I like to preheat for at least 10 minutes so the racks and air are consistent. A common misstep is placing cold dough in a not fully preheated oven, which can lead to uneven rising and spreading. If your oven runs hot, consider using an oven thermometer to confirm accuracy and rotate the sheet midway if needed.
- Mix all the dry ingredients in a food processor or with a blender, then add the butter and combine until you have a smooth dough.: You will feel a change as the dry mix becomes more cohesive once the butter is added. The aroma will shift from dusty flours to a richer, buttery scent and the texture should come together into a soft, slightly tacky dough. This texture matters because it determines whether the cookies hold their shape when rolled. Avoid overmixing, which can warm the butter and make the dough too soft. If your processor struggles, pulse gently to maintain control.
- Divide into 2 balls and roll out between two sheets of non-stick parchment paper.: Rolling between parchment keeps the dough from sticking and helps you achieve an even thickness, which is key for uniform baking. You should feel a smooth, cool surface under the roller and see neat, even edges forming. If the dough is very sticky, chilling briefly will firm it and make rolling easier. Pressing too hard while rolling can compress the dough and result in overly dense cookies, so use light, even pressure.
- Place the rolled out dough in the freezer for 15 minutes. This is an essential step!!: The freezer firms the butter and sets the shape, producing clean cut edges and preventing excessive spread during baking. After chilling, the dough should feel noticeably colder and firmer to the touch, almost like a stiff pliable sheet. If you skip this, cookies can lose their crisp silhouettes. A mistake to avoid is leaving it in the freezer much longer than intended, which can make it brittle and prone to cracking when cut.
- Cut into shapes with a cookie cutter of your choice. If the dough has been in the freezer for too long, it might break easily. In this case, just wait a few minutes to continue. Place the cut-outs on a baking sheet lined with parchment paper.: Cutting yields clean silhouettes if the dough is the right firmness, and you should hear a slight, satisfying clean press as the cutter removes the shape. If the dough breaks, it was likely chilled too long and needs a few minutes at room temperature to relax. Arrange cut-outs on parchment with space between them so heat circulates, and take care not to stretch shapes when transferring, as that can distort details.
- Form the leftovers of the dough into a ball, roll out again and repeat the freezer step.: Reworking scraps keeps waste low and gives you another round of uniform cookies. The second roll will have the same tactile cues as the first, a smooth, firm surface that holds cutter edges well. Work efficiently so the dough does not overheat from your hands, which can soften butter and cause spreading during baking. If the scraps feel greasy, chill them a little longer before cutting.
- Bake your first batch for 6-7 minutes until the edges are just beginning to brown.: During baking you will notice a faint, warm aroma and the cookie edges changing to a pale golden tone; that is your sign to remove them. The brief bake is crucial to preserve crunch without drying the center. A common error is leaving them too long to chase color, which leads to overbrowned, hard cookies. Use the lower end of the time window and watch closely, because oven performance varies.
- Let the cookies cool completely before glazing. These cookies are VERY FRAGILE when straight out of the oven. They firm up and become crunchy as they cool down.: Cooling is when structure solidifies and the cookies go from fragile to crunchy, a transformation you can feel by tapping an edge to hear a crisp sound. The surface will set and become less prone to breakage as it cools. Glazing hot cookies will melt the chocolate and ruin any decorations, so patience here is important. A frequent slip is attempting to decorate too soon and causing smudged or runny designs.
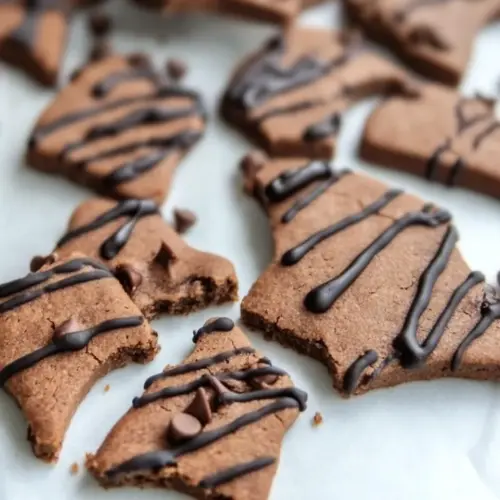
- Slowly melt sugar free or unsweetened chocolate in a water bath. You can also melt it in a microwave in 30 second bursts. If using unsweetened chocolate, add powdered sweetener and stir until combined.: Gently melting chocolate over simmering water gives you control and prevents burning, and you will see it go from matte and solid to glossy and smooth. If using unsweetened chocolate, stir in powdered sweetener until it dissolves and the flavor balances. Avoid letting any steam or water contact the chocolate directly, as that causes seizing. If you need speed, use short microwave bursts stirring between them to avoid hotspots.
- Fill the melted chocolate into a ziplock bag, pierce a hole and drizzle over the cooled cookies.: The act of drizzling is tactile and precise, the warm chocolate flowing in thin ribbons and setting into a firm, shiny line on the cookie surface. This step adds contrast and personality, and the cooled chocolate should snap slightly when bitten. A common decorating problem is cutting too large a hole, which produces blobs rather than fine lines; start small and enlarge if needed. Allow the drizzle to set fully before stacking to avoid sticking.
Notes
- Adjust sweetness carefully, taste the melted chocolate mixture before drizzling and add powdered sweetener incrementally so you do not oversweeten the glaze.
- Mind your measuring, spoon and level the almond and coconut flours to avoid dense dough from packed cups, and weigh if you want exact consistency.
- Work cold hands, warm palms soften butter quickly, so if the dough becomes sticky, pop it back into the fridge for a few minutes instead of adding more flour.
- Test bake a single cookie, if you are trying a different pan or oven, bake one to check spread and color before committing the whole batch.
- Store properly, layer cookies with parchment in a cookie jar at room temperature to maintain crispness and prevent decorations from sticking.